

Microsoft Copilot Studio (Standard builder)
Liongard MCP for Microsoft Copilot Studio (Standard builder)
Build a Liongard MCP agent with Copilot Studio's Standard builder and publish it to Microsoft Teams and Microsoft 365 Copilot. This path works with Microsoft 365 Copilot licenses, without buying Copilot Credits.
Which page do I need?
- You only have Microsoft 365 Copilot licenses: use this page.
- You have Copilot Studio capacity or pay-as-you-go billing: you can use this page or Microsoft Copilot Studio (Default builder).
Liongard provides guidance for integrating with Microsoft Copilot Studio and Teams. For platform-specific support, contact Microsoft.
Licensing requirements
The Standard builder is included with Microsoft 365 Copilot. People with a Microsoft 365 Copilot license can build, publish and use internal agents in Teams and Microsoft 365 Copilot at no extra cost.
People without a Microsoft 365 Copilot license, or agents published to other channels, may use Copilot Credits. Microsoft changes licensing often, so check the Copilot Studio licensing guide.
Prerequisites
In Liongard
- An active LiongardIQ and Liongard MCP subscription.
- One way to sign in:
- OAuth 2.0 (recommended): OAuth 2.0 enabled for your tenant, and a Liongard login. With end user credentials, every person who uses the agent needs their own Liongard login. See Liongard MCP OAuth 2.0 Sign-In.
- Bearer token: an active access key (Access ID and Secret) from Admin → AI Preferences.
- AI Usage turned on under Admin → Environments for every environment the agent should see.
- Your Liongard MCP URL, including
https://:https://[server].app.liongard.com/api/mcp. Replace[server]with your instance, for exampleus1.
In Microsoft
- A Microsoft 365 Copilot license for the agent maker and for the people who will use the agent.
- Permission to create connections in your Power Platform environment.
- Data loss prevention (DLP) policies that allow the MCP connector.
Access and security
Anyone who can use the published agent can query the Liongard data its connection can reach. Treat the agent like any other access path into customer data. Step 5 covers how to choose whose Liongard access the agent uses and who can chat with it.
If your agent uses SharePoint knowledge sources, access follows your existing Microsoft permissions.
Integration steps
Step 1: Open the Standard builder
-
Go to copilotstudio.microsoft.com.
-
Click Explore what else is possible with agents.

-
Under Build with standard orchestration, select Agent (Standard).

-
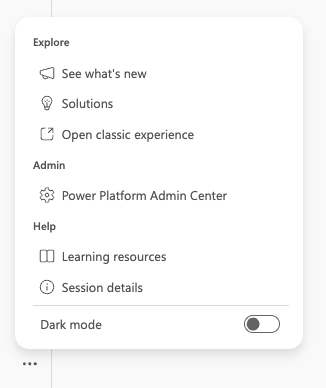
Alternatively, open the ⋯ menu at the bottom left of the home page and select Open classic experience.
Step 2: Create the agent
-
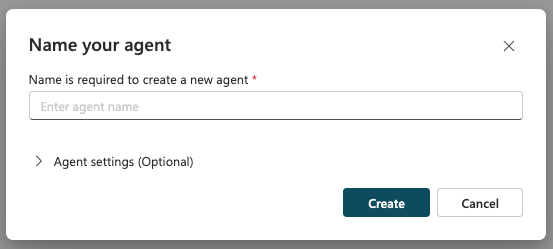
Give the agent a name, for example Liongard Assistant, and click Create.
-
On the agent's Overview page, add a description and instructions. You can also choose a model under Select your agent's model.
-
Save the agent.
Step 3: Add the Liongard MCP tool
- Open the agent's Tools section.
- Select Add a tool, then Model Context Protocol.
- Enter the server details:
| Field | Value |
|---|---|
| Server name | A unique display name with no symbols, for example Liongard MCP |
| Server description | For example, Liongard MCP Gateway |
| Server URL | https://[server].app.liongard.com/api/mcp |
Step 4: Set authentication and create the connection
Follow the tab for the sign-in method you chose.
- Under Authentication, select OAuth 2.0.
- Set Configuration type to Dynamic discovery. Copilot Studio registers itself with Liongard, so you don't need a Microsoft Entra app registration.
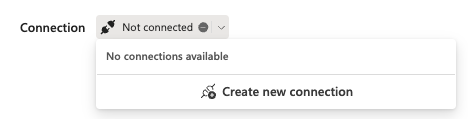
- Click Create. The dialog shows a Connection field set to Not connected.

- Click the Not connected dropdown and select Create new connection.
- Enter an optional Display name, for example Liongard, and click Create.
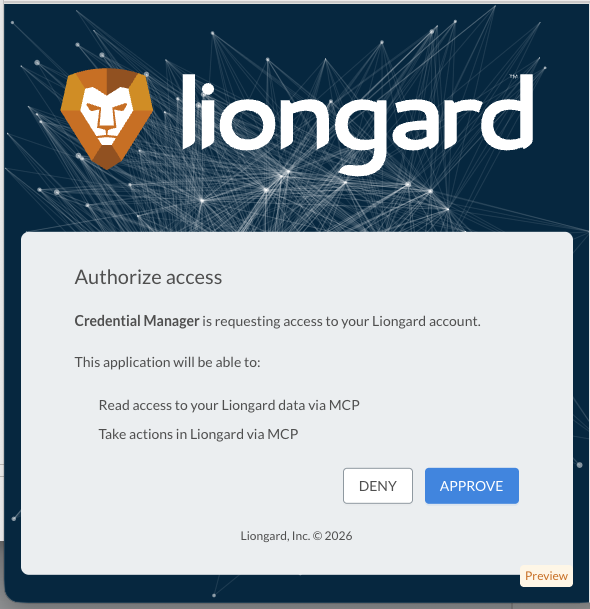
- A Liongard window opens. It says Credential Manager is requesting access to your Liongard account; that's how Copilot Studio appears to Liongard. Sign in if asked, review the access, and click Approve.
- Back in Copilot Studio, the connection shows Connected with your display name.
- Click Add and configure to add the tool to the agent.
- Under Authentication, select API key.
- Set the Header name to
Authorization. - Click Create. The dialog shows a Connection field set to Not connected.
- Click the Not connected dropdown and select Create new connection.
- Enter an optional Display name, for example Liongard.
- In the Authorization field, enter your full bearer token, including the Bearer prefix:
Bearer <AccessID>:<Secret>. Use the word Bearer, a space, then your Access ID and Secret separated by a colon, with no brackets. Find these under Admin → AI Preferences. - Click Create. The connection shows Connected with your display name.
- Click Add and configure to add the tool to the agent.
Bearer token connections can need reconnecting later. If the agent asks you to verify the connection, open Manage your connections, select the Liongard MCP connection, reconnect it until it shows Connected, and click Submit.
Step 5: Set credentials and confirm authentication
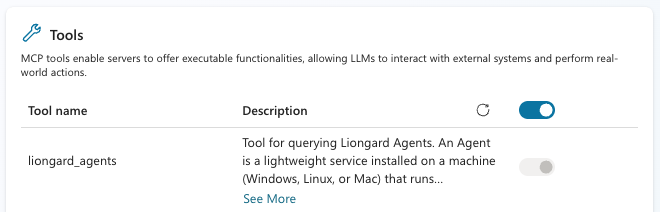
Two settings control access. Credentials to use decides whose Liongard access the agent uses. Authentication decides who can chat with the agent. Set both.
-
On the Tools tab, make sure the Liongard MCP tool is turned on.
-
Open the Liongard MCP tool, expand Additional details, and set Credentials to use:
- End user credentials (recommended): each user signs in to Liongard (OAuth 2.0) or enters their own bearer token the first time they use the agent.
- Maker-provided credentials: everyone uses your Liongard access. Users don't need Liongard credentials.
-
Click Save.
-
Open Settings, go to Security → Authentication, and confirm Authenticate with Microsoft is selected.
Don't use No authenticationNo authentication makes the agent publicly available. With maker-provided credentials, anyone who reaches the agent could query Liongard with your access. End user credentials also need the agent to know who the user is. This applies to both OAuth 2.0 and bearer tokens.
Step 6: Test the agent
In the test pane, ask What tools do you have for Liongard?, then How many environments are in Liongard?. The agent should return live data. With end user credentials, the test pane asks you to connect to Liongard first.
Environment scopeLiongard MCP only returns data for environments that have AI Usage turned on and are included in your bearer token or OAuth access.
Step 7: Publish the agent
- Limit who can use the agent, for example to a Microsoft Entra security group.
- Click Publish and select Teams and Microsoft 365.
- On the Copilot Studio home page, confirm the Agent harness column shows Standard for your agent.
Step 8: First use in Teams or Microsoft 365 Copilot
Open the agent in Teams or Microsoft 365 Copilot. With end user credentials, the agent asks each person to connect to Liongard the first time they use it: with OAuth 2.0 they sign in and click Approve, and with a bearer token they enter their own token.
Troubleshooting
| Error | Likely cause | What to do |
|---|---|---|
EnforcementUsageCredits or This environment is out of credits | The agent was built with the default builder and there are no Copilot Credits. This is a Microsoft billing limit, not a Liongard error | Rebuild the agent with the Standard builder (Step 1), or add Copilot Studio capacity |
| Can't check the license for this build option | A temporary license check in Copilot Studio | Select Try again. If it continues, confirm your Microsoft 365 Copilot license with your Microsoft admin |
Connector request failed: 405 Not Allowed | Under investigation | Check the Server URL is exactly https://[server].app.liongard.com/api/mcp. If you use a bearer token, try OAuth 2.0. If it continues, contact Liongard Support |
Couldn't load MCP tools (HTTP 500) | Server-side error | Contact Liongard Support with the ID shown in the error |
| Unauthorized, or the connection won't show Connected | Bearer token format, or a revoked key | Use Bearer <AccessID>:<Secret> in the Authorization header and confirm the key is active |
| Agent asks you to verify or reconnect the connection | Bearer token connections can need re-authorizing | Open Manage your connections, reconnect the Liongard MCP connection, and click Submit. Or switch to OAuth 2.0 |
| No Liongard approval window (OAuth 2.0) | OAuth 2.0 isn't enabled for your tenant | Contact your Account Manager, or use a bearer token |
| Fewer environments than expected | AI Usage is off, or the environment isn't in your access scope | Turn on AI Usage under Admin → Environments |
Before you contact Support, test the same URL and credentials in another MCP client, such as Claude Desktop. When you contact Support, include your Liongard instance, which builder you used, your sign-in method, your Microsoft license type, the exact error and any ID it shows, and the time it happened with your time zone.
Updated about 20 hours ago