Google Cloud Services Inspectors
The following document is intended to support users as they deploy Google Cloud Services Inspectors (Google Workspace and Google Drive).
Quick DetailsRecommended Agent: On-Demand
Supported Agents: On-Demand or Self-Managed
Is Auto-Discovered By: N/A
Can Auto-Discover: Child Inspectors (Delegated Access)
Parent/Child Type Inspector: Yes
Inspection via: API
Data Summary: Google Workspace, Google Drive
Overview
See it in Action
Google Workspace
Google Drive
Deployment
Liongard Google Cloud Services Inspectors run via service accounts set up in the Google Cloud Platform and are configured similarly.
To set up all Google Cloud Services Inspectors, you will complete the following steps:
- Step 1: Create a Project in Google Cloud Platform
- Step 2: Enable the Required APIs
- Step 3: Create a Service Account
- Step 4: Authorize Your Service Account in Google Workspace
Once you have set up your service account and authorized it, you should use it across all Google Cloud Services Inspectors
For each Inspector Type (e.g. Google Workspace, Google Drive, etc), you will follow the following steps.
Inspector Setup Preparation
Step 1: Create a Project in Google Cloud Platform
The first portion of the Liongard Google Cloud Services Inspectors' setup process takes place in the Google Cloud Platform. The following steps will run through how to create a new project for the Inspector.
-
Log in to the Google Cloud Platform console using an account with super administrator privileges in the Google Workspace organization you're trying to inspect.
-
Under the Project drop-down menu, to the left of the Google Cloud Platform logo, ensure that your Google Workspace organization/account is selected under Organization.
-
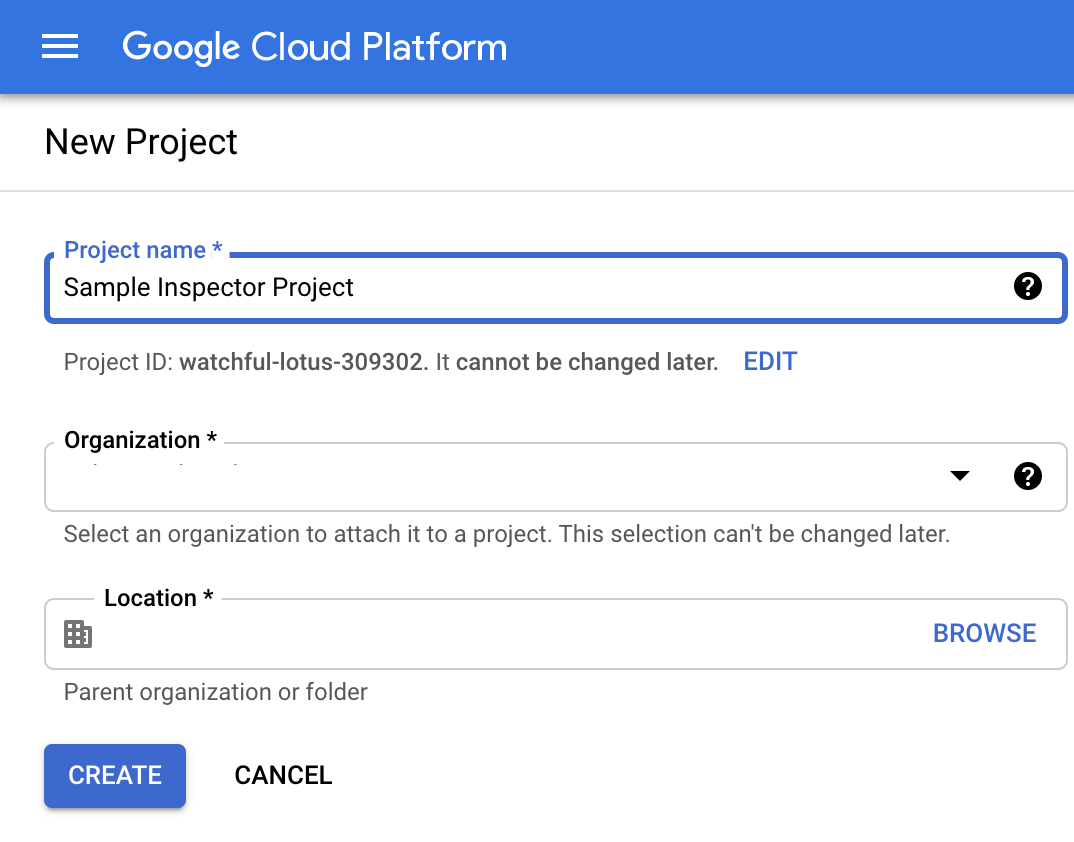
Select "New Project" and fill out the project details:
Project Name: Liongard Inspector
Organization: Parent organization
Location: Parent organization location
Step 2: Enable Required APIs
Liongard's Google Cloud Services Inspectors require several different APIs to be enabled in your project. In this step, we'll run through enabling these APIs via the API Library.
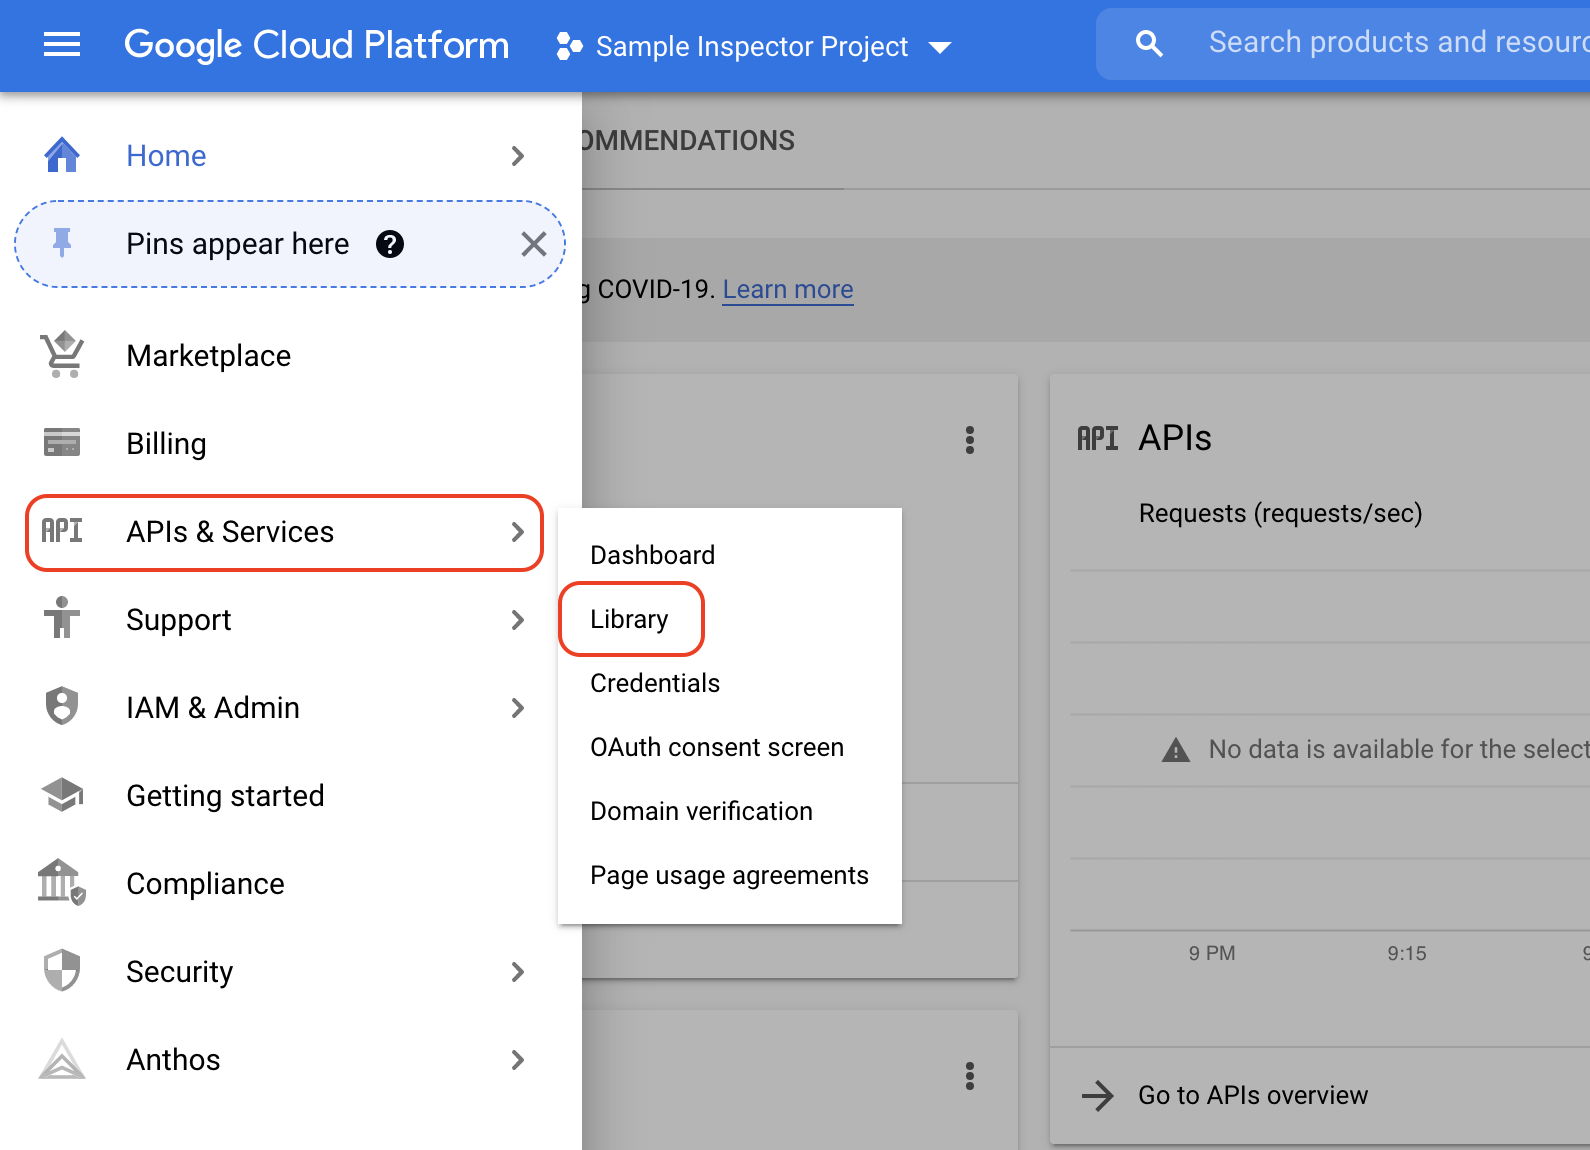
- In the left-hand sidebar, select APIs & Services > Library
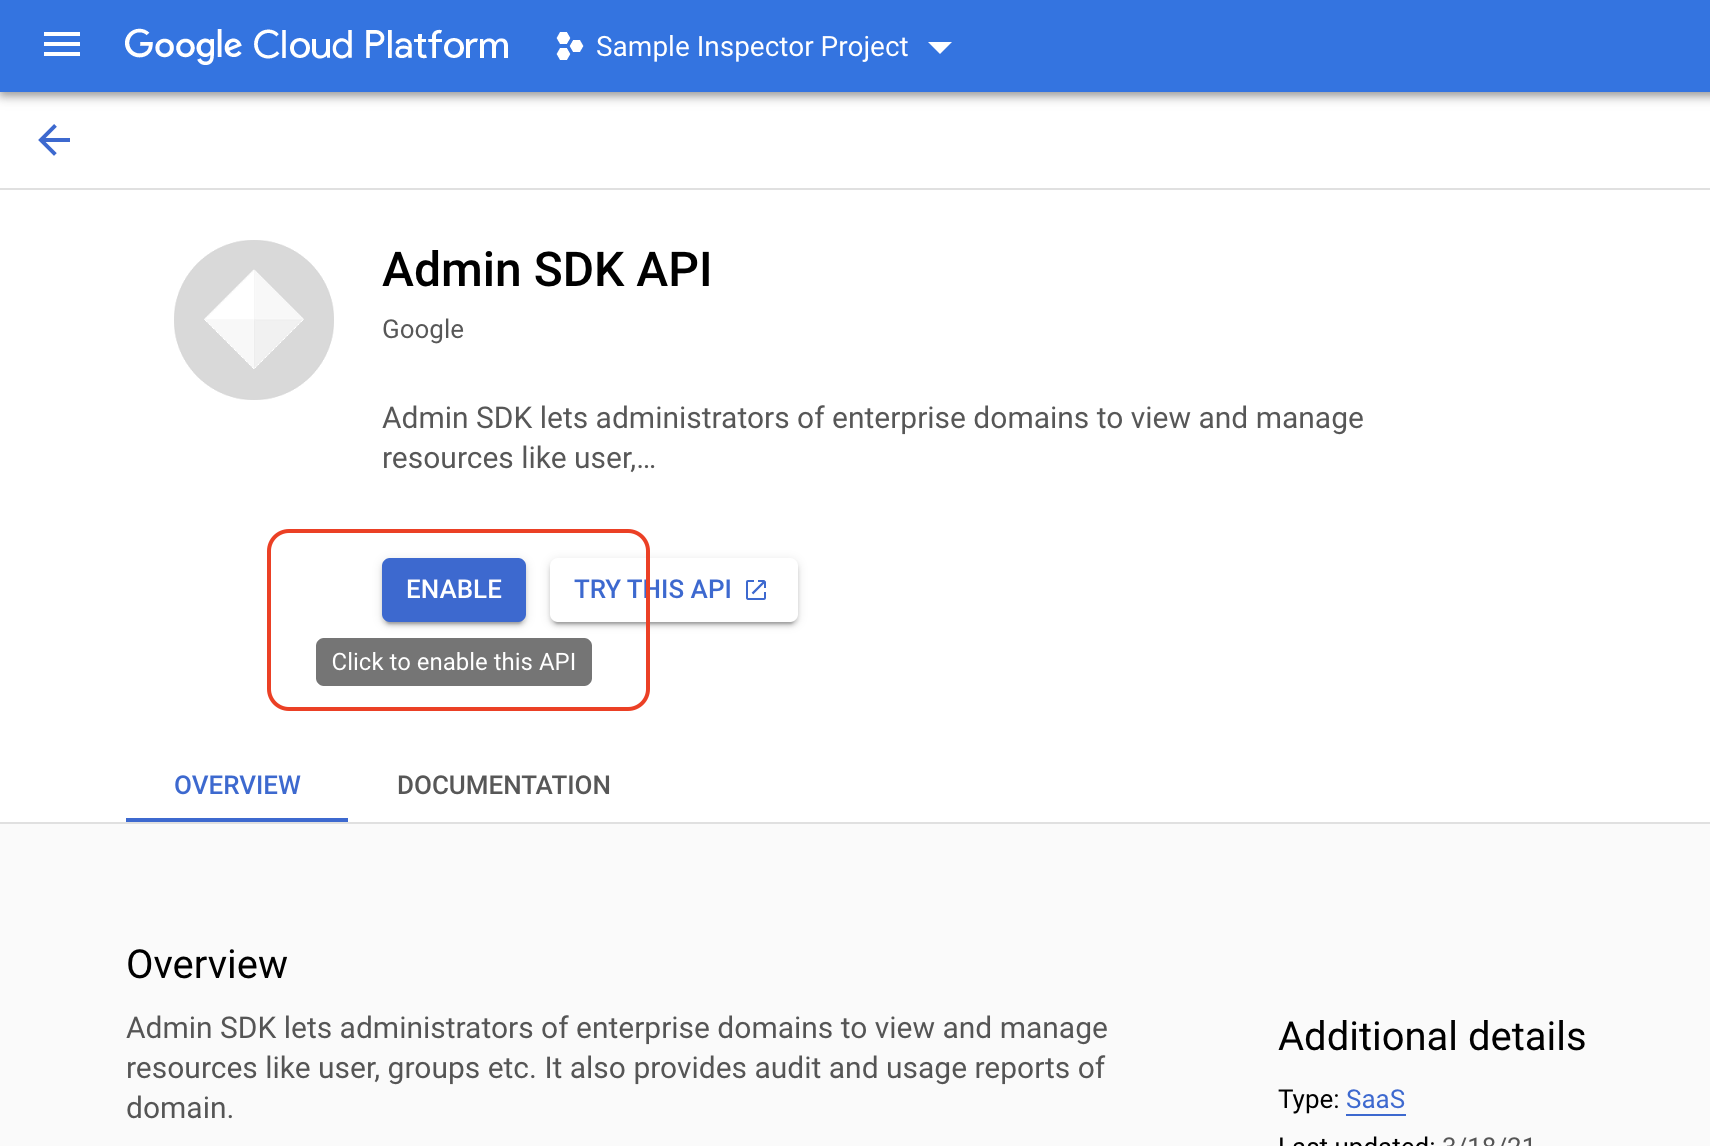
- Reference the table below to determine which APIs to enable. Then, select Enable to activate them:
| API | Full Suite | Google Workspace | Google Drive |
|---|---|---|---|
| Admin SDK API | Y | Y | Y |
| Google Workspace Reseller API (optional) | Y | Y | Y |
| Enterprise License Manager API | Y | Y | N |
| Google Drive API | Y | N | Y |
Example:
Step 3: Create a Service Account
In this step, we'll run through how to configure a service account to make requests against Google's APIs.
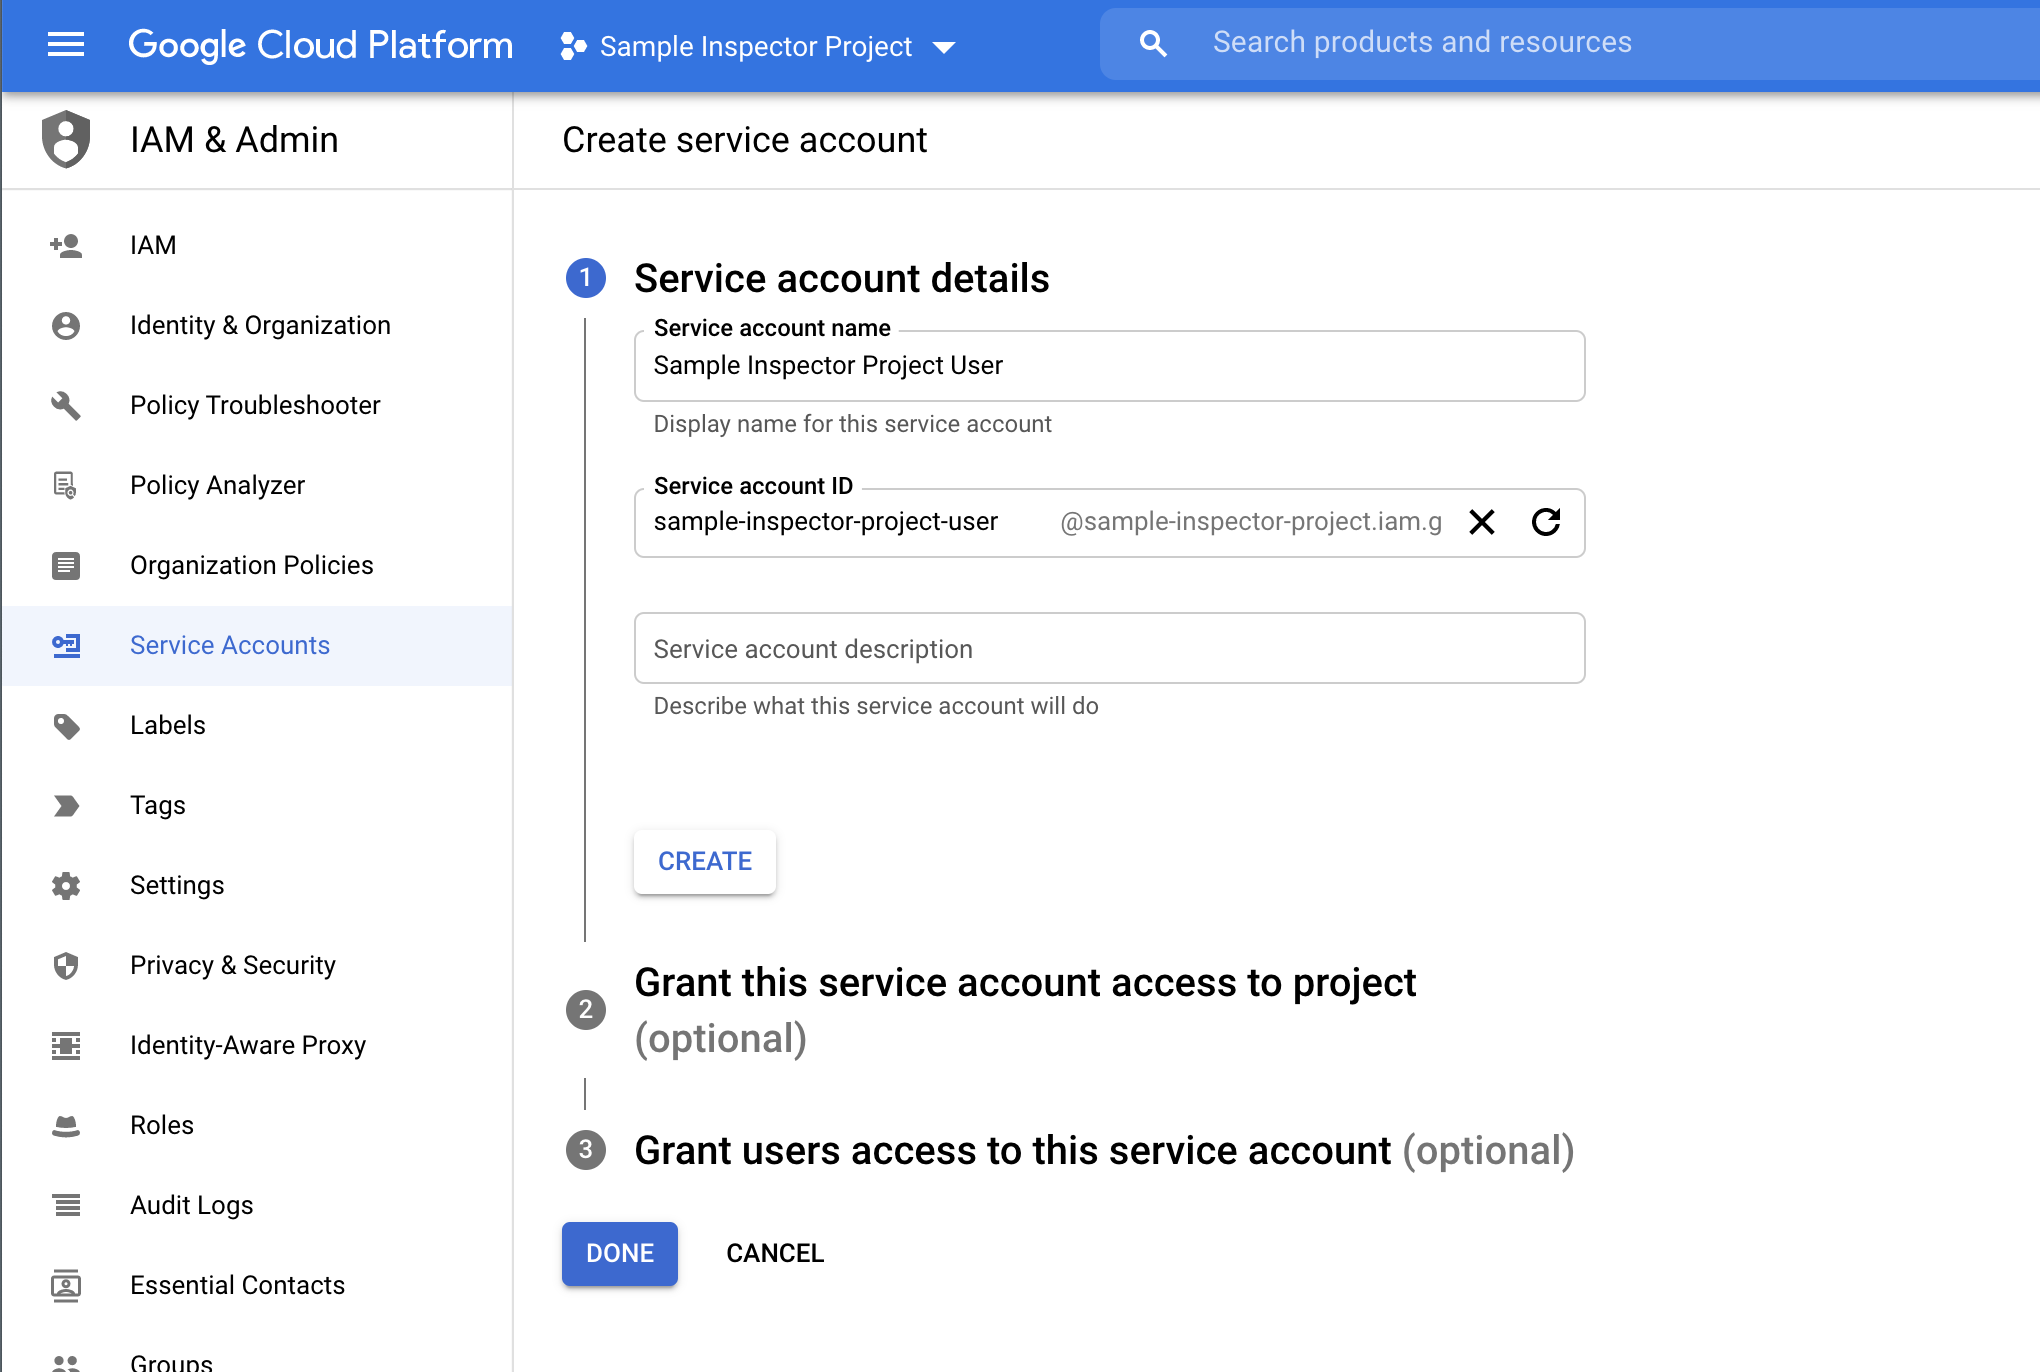
- In the left-hand sidebar, select IAM & Admin > Service Accounts.
- Select + Create Service Account and fill out the service account details as follows:
- Service account Name: Liongard Inspector (Suggested)
- Service account ID: Leave auto-filled input
- Service account description: (Optional)
- Once done, select Create.
- For the Grant this service account access to project (optional), grant the following IAM roles to your service account using the Select a role drop-down menu, select service accounts, and select the below options:
- Service Account User
- Service Account Token Creator
- Once done, select Continue.
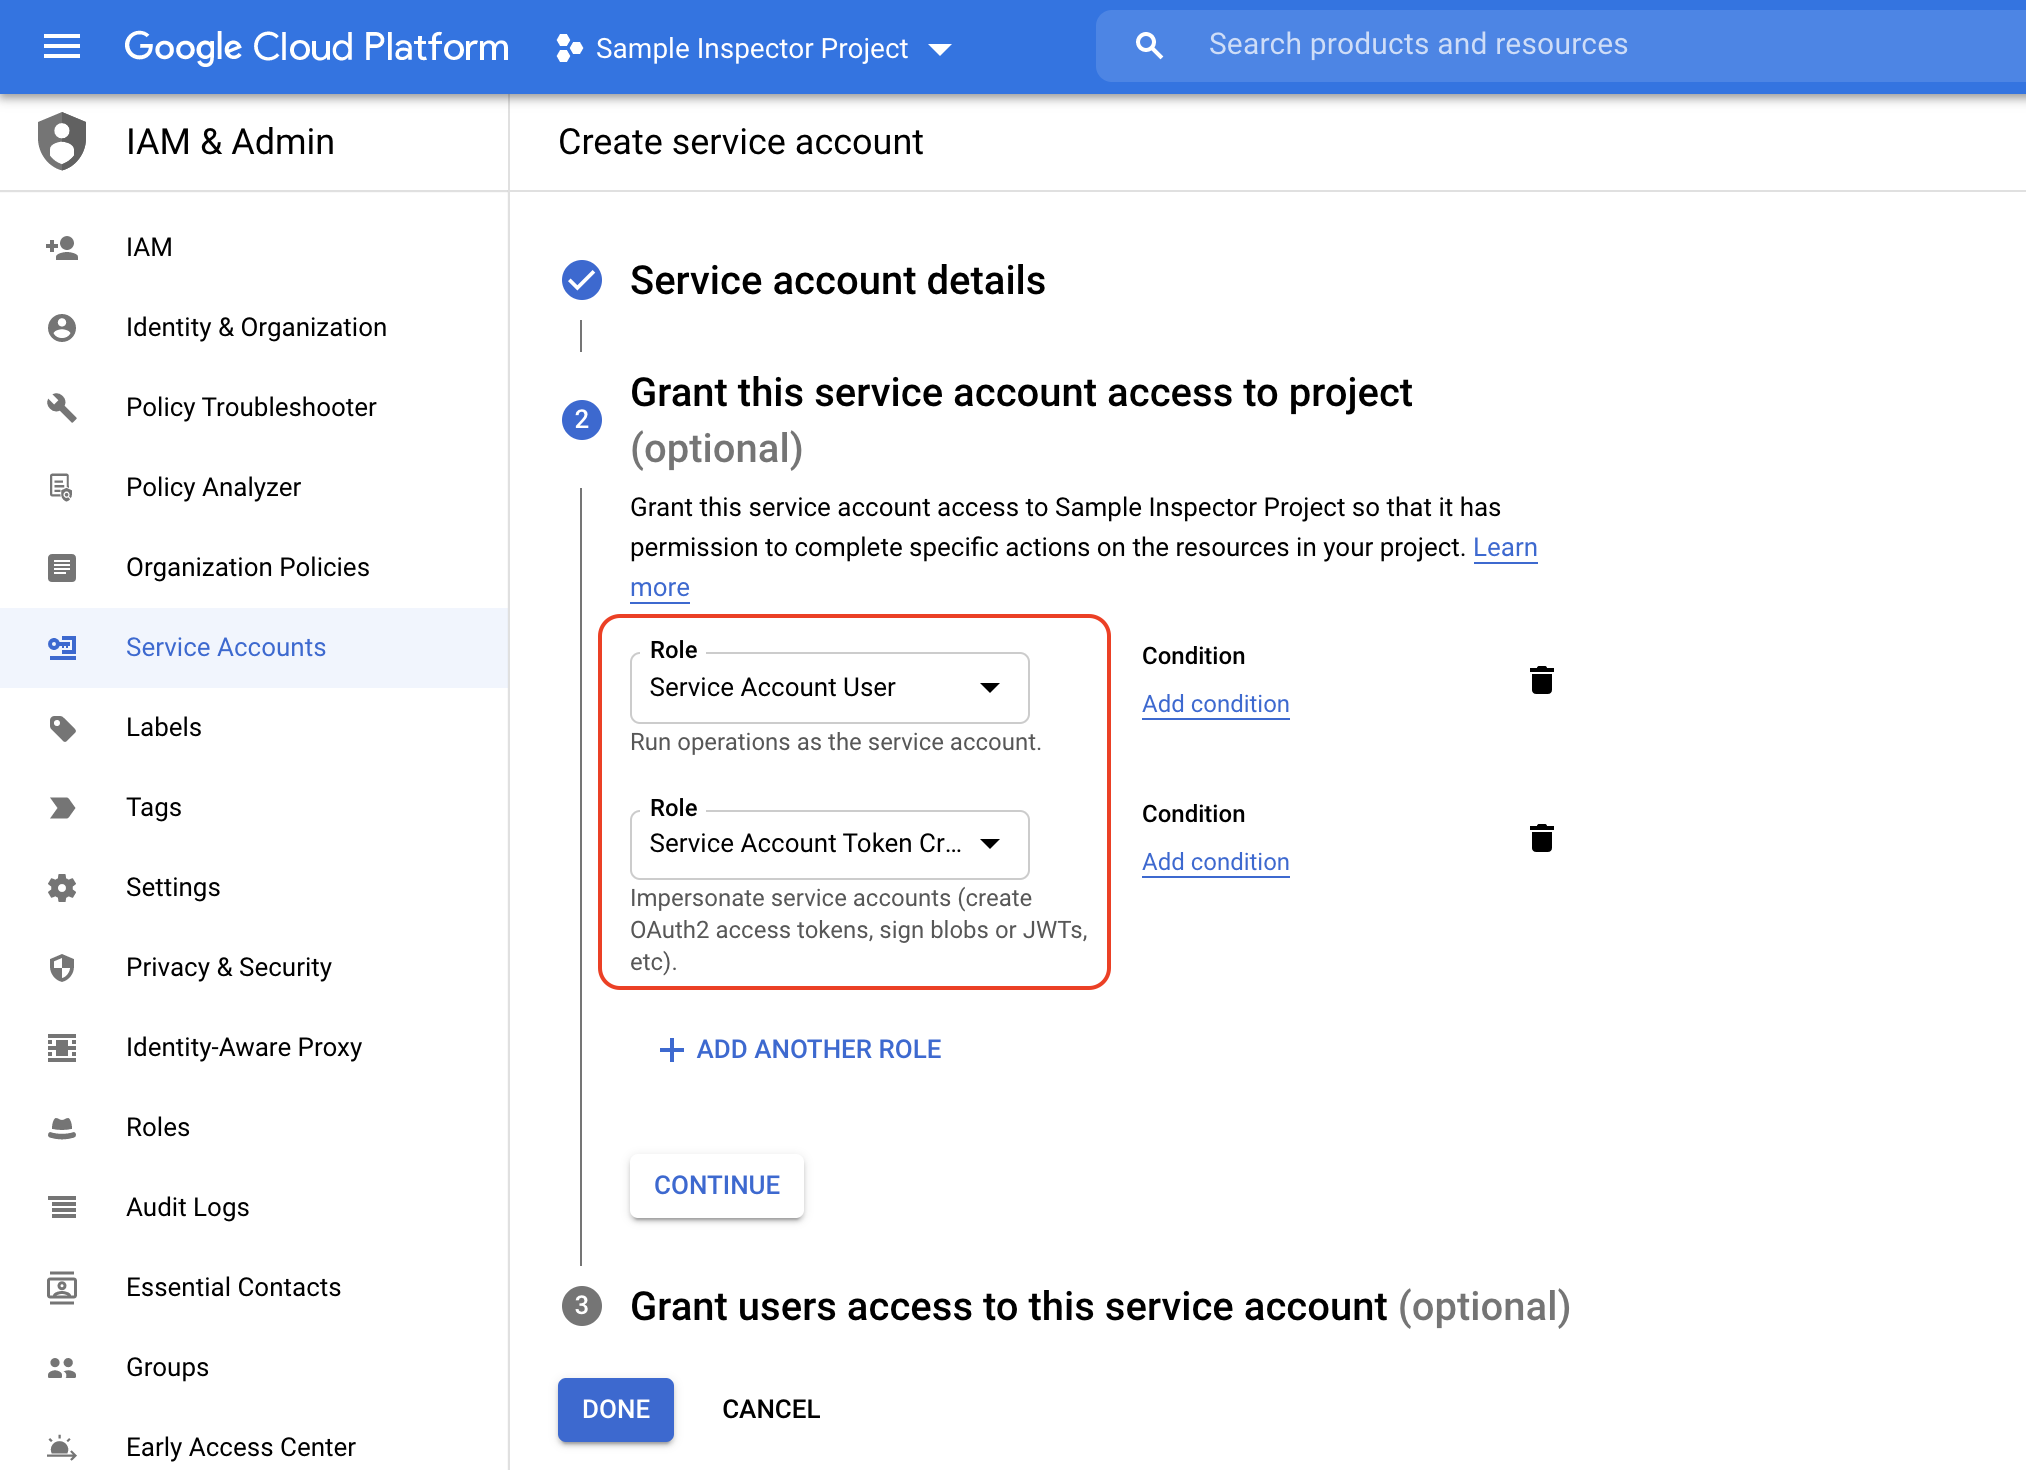
- Skip the Grant users access to this service account (optional) step. Using the "Actions" menu on the far right of your new service account's row, select Manage keys.
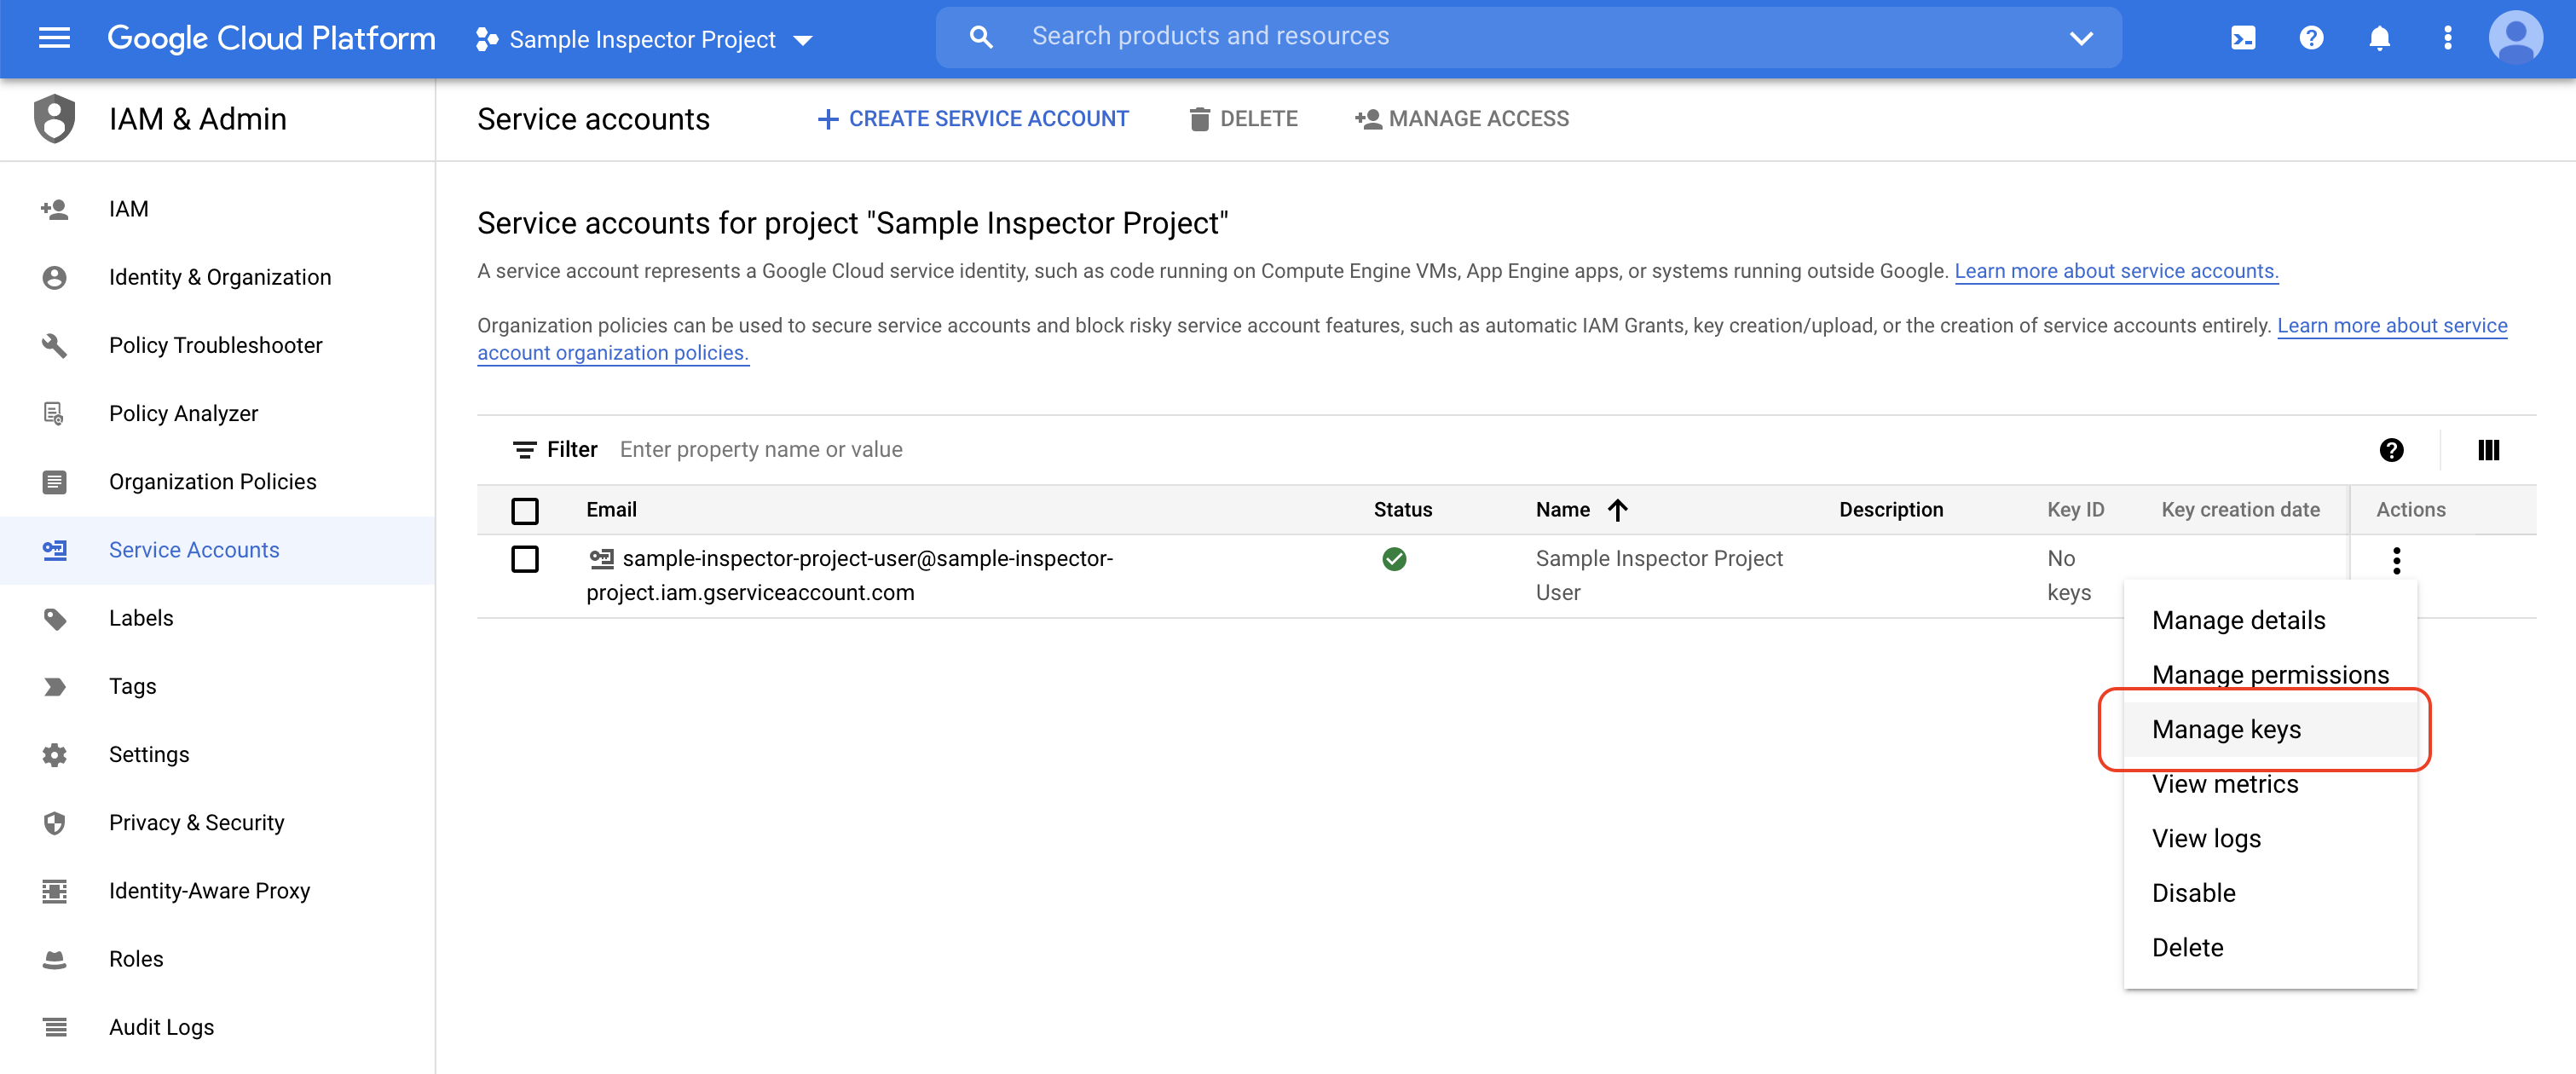
- On the next page, select Add Key > Create new key
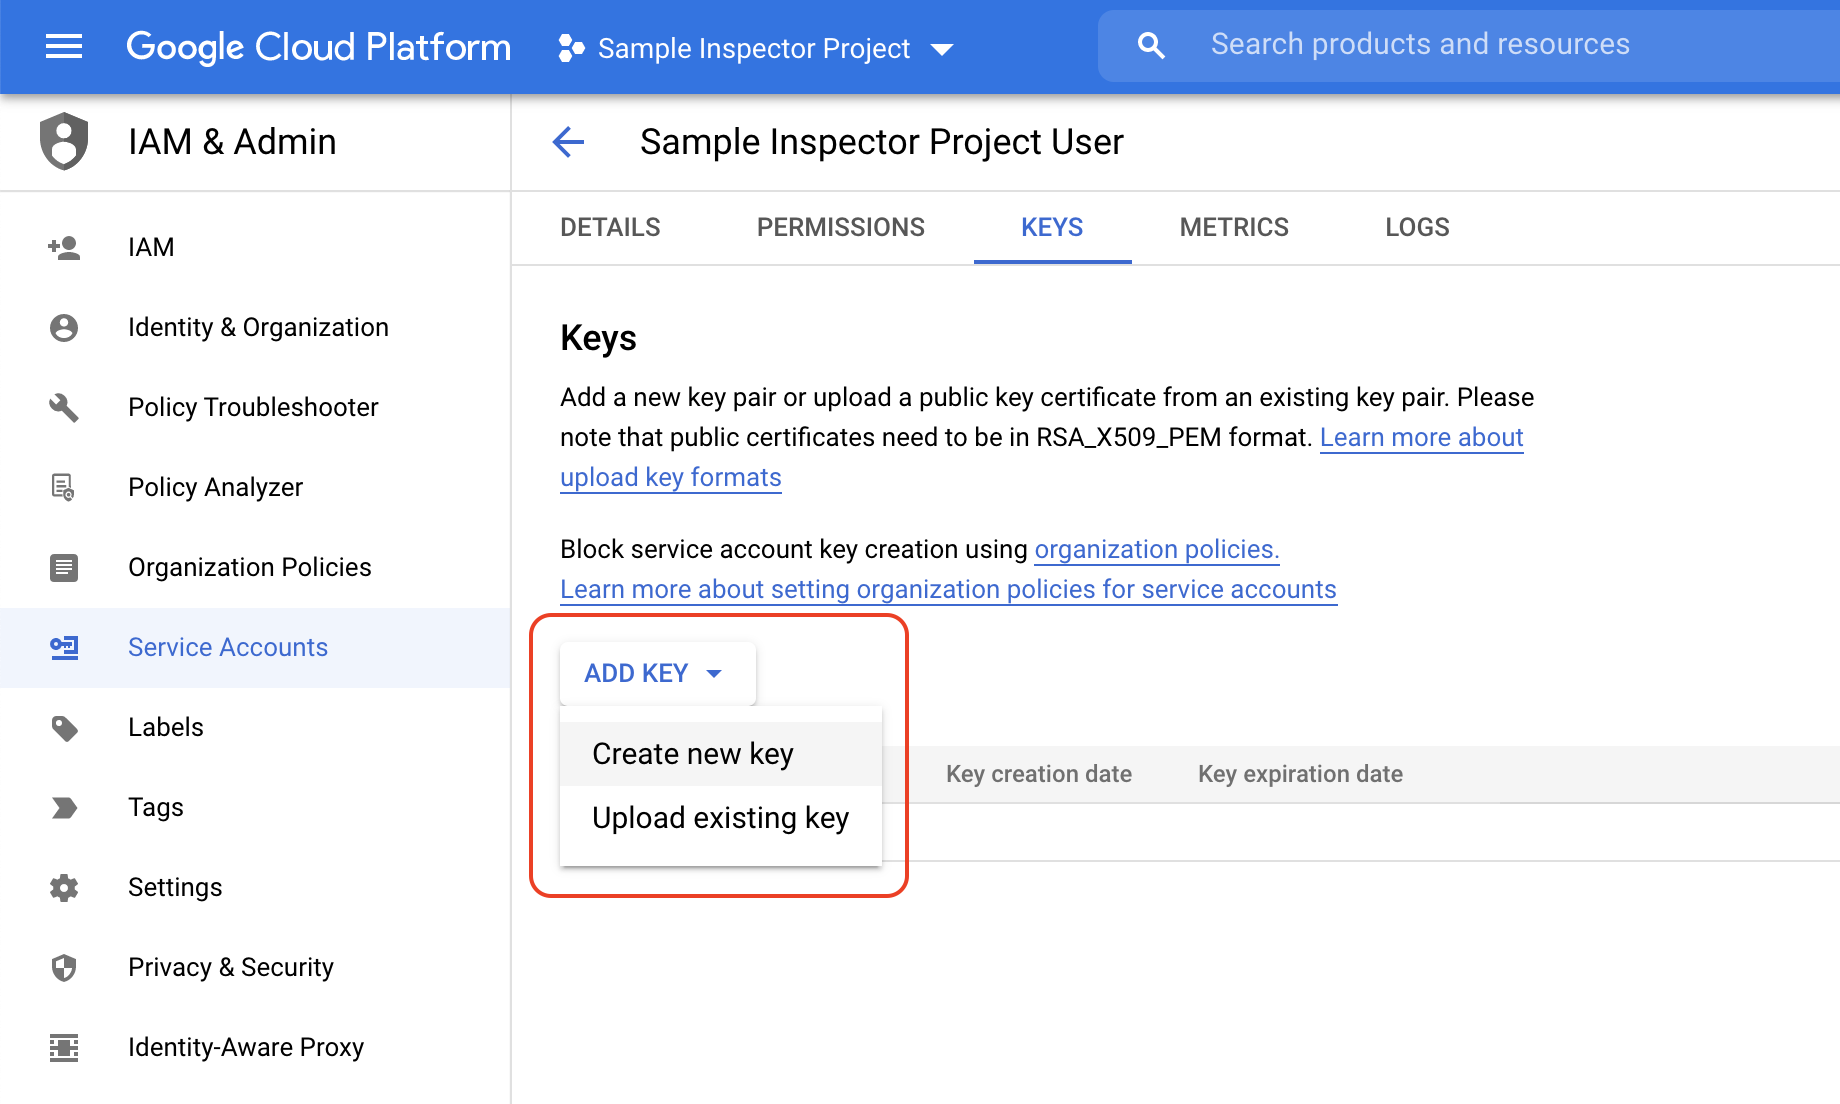
- Select JSON for key type. Then, select Create. This will download a private key file. Keep this file handy, as Liongard Google Cloud Services Inspectors will need it to authenticate with Google's APIs. Treat this file like you would a sensitive password.
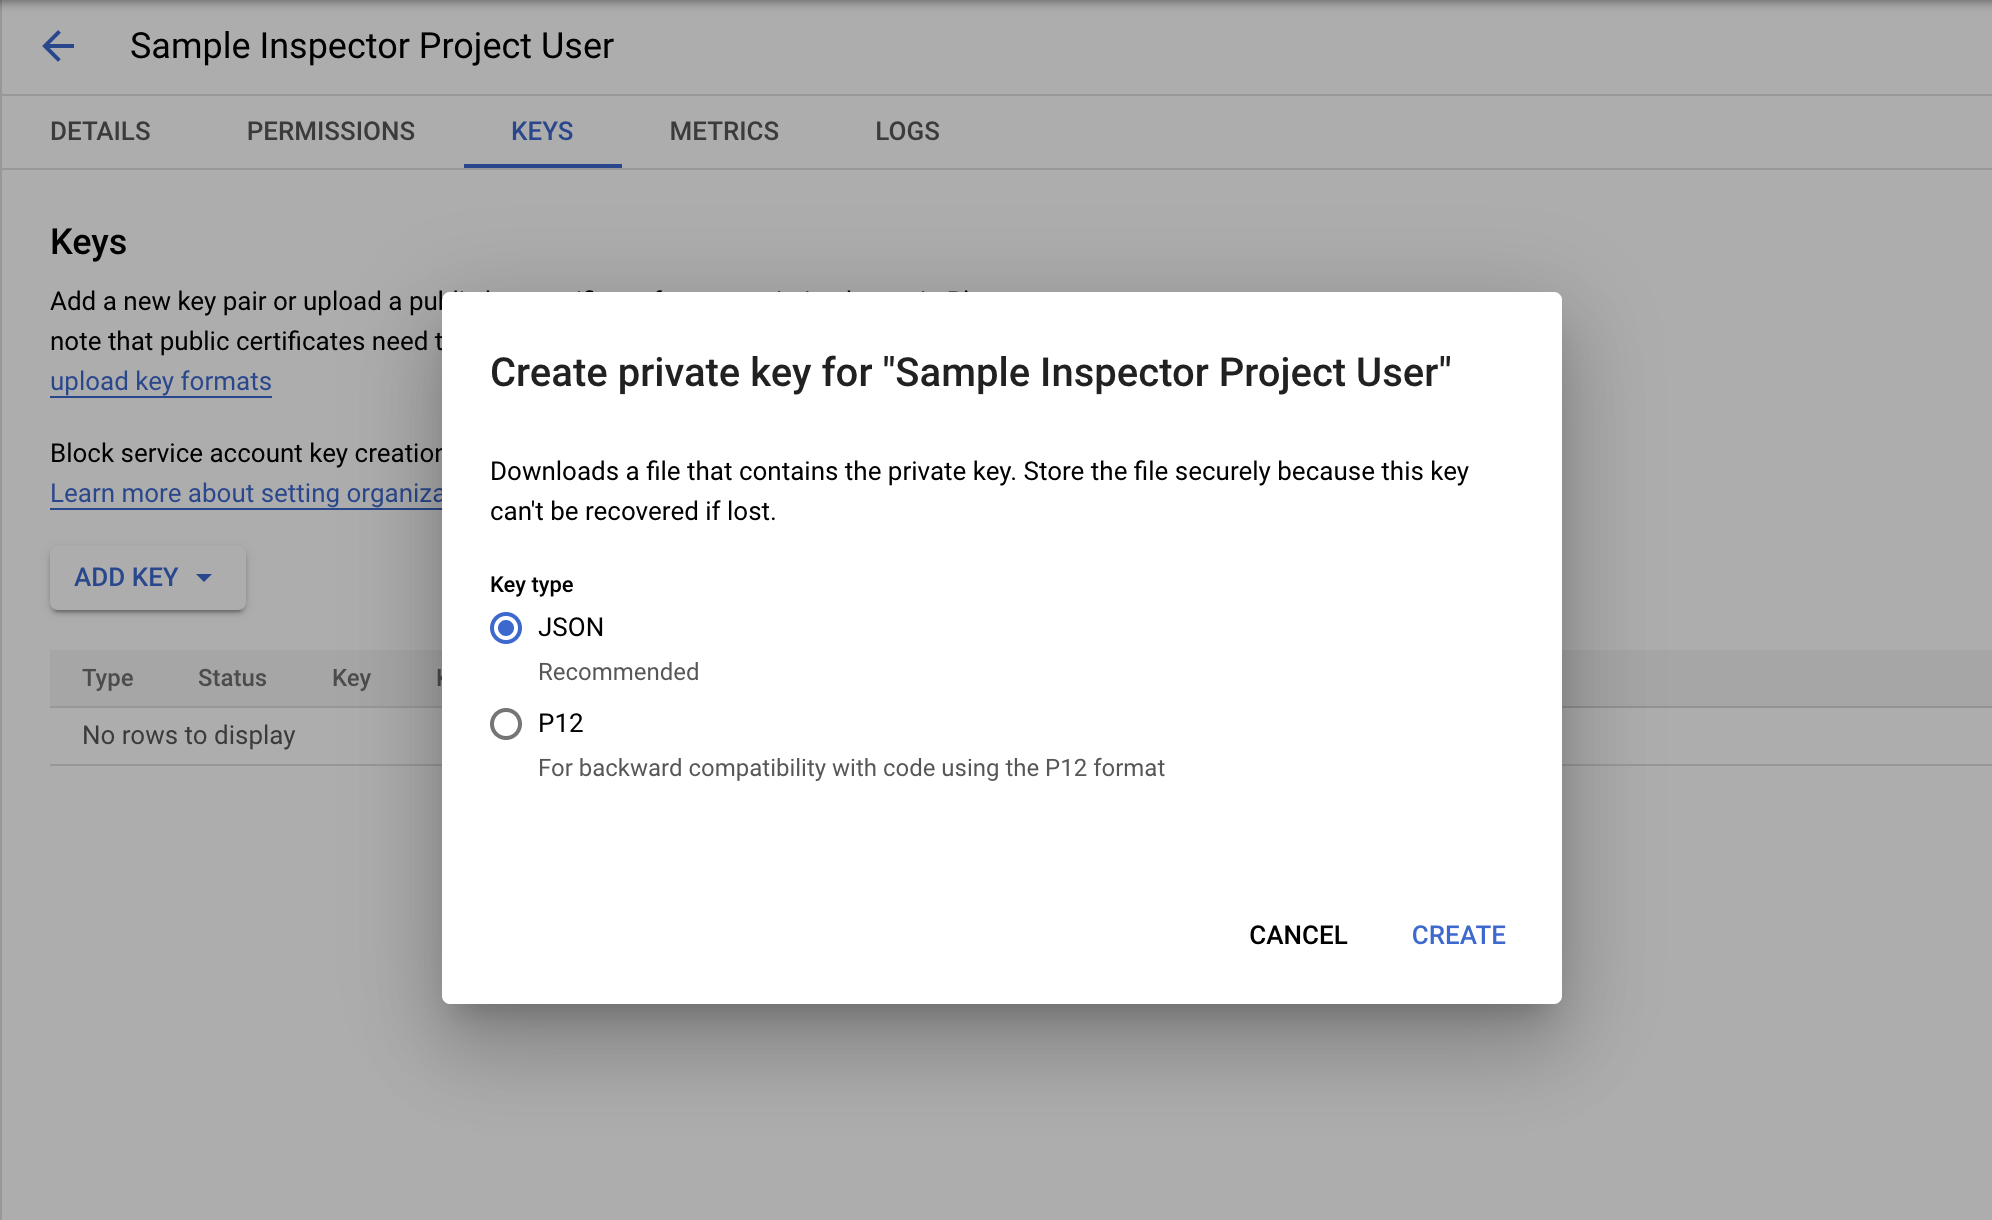
Replacing Your Private Key FileIf you happen to lose your original private key file, you can repeat the aforementioned steps to generate a new private key file.
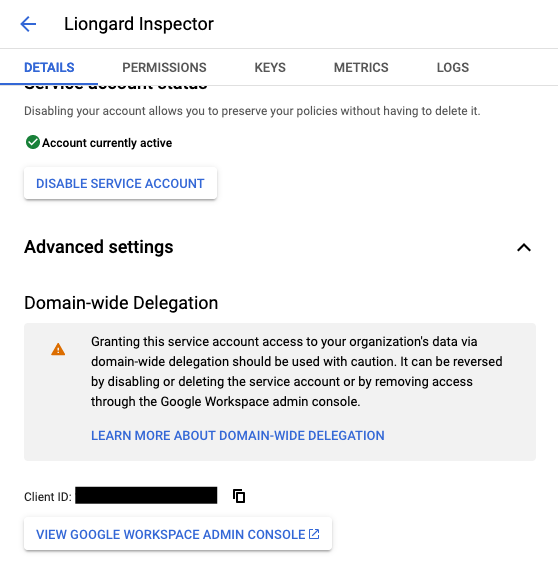
- While you're still in the service account settings menu, select the Details tab on the far left and select Advanced settings. Expand the section titled Domain-wide Delegation and find the Client ID.. This Client ID is needed to identify your service account when authorizing it in your Google Workspace account. This value can also be found inside the private key file you downloaded.
Step 4: Authorize Your Service Account in Google Workspace
- In the main menu of the admin portal (not the Cloud Console), navigate to Security > Access and data control > API controls. (https://admin.google.com/ac/owl). Scroll down to the Domain wide delegation section and select Manage Domain Wide Delegation.
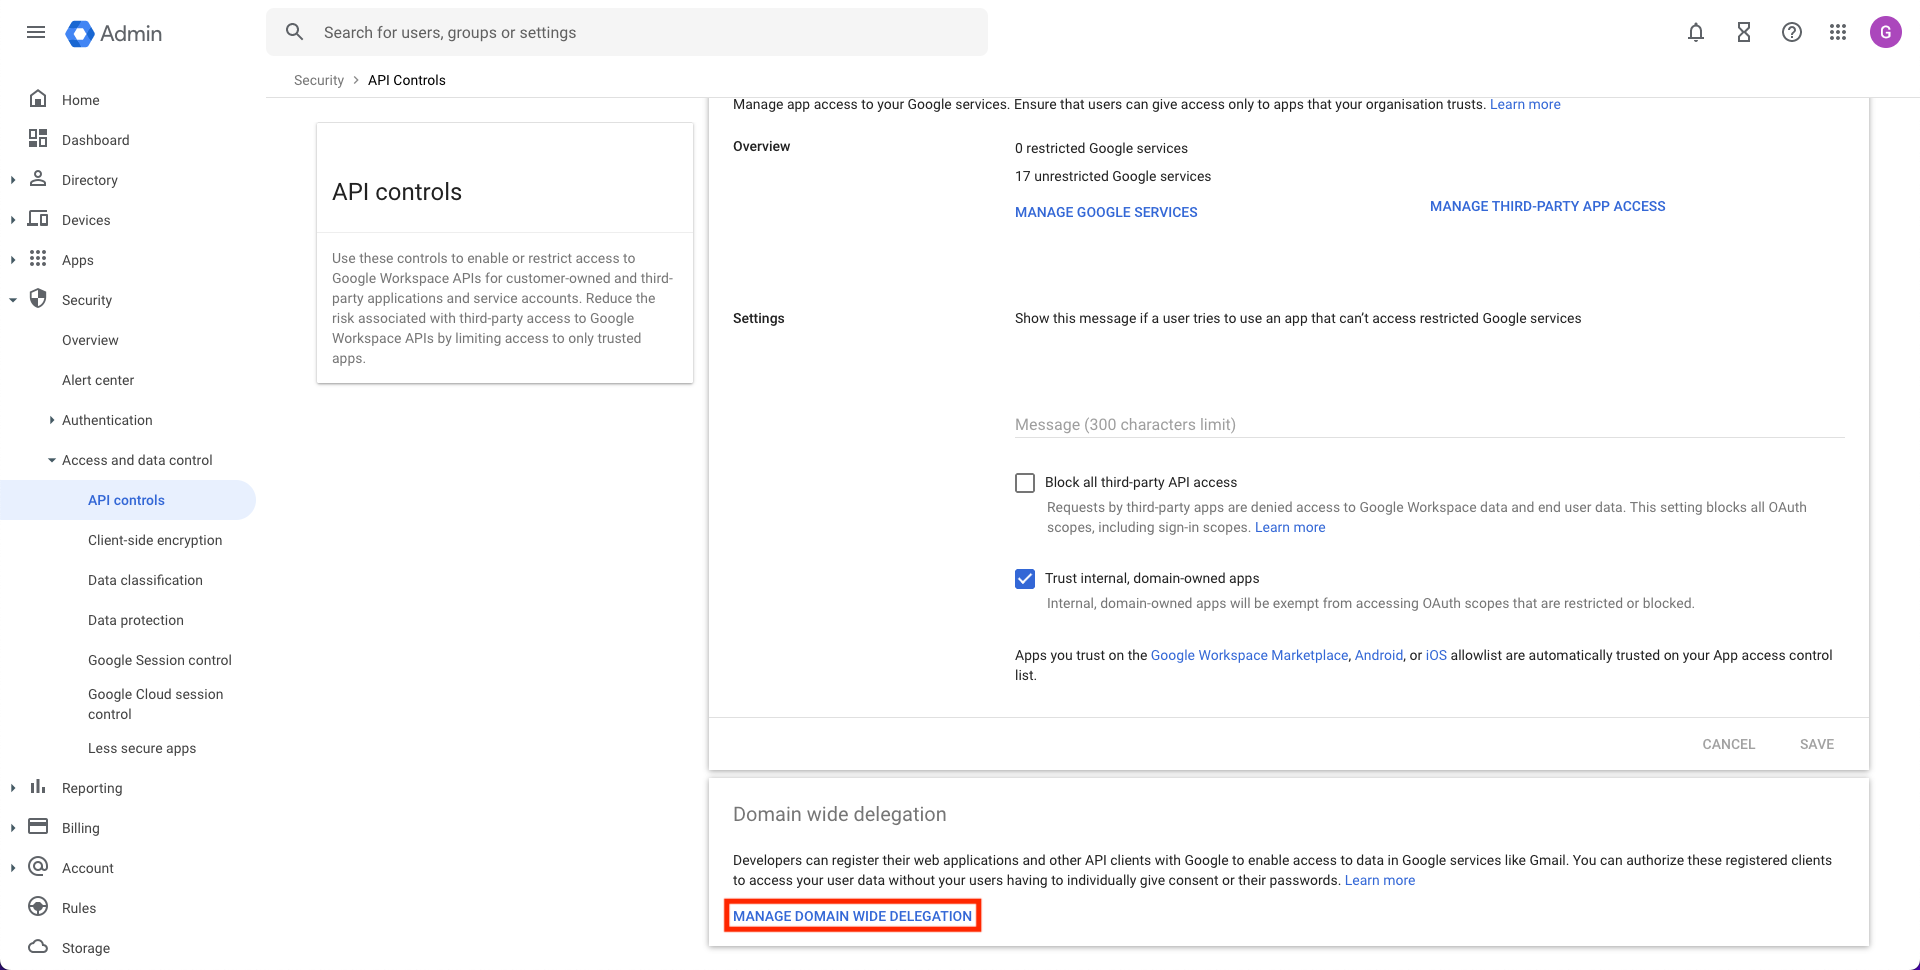
- On the next page, select Add new.
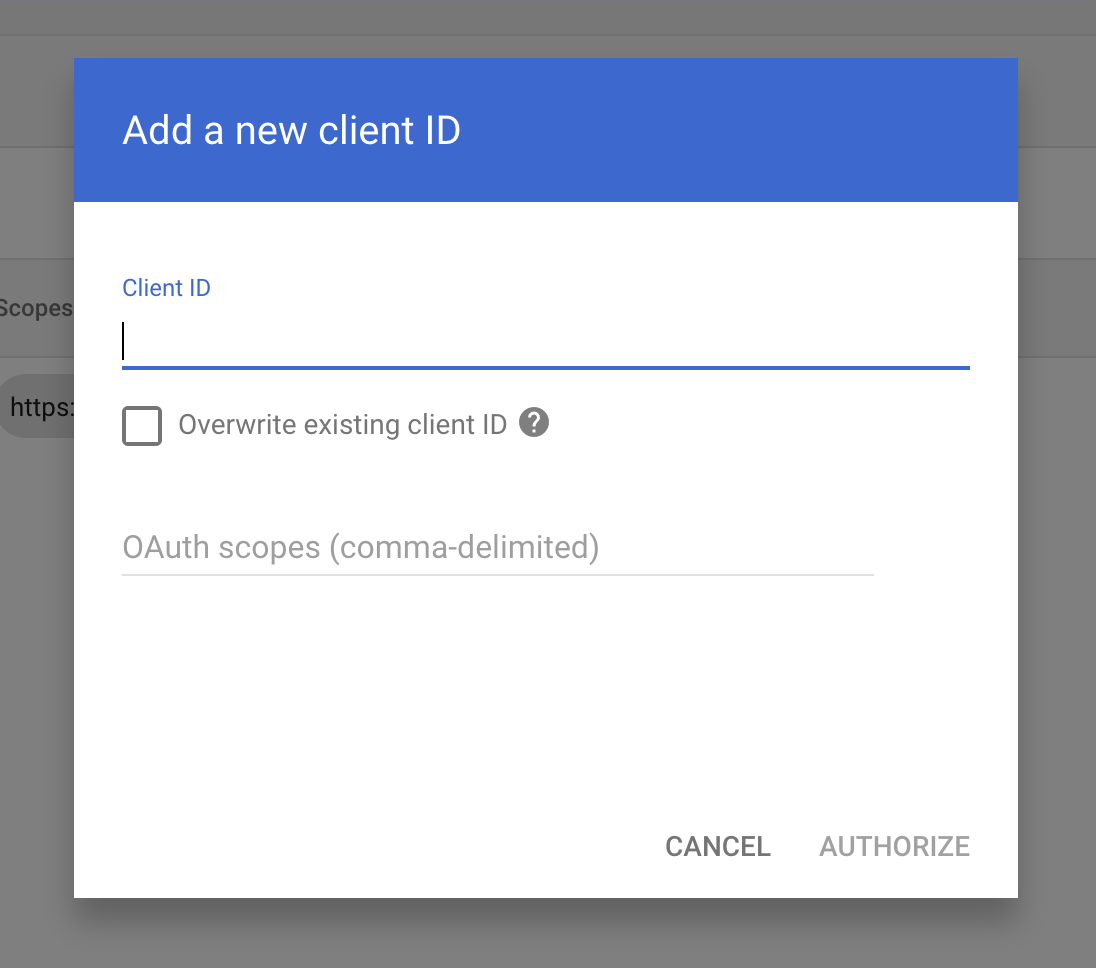
- In the Add a new client ID modal, add the unique (client) ID associated with the service account you created. Under OAuth scopes (comma-delimited), copy-and-paste the required scopes for the Inspector(s) you wish to configure (see the lists below) and select Authorize:
Google Workspace + Google Drive:
https://www.googleapis.com/auth/admin.directory.device.chromeos.readonly,
https://www.googleapis.com/auth/admin.directory.group.member.readonly,
https://www.googleapis.com/auth/admin.directory.group.readonly,
https://www.googleapis.com/auth/admin.directory.orgunit.readonly,
https://www.googleapis.com/auth/admin.directory.user.readonly,
https://www.googleapis.com/auth/admin.directory.user.alias.readonly,
https://www.googleapis.com/auth/admin.directory.rolemanagement.readonly,
https://www.googleapis.com/auth/admin.directory.userschema.readonly,
https://www.googleapis.com/auth/admin.directory.customer.readonly,
https://www.googleapis.com/auth/admin.directory.domain.readonly,
https://www.googleapis.com/auth/admin.directory.device.mobile.readonly,
https://www.googleapis.com/auth/admin.directory.resource.calendar.readonly,
https://www.googleapis.com/auth/admin.reports.audit.readonly,
https://www.googleapis.com/auth/admin.reports.usage.readonly,
https://www.googleapis.com/auth/apps.order.readonly,
https://www.googleapis.com/auth/calendar.readonly,
https://www.googleapis.com/auth/calendar.events.readonly,
https://www.googleapis.com/auth/calendar.settings.readonly,
https://www.googleapis.com/auth/drive.readonly,
https://www.googleapis.com/auth/drive.activity.readonly,
https://www.googleapis.com/auth/apps.licensing
Google Drive:
https://www.googleapis.com/auth/drive.readonly,
https://www.googleapis.com/auth/apps.order.readonly,
https://www.googleapis.com/auth/admin.directory.user.readonly,
https://www.googleapis.com/auth/admin.directory.group.readonly,
https://www.googleapis.com/auth/admin.directory.domain.readonly,
Liongard Inspector Setup
For each system you are deploying, you must first set up a Parent Inspector and then activate the Child Inspectors. Repeat these steps for each system you wish to deploy Inspectors.
Step 1: Parent Inspector Setup
Since Google Cloud Services Inspectors are multi-tenant systems where a single portal can be used to manage many Environments, you will set up a single "Parent" Inspector that will then auto-discover "Child" Inspectors for each Environment.
In Liongard, navigate to Admin > Inspectors > Inspector Types > Navigate to the Appropriate Google Cloud Services Inspector > Add System.
Fill in the following information:
- Type of Inspector: Parent
- Environment: Select your MSP's Environment
- Friendly Name: Suggested " Name] [In pector Name] Par Parent"
- Agent: Select On-Demand Agent
- Inspector Version: Latest
- Google Workspace Admin Email: Email of a Super Administrator on the Google Workspace account to be inspected under Google Workspace Admin Email
- Private Key: The entire contents of the private key file you created during the Google Cloud Platform (GCP) portion of the setup process
- For Google Workspace: Enable Google Workspace Reseller API: If you're enrolled as a Google Workspace Authorized Reseller, select this option to enable auto-discovery
- Scheduling: The Inspector will default to run once a day at the time the Inspector is set up. Here you can adjust the schedule
Select Save. The Inspector will now be triggered to run within the minute.
Step 2: Child Inspector Setup
After the first run of the Parent Inspector, your client Google Cloud Services organizations will be auto-discovered in the Discovered Systems tab on the Inspectors > Appropriate Google Cloud Services Inspector page.
Navigate to the Discovered Systems tab in your Inspectors > Appropriate Google Cloud Services Inspector page
- Activate or Archive your Discovered Systems by ensuring that they're mapped to the correct Environment > Check the checkbox to the left of Inspector(s) > Select the Actions drop down menu > Activate Launchpoints
Optional: Turn on Flexible Asset/Configuration Auto-Updating
If you would like these Inspector's data to be sent to ConnectWise and/or IT Glue, turn on Flexible Assets/Configurations for these Inspectors:
- ConnectWise: Admin > Integrations > ConnectWise > Configuration Types > Confirm the "Configuration Auto-Updating" toggle is enabled
- IT Glue: Admin > Integrations > IT Glue > Flexible Assets > Confirm the "Flexible Asset Auto-Updating" toggle is enabled
Updated 5 months ago
