Onboarding a New Customer Environment
Liongard AcademyLearn more about onboarding with Liongard Academy's "Onboard a Customer Faster with Liongard" course.
Access it today at Liongard Academy.
Overview
One of the most popular ways to leverage Liongard is to automate the system documentation when onboarding a new customer. The average IT Service Provider spends 40 hours on properly documenting a new customer. With Liongard, IT Service Providers are onboarding new customers start to finish between 45 minutes and two hours.
Below is our suggested process for onboarding a new customer in Liongard. It is a four-step process:
- Step 1: Import and Integrate your New Customer
- Step 2: Deploy a Self-Managed Agent
- Step 3: Activate your Auto-Discovered Inspectors
- Step 4: Deploy Additional Inspectors
Step 1: Import and Integrate your New Customer
Time: 10 minutes
Not Using an Integration?If you are not using one of our Platform Integrations, you can add a new customer by navigating to Admin > Environments and selecting the Add Environment button. Here, please complete the fields and select Save to add the new customer.
Customers can also be bulk imported following the documentation found here.
For Integration best practices and complete details of our platform Integrations, please visit our Liongard Integration Best Practices document and the documentation for your specific Integration, linked within.
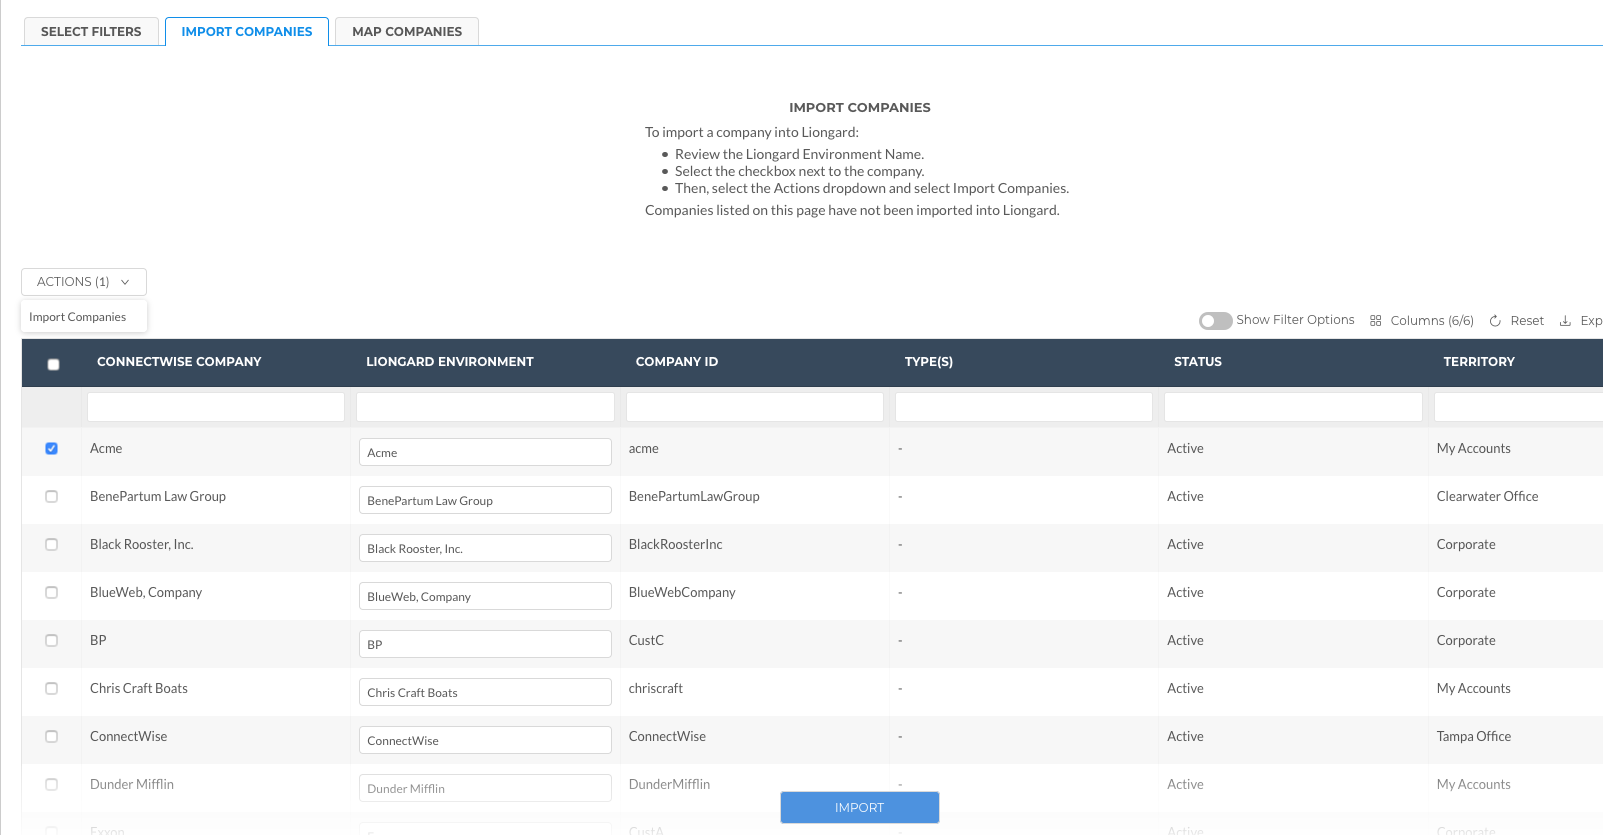
- In Liongard, navigate to Admin > Integrations > Select your Integration (left-hand menu) > Select Import & Mapping > Import Companies Tab
- Select the New customer (using the checkbox as shown in the screenshot below)> Actions > Import Companies, OR you can click the "+ Import" button at the bottom of the page.

- In the Map Companies Tab, make sure the new Environment is mapped correctly.
If you'd like to push this new customer's documentation from Liongard to IT Glue's Flexible Assets or ConnecWise's Configurations:
- In the Configuration Types > Select Environments Tab, ensure that the new customer's Environment's Auto-Updating toggle has been turned on
- In the Flexible Assets > Select Environments Tab, ensure that the applicable Flexible Assets/Configuration Types' Auto-Updating toggles have been turned on.
Data Landing in ConnectWise and IT GlueAs a reminder, Flexible Assets/Configurations will not land until the Inspector runs.
You can force run an Inspector by navigating to Admin > Inspectors > Click into an Inspector. Then, you can either bulk or single select the System Inspector > Actions > Run Inspectors, OR you can select the Play button next to a System Inspector.
Step 2: Deploy Self-Managed Agents
Time: 30 minutes
If applicable, deploy an Self-Managed Agents using our documentation.
- After installing the Agents on Windows Servers and Windows Workstations, you will be able to deploy a Windows Server Inspector and Windows Workstation Inspector for the respective Agent installs. Activating these Windows Server Inspectors will trigger additional Inspector auto-discoveries.
Keep in mind that Windows Server and Windows Workstation Inspectors are Endpoint Inspectors. Endpoint Inspectors are billed per unit according to your agreement with Liongard. Usage beyond the contracted amount will be charged on your monthly invoices.
- When activated, after the Windows Server Inspector completes, if installed on a Domain Controller, an Active Directory Inspector will be auto-discovered.
- Additionally, when the Windows Server Inspector completes, it will auto-discover a Network Discovery Inspector.
- After the Network Discovery Inspector is activated and it completes its initial run, it will auto-discover several different Firewall Inspectors. A full list is included on the Network Discovery Inspector page.
You will activate thisActive Directory Inspector and any additional Discovered Inspectors in Step 3.
Step 3: Activate your Auto-Discovered Inspectors
Time: 10-35 minutes
For complete details of Liongard's Auto-Discovery, please visit our Auto-Discovery documentation.
Prework:
- If you are taking advantage of a PSA Integration with Liongard, confirm that you have added the new customer's Company/Account into the PSA at least 24 hours before importing the customer into Liongard. If not, force run your applicable PSA Inspector. If you do not have a PSA Integration with Liongard, you will need to roll out an Internet Domain/DNS Inspector.
- If you are managing a system(s) for your new customer that has an associated Parent/Child Type Inspector, confirm that you have added the new customer’s tenant(s) to this system(s) in the last 24 hours. If you’ve added the new customer’s tenant(s) to this system(s) within the last 24 hours, then force run their applicable Parent/Child Type Inspector’s Parent Inspector(s). If you haven’t added the new customer’s tenant(s) to this system(s), then you will need to do so now, and then, force run their applicable Parent/Child Type Inspector’s Parent Inspector(s).
Parent/Child Type Inspectors:
- Acronis Cyber Protect Cloud
- Auvik
- Azure Active Directory
- Bitdefender GravityZone
- Cisco Meraki
- Cisco Umbrella
- Cloudflare
- ConnectWise Automate
- Continuum RMM
- Datto BCDR
- Datto Networking
- Datto RMM
- Domotz
- Duo Security
- ESET Licensing
- Google Drive
- Google Workspace
- JumpCloud
- Kaseya VSA
- Microsoft 365
- Microsoft OneDrive
- Microsoft SharePoint
- Microsoft Teams
- N-able Backup
- N-able N-central
- N-able RMM
- NinjaOne
- SentinelOne
- Sophos Central
- Syncro
- Ubiquiti UniFi
- Vade
- Veeam Availability Console
- Veeam Service Provider Console v4
- Webroot Secure Anywhere GSM
You will activate the discoveredInternet Domain/DNS or TLS/SSL Inspector(s) and your applicable discovered Child Inspectors later in this step.
Activate your Auto-Discovered Inspectors
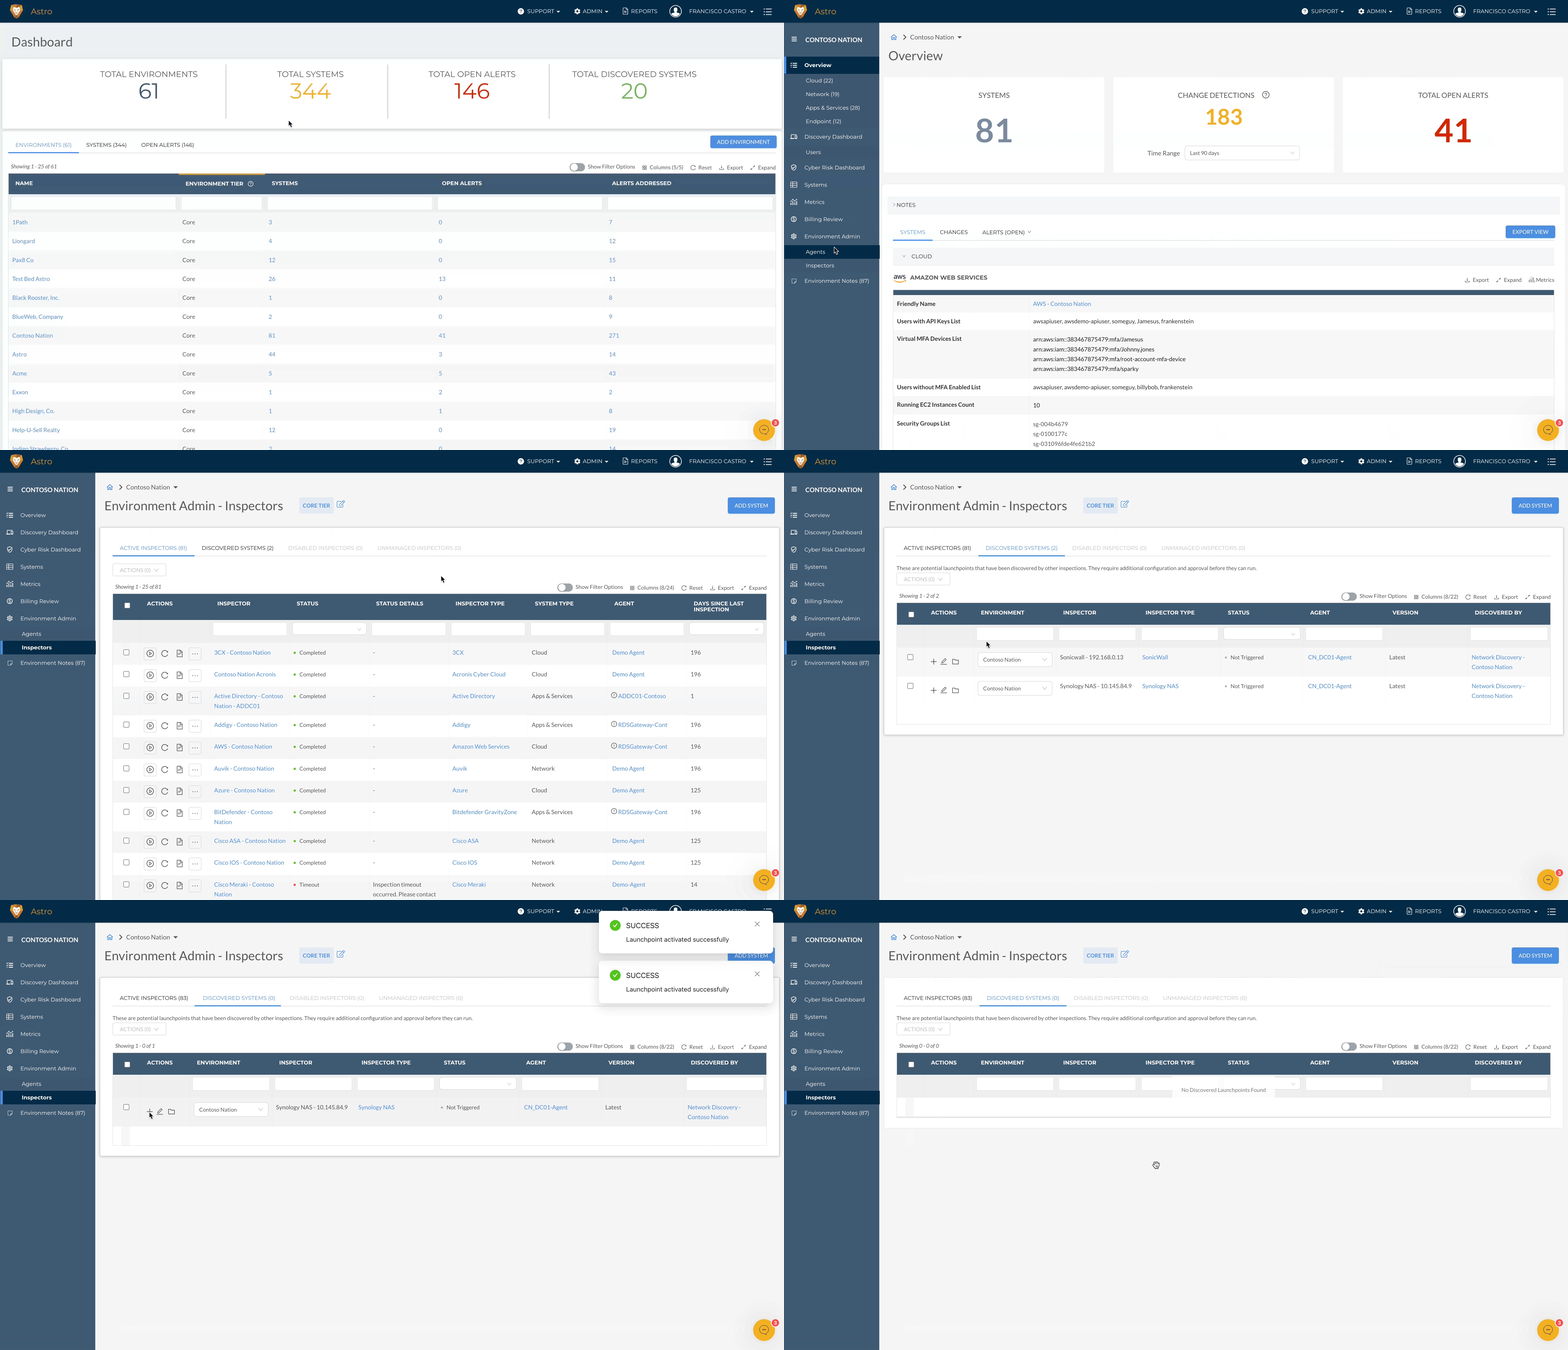
Navigate to your Dashboard > Select your new customer's Environment > Navigate to the Environment Admin tab (in the left sidebar) > Click the New Discovered Systems tab

- Note: If you do not see Discovered Inspectors that you expect to see, navigate to Admin > Discoveries. Here you'll find all auto-discovered Inspectors across Environments in Liongard. Search for your expected auto-discovered Inspectors, and map them to your new customer Environment.
Bulk select the checkboxes to the left of the Discovered Inspectors > Actions > Activate Launchpoints
Step 4: Deploy any Additional Inspectors
Time: 10 minutes - 45 minutes
Use individual Inspector documentation to roll out Inspectors for the new customer's additional Systems.
Challenge: Race the Clock!We have partners who are onboarding customers from 30 minutes to two hours. Think you can onboard a customer faster in Liongard?! Time it!
Related Features
Because the majority of Liongard's Inspectors employ Auto-Discovery, rolling out System Inspectors in Liongard can be a quick task.
Updated 5 months ago
