Installing a Linux Agent
This document provides instructions on how to set up and install a Linux-based Agent
Supported DistributionsCurrently, the Linux Agent only officially supports Ubuntu, Red Hat, Debian, Fedora, and CentOS. Although most of the data collection is generic to any Linux distribution, thus far testing has only been completed on Ubuntu, Red Hat, Debian, Fedora, and CentOS.
Raspberry Pi/ARM-based Linux OS SupportARM-based Linux operating systems are not currently supported for our Linux Agent. If this functionality appears useful to your organization, please upvote the implementation of this feature request here.
Linux Agent 1.9.4 and lowerIf you are running Linux Agent 1.9.4 or lower you must uninstall your agent version before proceeding to install the latest version. Instructions for completing this can be found here
In this article
- Recording a Liongard Access Key ID and Secret
- Installing the Agent
- Downloading the Agent Installer Manually
- Per-Environment Agent Installer
- Uninstalling the Linux Agent
- Troubleshooting
- FAQs
Recording a Liongard Access Key ID and Secret
Access TokensLiongard Access Key Tokens and Secrets can be reused when installing Agents, or you can generate a new Access Key Token and Secret every time.
If you do decide to reuse the Access Key and Secret, it should be secured as you would any other sensitive password.
Our Access Tokens are used only to register an Agent. It is not something that the Agent stores, so if a token gets deleted, nothing will happen to Agents that were installed using that token.
- In Liongard, navigate to Your Name > Account Settings > Access Tokens
- If you have an existing Access Token, you may use it to deploy the Agent.
- If you need to generate a new token, select Generate New Token then select Agent Install Token.
- Note: Users must be a member of the Global Admin, Global Environment Manager, or Global System Integrators groups to see the Agent Install Token option.
- Record a Liongard Access Key ID and Secret as you will need them in the next steps.

Installing the Agent
What user should I run the Agent as?We recommend using a normal local user with sudo access on the system. We do not recommend running as root.
- Log into the Linux system
- Download the Liongard Agent using wget or your preferred method:
- wget:
wget -k https://agents.static.liongard.com/LiongardAgent-lts-x64.xz.run - curl:
curl -o LiongardAgent-lts-x64.xz.run https://agents.static.liongard.com/LiongardAgent-lts-x64.xz.run
- Verify that the file was downloaded with the
lscommand

- Run
chmod 700 LiongardAgent-lts-x64.xz.runto give the file executable permissions.

- Run the the command to install the agent:
sudo ./LiongardAgent-lts-x64.xz.run -- -u InstanceURL -k AccessKey -s AccessSecret

Initiating argumentsThe use of
--must precede any arguments used for the installer
The available arguments for the agent installer are as follows:
- -u: Liongard Instance URL (Required)
- -k: Agent Access Key (Required)
- -s: Agent Access Secret (Required)
- -n: Agent Name
- -e: Liongard Environment
- -d: Agent Description
Downloading the Agent Installer Manually
- Log in to Liongard
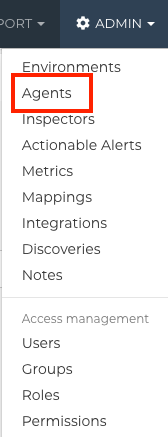
- Click on the Admin menu and select Agents

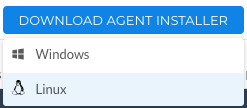
- Hover over the Download Agent Installer button in the top-right corner and select Linux

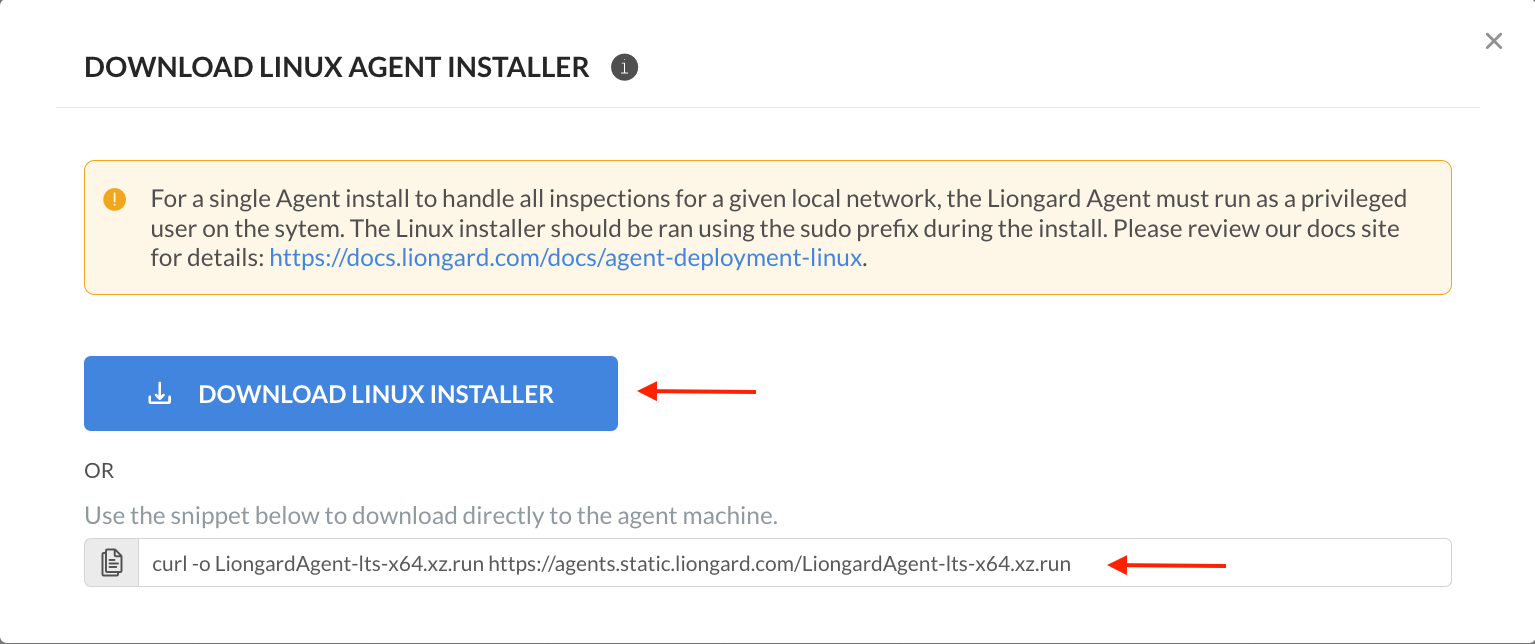
- You can either download the install script by clicking on the Download Linux Installer button or copy the curl command to download it in the Shell.

Optional: Use a Per-Environment Agent
You also have the option to download a Windows, Mac, or Linux agent installer that has been pre-configured for a specific environment. This pre-configured installer can then be used to install the agent without the need for any manual configuration.
To download a per-environment agent installer, navigate to the Admin > Agents page, click Download Agent Installer, and select your operating system. In the agent installer modal, click on Per-Environment Installer. In the Environment field, search for the name of the environment for which you are configuring the installer. After a few seconds, you can download your per-environment agent installer by clicking the Download button.
Uninstalling the Linux Agent
The agent can be uninstalled from the system with the installer file by using the -x argument as shown below:
sudo ./LiongardAgent-lts-x64.xz.run -- -x

Troubleshooting
Checking the Agent Service
The following command can be used to check on the status of the Liongard Agent Service:
systemctl status liongard-agent

Checking the Updating Service
The following command can be used to check on the status of the Liongard Updater Service:
systemctl status liongard-agent-updater

Checking the Liongard Agent Timers
The following command can be used to check when the Liongard updater service checks for updates:
systemctl list-timers | grep liongard

Checking Liongard Agent Logs
To assist support with troubleshooting Agent issues the following log files may be required to send to support for further analysis:
/opt/liongard/logs/debug.log/opt/liongard/logs/error.log/opt/liongard/logs/heartbeat.log/opt/liongard/logs/updater.log
FAQs
*Do I need to allowlist specific URLs?
Yes. You must allowlist npmjs.org and nodejs.org as well as your Liongard instance in order to download and install the Agent successfully.
For further information about allowing URLs with the Agent, please visit the Deployment via MSI Installer document under the Allowlisting Requirements
section.
*Do you support all Linux distributions and versions?
We have attempted to support across all versions and distributions. However, most of the testing has been done on Ubuntu, Red Hat, Debian, and Fedora. If you encounter problems on a specific distribution, please Support Portal: Chat with Support.
Uninstall Linux Versions 1.9.4 or lower
Step 1. Download the uninstall script with the following command
curl -k https://roar2.app.liongard.com/api/v1/agents/scripts/uninstall-roar-agent/ -o uninstall-roar-agent
Step 2. Open terminal in uninstall script location and run the following command
chmod +x uninstall-roar-agent
Step 3. Finally, run the following command
sh -e uninstall-roar-agent
Step 4. Log into your Liongard Instance
Step 5. Navigate to your Agents by going to Admin > Agents
Step 5. Delete the Uninstalled Agent(s)
Updated 5 months ago
