Create a Liongard API Account in ConnectWise
This document will provide detailed instructions for setting up your Liongard API user account within ConnectWise Manage.
This documentation covers the set up of a Liongard API User account. This process is the first step towards integrating Liongard with ConnectWise Manage to enable company import to Liongard, auto-documentation from Liongard into ConnectWise Configurations, Actionable Alerting, and Billing Review.
There are four steps to creating a Liongard API Account in ConnectWise:
- Confirm ConnectWise Manage Version
- Create a new Security Role for the Liongard API User
- Create a Roarbot API User in your ConnectWise Manage Account
Step 1: Confirm ConnectWise Manage Version
You can confirm the version you're running by right-clicking on the application icon and viewing properties. While the screens may vary slightly between versions, the process is uniform. If you run into any issues or inconsistencies, open a chat with Support.

Step 2: Create a new Security Role for the Liongard API User
Navigate to System > Security Roles and click the "+" sign to add a new role.

In the Role ID field, type "Liongard" and click the Save icon.
This will take you to the Security Modules page.

Security Modules for Role - Liongard
Optional Permissions for ConnectWise Manage InspectorSome of the permissions listed below are not required for the ConnectWise Manage Integration to run successfully. These permissions are marked as "Optional" below.
"Optional" permissions are necessary for the ConnectWise Manage Inspector to return the corresponding data. If you would like this Inspector to return this data, please enable the "Optional" permissions.
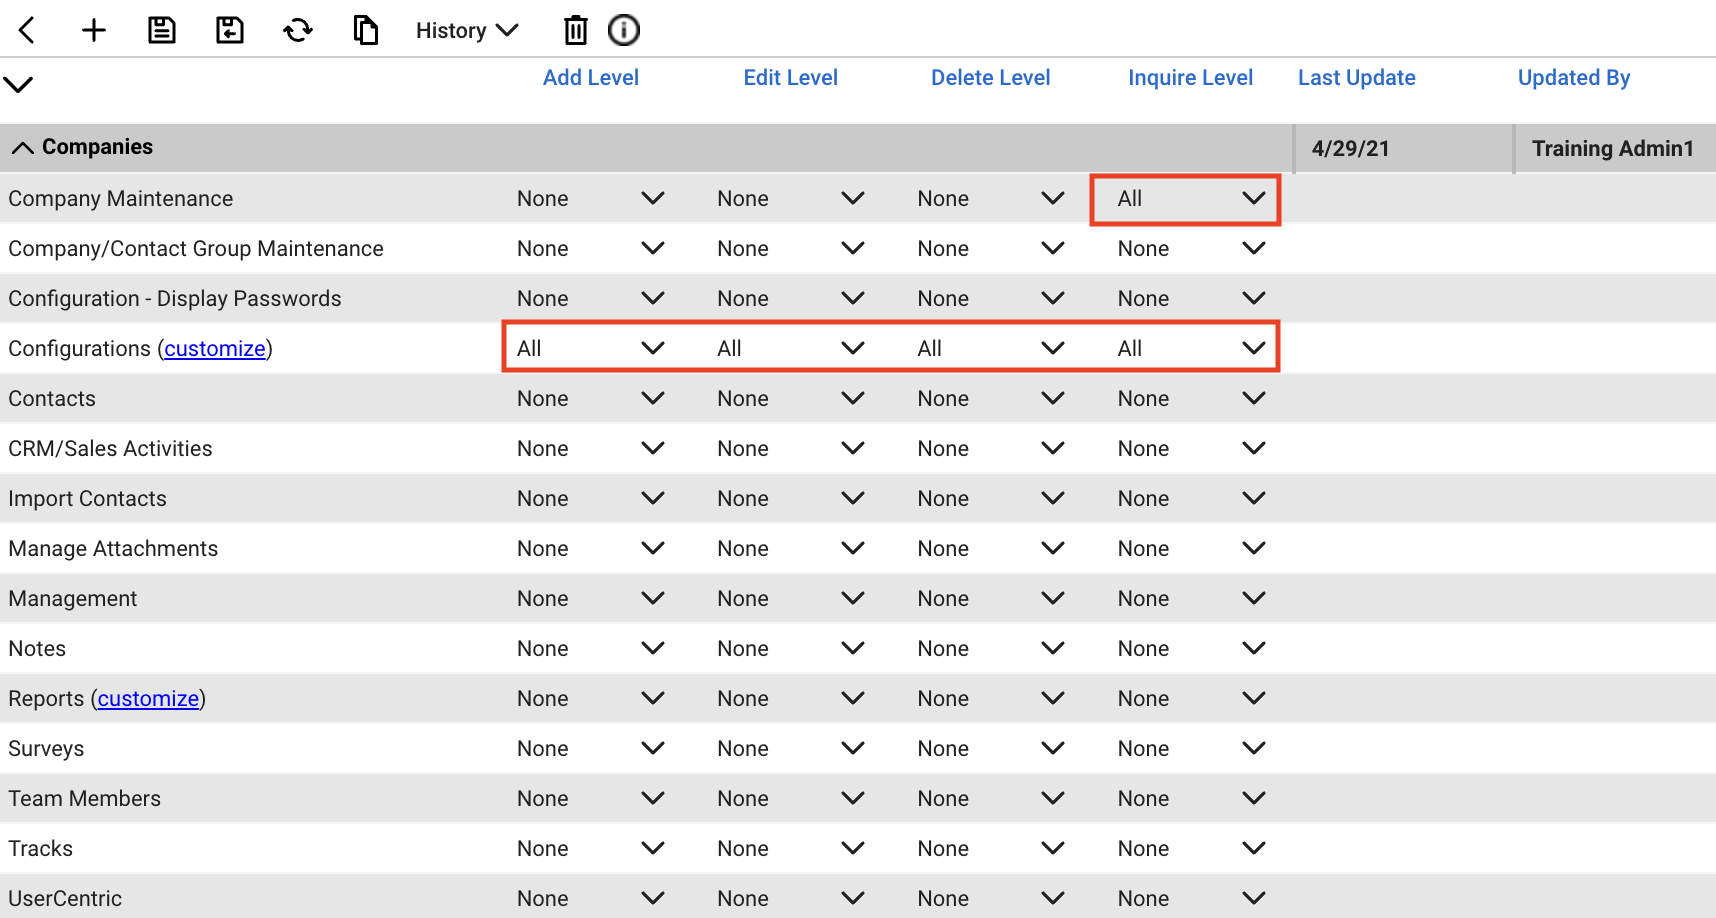
Fill in the information as follows:
Companies: For Company Mapping in Liongard
-
Company Maintenance: Allows Liongard to read company information in ConnectWise Manage.
- Add Level - None
- Edit Level - None
- Delete Level - None
- Inquire Level - All
-
Configurations: Allows Liongard to Add, Edit, and View configurations in ConnectWise Manage.
- Add Level - All
- Edit Level - All
- Delete Level - All
- Inquire Level - All
-
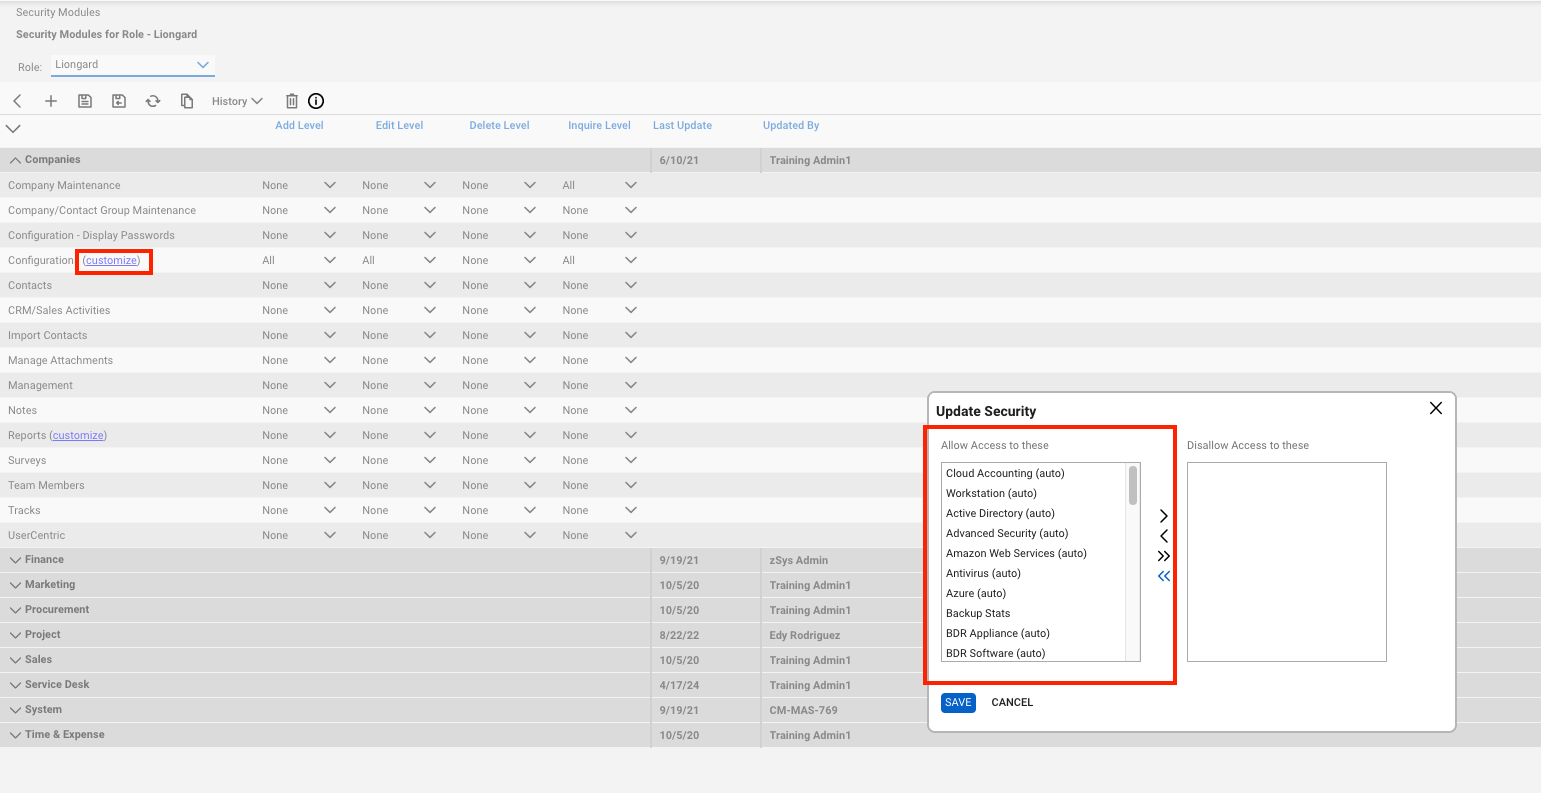
Customize Configurations: Permissions set are only applicable to Liongard's configurations.
- Click on the (customize) link next to Configurations
- Click on the arrows facing to the left to make sure that Liongard Configuration types are shown on the left-hand side to allow updating and creating of Liongard-created Configurations, which are suffixed with "(auto)".
- Click Save to continue
- Contacts (Optional): Allows Liongard to view your ConnectWise Contacts
- Add Level - None
- Edit Level - None
- Delete Level - None
- Inquire Level - All

Finance (Allows Liongard to view Agreements)
- Agreements: Allows Liongard to view your Agreements in ConnectWise.
- Add Level - None
- Edit Level - None
- Delete level - None
- Inquire Level - All

- Invoicing (Optional): Allows Liongard to view your ConnectWise Invoices
- Add Level - None
- Edit Level - None
- Delete Level - None
- Inquire Level - All

Project
- Project Headers (Optional): Allows Liongard to view your ConnectWise Project Tickets
- Add Level - None
- Edit Level - None
- Delete Level - None
- Inquire Level - All

Service Desk (Allows Liongard to create and update Tickets in ConnectWise)
- Close Service Tickets: Allows Liongard the capability to close a ticket it creates in ConnectWise Manage.
- Add Level - None
- Edit Level - All
- Delete Level - None
- Inquire Level - All
- Service Tickets: Enabling these permissions will allow Liongard to create tickets in ConnectWise Manage.
- Add Level - All
- Edit Level - All
- Delete Level - None
- Inquire Level - All

System
- Member Maintenance: Allows Liongard to assign the Roarbot User to a ticket
- Add Level - None
- Edit Level - None
- Delete Level - None
- Inquire Level - All
- My Company: Allows Liongard to pull Territories for filtering purposes
- Add Level - None
- Edit Level - None
- Delete Level - None
- Inquire Level - All
- Table Setup: Allows Liongard to create and edit our own configuration items and questions.
- Add Level - All
- Edit Level - None
- Delete Level - None
- Inquire Level - All

- Customize Table Setup: Allows Liongard to create configuration types.
- Click on link (customize) next to Table Setup
- Click on the arrows facing to the right to disallow Liongard access to all Table Setup options.
- Find the following entries in the Disallow Access to these table and click the arrow facing to the left to move the entries over to Allow Access to these
- Company / Configuration
- Company / Company Status
- Company / Company Type
- Service / Priority
- Service / Service Board
- Service / Source
- Company / Team Role (Optional)
- Opportunities / Sales Roles (Optional)
- Time / Work Role (Optional)
- Click Save to continue

Save Role
Click on the Save icon to save the Role's permissions

Step 3: Create a Roarbot API User in your ConnectWise Manage Account (v2018.5 and greater)
Liongard requires the ability to access your ConnectWise Manage account through an API Member. This account type does not require a user license.
ConnectWise ScreensThe ConnectWise screens for configuring an API user have been simplified starting in version 2018.5. The following steps are for the latest version. See below for instructions for earlier versions of ConnectWise Manage.
- In the lefthand navigation panel, navigate to System > Members > API Members
- You will now add in a RoarBot User by clicking on the "+" symbol in the submenu bar

Naming ConventionsPlease refer to your organization's naming convention policies when creating usernames. Usernames we state in the documentation are suggestions only.
- Fill out the New Member screen with the following recommended values
- Member ID: Liongard
- Member Name: RoarBot
- Role ID: Liongard (The Security Role created in the previous section)
The other required fields can be completed with values that make sense for your organization.

API Member DefaultsIt is critical that your API member has defaults set up including default Location and Territory. Please verify defaults are properly set up for the API member before continuing.

Step 3: Create a Roarbot API User in your ConnectWise Manage Account (v2018.4 and earlier)
Old Version AlertSkip this section and proceed to "Create an API Key..." below if you are running v2018.5 or greater.
- In the lefthand navigation panel, navigate to System > Members > API Members
- Add in a RoarBot User by clicking on the "+" symbol in the submenu bar
- Provide the user details for the Roarbot user.
- Member ID: Any name to identify the API account user
- License Class: API
- Password/Confirm: Fill this in, but it is not used since online console access will not be required.
- Disable Online: Check
- First Name: Roarbot
- Last Name: Liongard
- Role ID: Liongard (Role created in prior steps)
- Location: Your default location
- Level: Corporate (Level 1)
- Business Unit: Admin (suggested)
- Name: Corporate
- Time Approver: Select the default Time Approver
- Work Role: Office (suggested)
- Expense Approver: Select the default Expense Approver
- Default Territory: Default Territory

Step 4: Create an API Key under the Roarbot User Account
Finally, allocate an API Key under your new API user account.
- Click into the recently created Roarbot API Member
- Click into the API Keys tab
- Add an API Key by clicking on the "+" symbol in the submenu bar
- Add the Description and click the Save icon to generate the Keys
- Copy and save the Public Key and Private Key values to a secure place
Private KeyYou will not be able to access these the Private Key once you navigate away from this tab.

What's next?
Once our team is finished provisioning your Liongard instance, you'll receive an invite to log in. You can then log in and plug the API Key in Liongard to complete the ConnectWise Integration.
Updated 7 months ago