Ubiquiti UniFi
This document provides the steps required to configure the Ubiquiti Unifi Inspector.
Quick DetailsRecommended Agent: On-Demand
Supported Agents: On-Demand or Self-Managed
Is Auto-Discovered By: N/A
Can Auto-Discover: UniFi Child Inspectors
Parent/Child Type Inspector: Yes
Inspection via: API
Data Summary: Here
Overview
See it in Action
UniFi Cloud Access PortalThis Inspector does not support the UniFi Cloud Access Portal. If you are interested in this, please share your feedback using the in-app feedback form found in the Support dropdown in your Liongard.
UniFi Cloud KeysIf you are using UniFi Cloud Keys and want to deploy the UniFi Inspector, you must configure the Inspector with a Self-Managed Agent. If you are using UniFi Cloud Keys, the Inspector will fail if you configure the Inspector using the On-Demand Agent.
Inspector Setup Preparation
Read-Only Permissions & 2FA RestrictionsThe UniFi Inspector requires a UniFi Controller login with at least Read-Only Permissions to all sites on the controller.
The Unifi Inspector cannot inspect a device when 2FA is required for the given username/password. When this scenario occurs the inspector will result in a setup issue with the following message, "This device has two-factor login required, which is not compatible with inspection."
The exact process for preparing your UniFi controller may vary depending on your Ubiquiti device and firmware version. Please use the process that most closely resembles the options available on your UniFi controller.
For Older Ubiquiti Devices and Virtual Controllers
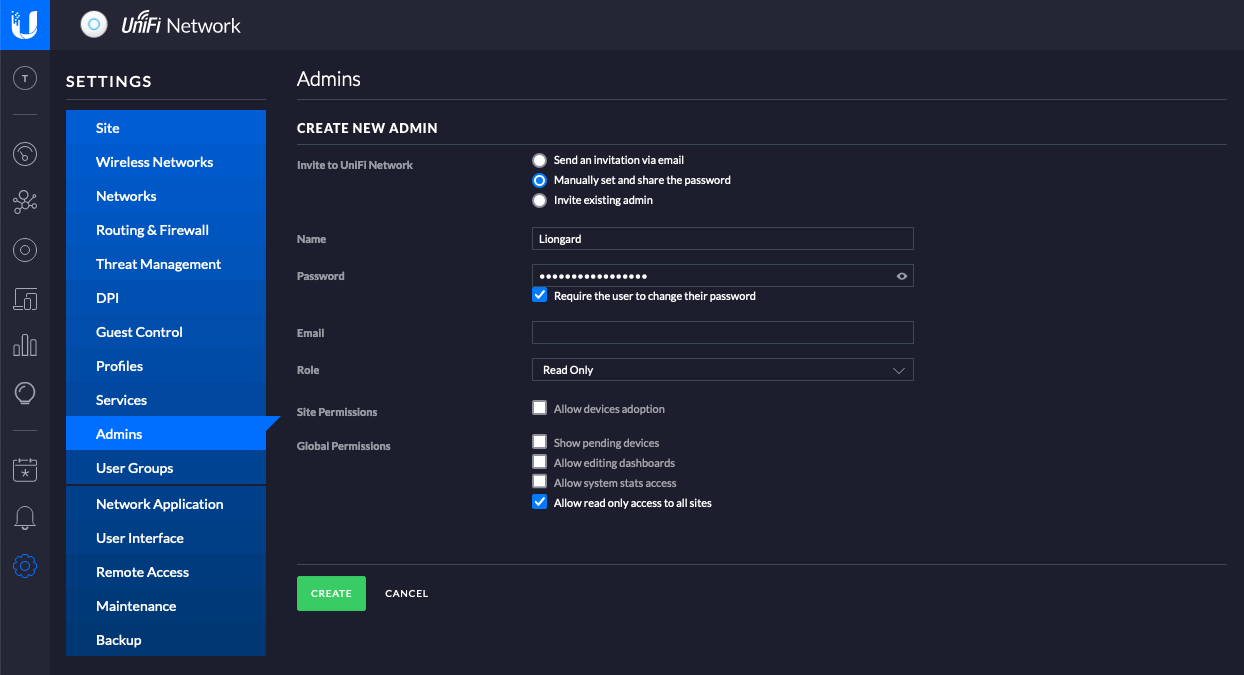
- On your UniFi Controller, navigate to Settings > Admin
- Create a new Admin with the "Read Only" role and select the, "Allow read only access to all sites" option.

For Newer Ubiquiti Devices (i.e. The Dream Machine Pro and Cloud Key Gen2)
Ubiquiti Unifi's MFA RequirementStarting in July 2024, MFA will be enforced on Ubiquiti Identity (UI) accounts. Partners that have configured their inspectors according to our requirements should not be impacted by this change. However, since Liongard is unable to bypass MFA, Inspections will fail for any partners that have configured the Inspector to run with a UI account.
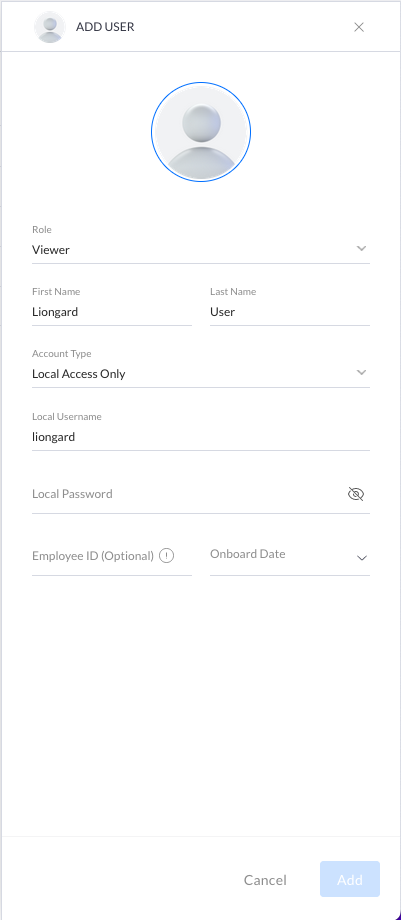
- On your UniFi Controller, navigate to the Users screen and click Add User
- Create a new user with the "Viewer" Role and the "Local Access Only" Account Type

Liongard Inspector Setup
Step 1: Parent Inspector Setup
Network AccessThe Liongard Agent that you use for this Inspector must be able to reach the UniFi Controller in question. If the UniFi controller you are managing is installed on-premises, you can use the self managed agent in those enviornments.
Child Discovery RequirementIn order to activate and properly inspector child discoveries for this inspector, you must setup the parent inspector using an agent with the "Global" Enviornment Scope, You can read more on how to change the scope here.
Since Ubiquiti UniFi is a multi-tenant system where a single portal is used to manage many Environments, you will set up a single "Parent" Inspector with read-only permissions login that will then auto-discover "Child" Inspectors for each Environment.
In Liongard, navigate to Admin > Inspectors > Inspector Types > Navigate to the Ubiquiti UniFi Inspector > Add System.
Fill in the following information:
- Type of Inspector: Parent
- Environment: Select your MSP's Environment
- Friendly Name: Suggested Naming: SP Name] UUbiquiti UniFi Parent
- **Agent:**Select On-Demand Agent or a Self-Managed Agent
- Inspector Version: Latest
- IP Address: The fully qualified domain name or IP Address of the UniFi Controller.
- Port: The network port on which the UniFi Controller is listening.
Default Local Ingress (Incoming) PortsTCP 443 Port used for application GUI/API as seen in a web browser. Applications hosted on a UniFi OS Console
TCP 8443 Port used for application GUI/API as seen in a web browser. Applications hosted on Windows/macOS/Linux and Gen 1 Cloud Key Consoles
Note: Changing the default port assignments can only be done on self-hosted Network applications (Windows/macOS/Linux).
Reference: https://help.ui.com/hc/en-us/articles/218506997-UniFi-Ports-Used
- Username: The read-only username set up earlier.
- Password: The password for the account created earlier.
- Scheduling: The Inspector will default to run once a day at the time the Inspector is set up. Here you can adjust the schedule
Select Save. The Inspector will now be triggered to run within the minute.
Step 2: Child Inspector Setup
After the first run of the Parent Inspector, your client Ubiquiti UniFi organizations will be Auto-Discovered in the Discovered Systems tab on the Inspectors > Ubiquiti UniFi page.
Navigate to the Discovered Systems tab in your Inspectors > Ubiquiti UniFi page
- Activate or Archive your Discovered Systems by ensuring that they're mapped to the correct Environment > Check the checkbox to the left of Inspector(s) > Select the Actions drop down menu > Activate Launchpoints
If Child Inspectors are not auto-discovered, this likely indicates that the Environment in the Ubiquiti UniFi portal does not have any child sites configured in addition to the standard default site. If this condition exists, child inspectors will need to be manually created.
Fill in the following information:
- Type of Inspector: Child
- Parent: Select the parent Inspector previously created
- Environment: Select the designated Environment
- Friendly Name: Suggested Naming: nvironment Name] UUbiquiti UniFi Child
- **Agent:**Automatically populated after selecting Parent field
- Inspector Version: Latest
- Site Name: Enter: default
- Scheduling: The Inspector will default to run once a day at the time the Inspector is set up. Here you can adjust the schedule
Optional: Turn on Flexible Asset/Configuration Auto-Updating
If you would like this Inspector's data to be sent to ConnectWise and/or IT Glue, turn on Flexible Assets/Configurations for this Inspector:
- ConnectWise: Admin > Integrations > ConnectWise > Configuration Types > Confirm the "Configuration Auto-Updating" toggle is enabled
- IT Glue: Admin > Integrations > IT Glue > Flexible Assets > Confirm the "Flexible Asset Auto-Updating" toggle is enabled
Updated 4 months ago
