How to Set up Actionable Alerts
Overview
Pre-work: Set up your PSA (Ticketing System) or Email IntegrationIf you would like Liongard to send tickets to your PSA, Microsoft Teams, or email(s), you must complete a basic integration of Liongard to your PSA, Microsoft Teams, or email(s).
Follow the instructions below to get started with these integrations:
In order to set up Liongard's Actionable Alerts, you will need to turn on rules in templates, and then, apply those templates to Environments.
Templates allow you to bundle rules, depending on how you are using the alerts, as well as determine where you would like the alerts to land.
Liongard's Actionable Alert templates can be:
- Assigned to a specific destination board/queue in your PSA
- Assigned to a specific email address(es)
- Scoped to only include the rules that you care about
- Applied to the Environments that you specify
In Liongard, navigate to Admin > Actionable Alerts. Here you'll see three tabs:
Rules Tab
The Rules tab displays all Actionable Alert rules that can be added to templates to trigger alerts.
Rules are based on Metrics. You can use Liongard's rules or you can create your custom Actionable Alert rules. To learn how to write a custom Actionable Alert, please review our documentation.
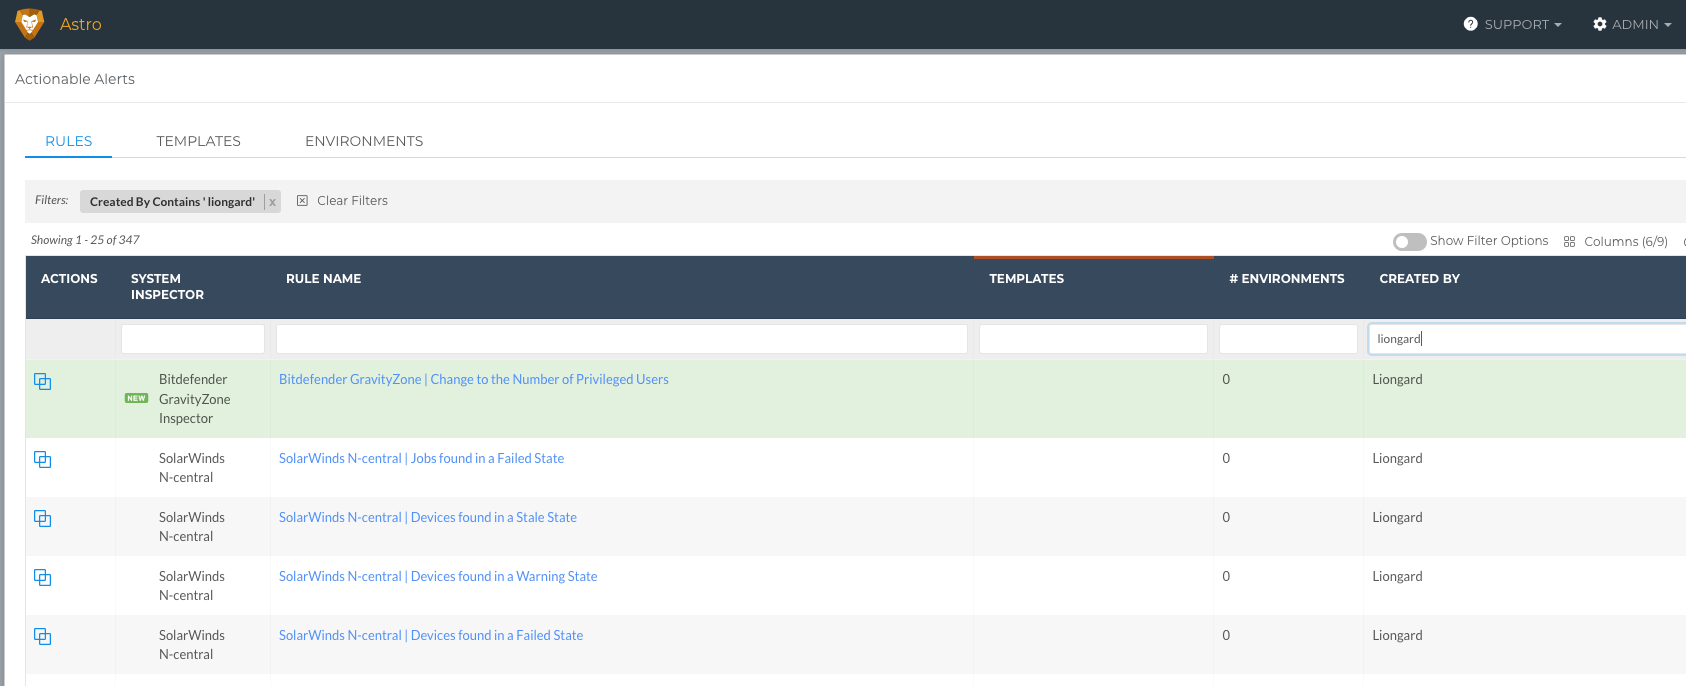
- Actions: Edit custom rules or clone existing rules
- System Inspector: Identifies the Inspector associated with the rule
- Rule Name: Name of the rule
- Templates: Indicates for which Template(s) the rule is enabled
- # Environments: Total number of Environments, across templates, the rule is applied to
- Created By: Identifies who created the rule. All rules created by Liongard will read "Liongard"
- Create Rule: Rule Builder for creating a custom Actionable Alert rule
Allowlist Users to Active Directory User-Related Liongard Alert: RoarExclude GroupActive Directory and Azure Active Directory Actionable Alert rules can be configured for Liongard created metrics that support the RoarExclude group filter. The RoarExclude group filter will prevent alerts from triggering for users that are part of the RoarExclude group. To utilize this feature, you will need to create a Security Group named “RoarExclude”.
The following Active Directory metrics support the use of the RoarExclude group:
- Active Directory: Active Users Count (Exclusions Supported)
- Active Directory: Active Users List (Exclusions Supported)
- Active Directory: Age of Oldest Non-Privileged User Password
- Active Directory: Age of Oldest Privileged User Password
- Active Directory: End of Life Workstations (Excludes Roar Group)
- Active Directory: Non-Privileged Users with Stale Password List
- Active Directory: Privileged Users with Stale Password List
- Azure Active Directory: Active Users Count (Exclusions Supported)
- Azure Active Directory: Active Users List (Exclusions Supported)
Templates Tab
On the Templates tab, you can create or clone templates or edit existing templates. Templates determine where alerts land.

- Actions: Edit or clone templates
- Order: The Order field helps Liongard choose which destination to land alerts. Essentially, if two rules are enabled in two different templates, that are assigned to two different destinations, there's a potential for Liongard to land the same ticket in two different places - we don't want that. Whichever template has a lower number Order, means it has a higher priority.
- Template Name: Name of the template
- Status: Active or Inactive. In order to trigger alerts, a template must be Active.
- Auto-Apply: If a Template is set to Auto-Apply when new Environments are added the template will be automatically applied
- Environment Count: Number of Environments the template applies to
- Applies To: Indicates where alerts will land once triggered
- Destination: If a PSA or Email is indicated in the "Applies To" column, the Destination column will state which board/queue/email(s) the alerts will land once triggered
- Created On: Date the template was created on
Template DestinationWhen setting a Template from "Liongard Only" to "Liongard & PSA (or email(s))," any previously triggered alerts will be pushed to the new destination (PSA or Email(s)) upon the Inspector's next run.
Liongard's Example Template
Liongard includes an Example Template that is meant to be a starting point for using Liongard's Actionable Alerts. For more information on this template, please visit our documentation here.
Environments Tab
Templates must be applied to Environments in order to trigger alerts. On the Environments tab, you can apply templates to Environments.
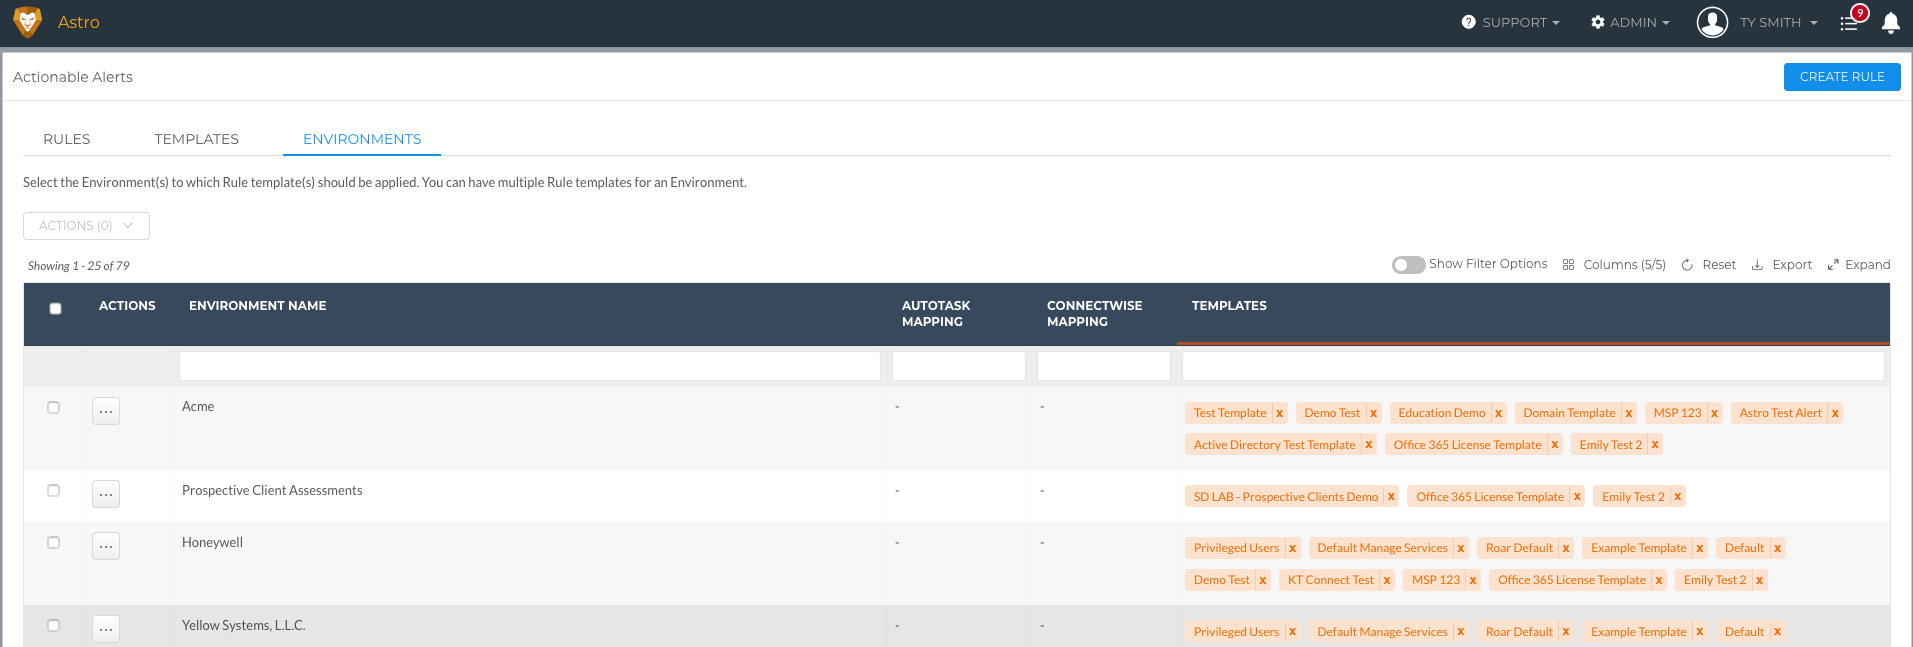
- Actions: Edit the templates applied to an Environment
- Environment Name: Environment name
- ConnectWise Mapping: Indicates whether a mapping is established for ConnectWise
- Autotask Mapping: Indicates whether a mapping is established for Autotask
- Templates: Lists the templates applied to the Environment
Setting Up Actionable Alerts
Step 1: Create a Rules Template
There are two ways to create a rules template:
Create a New Template
Navigate to Admin > Actionable Alerts > Templates > Click New Template
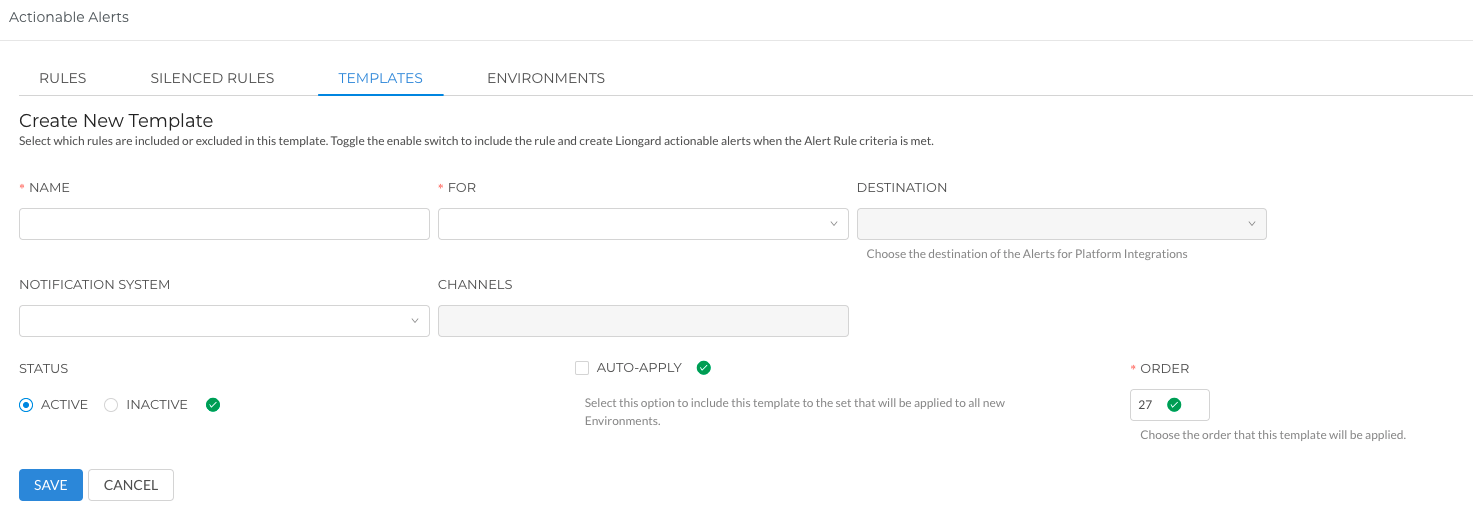
- Fill in the following fields:
- Name the template
- In the For field, select where you would like Liongard to direct this template's triggered alerts
- Destination Field: If you selected Liongard and one of the PSA Integrations or Email, select which service board/ticket queue/email(s) for which you would like alerts to land. Prior to selecting a service board/ticket queue/email, you must map its Statuses and Priorities in the Admin > Integrations > PSA > Ticketing tab and/or configure the email address on the Admin > Integrations > Email screen. If selecting email as a destination, you can also choose whether the email format for these alerts should be Plain Text or HTML Based
- Email Format: If you selected Liongard & Email, you can choose the Email Format of email tickets for this template. The Email Format selected on the Admin > Integrations > Email screen will be selected by default.
- Notification System: If you have set up your Microsoft Teams integration, here you can select Microsoft Teams.
- Channels: Selecting Microsoft Teams in the Notification System field will enable this field. Here you are able to select any configured Microsoft Teams Channels.
- Status: Select Active. A template must be Active to trigger alerts
- Auto-Apply: Select if you would like the template to be auto-applied to any new Environment(s) added into Liongard after creating this template
- Order: Assign a priority to this template in the Order field
- The lower the number, the higher the priority. "1" is the highest priority.
- All templates need to be assigned an Order
- You can also change the Order of a template in the Actionable Alerts > Templates tab by selecting the three lines next to the Order number and moving it up or down.
Order: Same Rule, Different TemplateThe same rule can be enabled in two separate templates. However, if those two separate templates have two different Applies To configurations, then the rule will trigger for both templates. However, if those separate templates have the same Applies To configurations but different Destination configurations and were both applied to one Environment, then Liongard will only land the rule in the Destination of the template with the highest priority (lowest order).
- Now you can enable rules either by individually toggling them on in the Enabled column or by bulk selecting the checkboxes to the left of multiple/all Rules. Then, in the Actions menu above the Rules table, select Turn On.
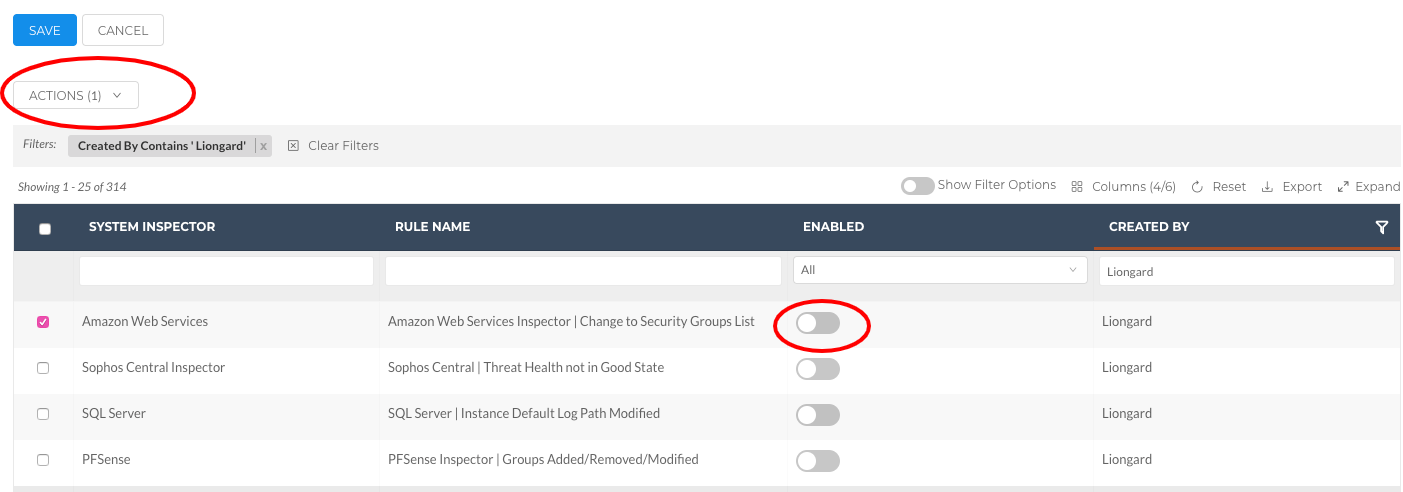
- Select Save
Clone an Existing Template
Navigate to Admin > Actionable Alerts > Templates > Click the double-box icon next to the Template you would like to Clone.

- Edit the following fields:
- Name the template
- In the For field, select where you would like Liongard to direct this template's triggered alerts
- Destination Field: If you selected Liongard and one of the PSA Integrations or Email, select which service board/ticket queue/email(s) for which you would like alerts to land. Prior to selecting a service board/ticket queue/email, you must map its Statuses and Priorities in the Admin > Integrations > PSA > Ticketing tab and/or configure the email address on the Admin > Integrations > Email screen
- Email Format: If you selected Liongard & Email, you can choose the Email Format of email tickets for this template. The Email Format selected on the Admin > Integrations > Email screen will be selected by default.
- Notification System: If you have set up your Microsoft Teams integration, here you can select Microsoft Teams.
- Channels: Selecting Microsoft Teams in the Notification System field will enable this field. Here you are able to select any configured Microsoft Teams Channels.
- Status: Select Active. A template must be Active to trigger alerts.
- Auto-Apply: Select if you would like the template to be auto-applied to any new Environment(s) added into Liongard after creating this template
- Order: Assign a priority to this template in the Order field
- The lower the number, the higher the priority. "1" is the highest priority.
- All templates need to be assigned an Order
- You can also change the Order of a template in the Actionable Alerts > Templates tab by selecting the three lines next to the Order number and moving it up or down.
- Now you can enable, or disable, rules either by individually toggling them on or off in the Enabled column or by bulk selecting the checkboxes to the left of multiple/all Rules. Then, in the Actions menu above the Rules table, select Enable Rule or Disable Rule
Step 2: Assign your Template(s) to an Environment(s)
Navigate to Admin > Actionable Alerts > Environments
Here is where you will assign your template(s) to an Environment(s).
Once complete, this template will start triggering Actionable Alerts.
PSA Ticketing Integration: Environments must be MappedIf you are taking advantage of our PSA integrations, prior to applying a template to an Environment, the Environment must be mapped in the PSA Integration.
If it is mapped, you will see a green checkmark next to the Environment name. If it is not mapped correctly, there will be a dash. If you would like to learn how to map Environments, visit our documentation:
To apply a template to an Environment:
- Select or bulk select the checkboxes to the left of the Environments for which you would like to assign a template
- In the Actions menu above the Environments table, select Apply Template(s) to Selected
- A popup will appear. Select the checkboxes to the left of the templates that you would like to apply to your previously selected Environments
- Select Save in the top right corner
Step 3: Review Open Actionable Alerts
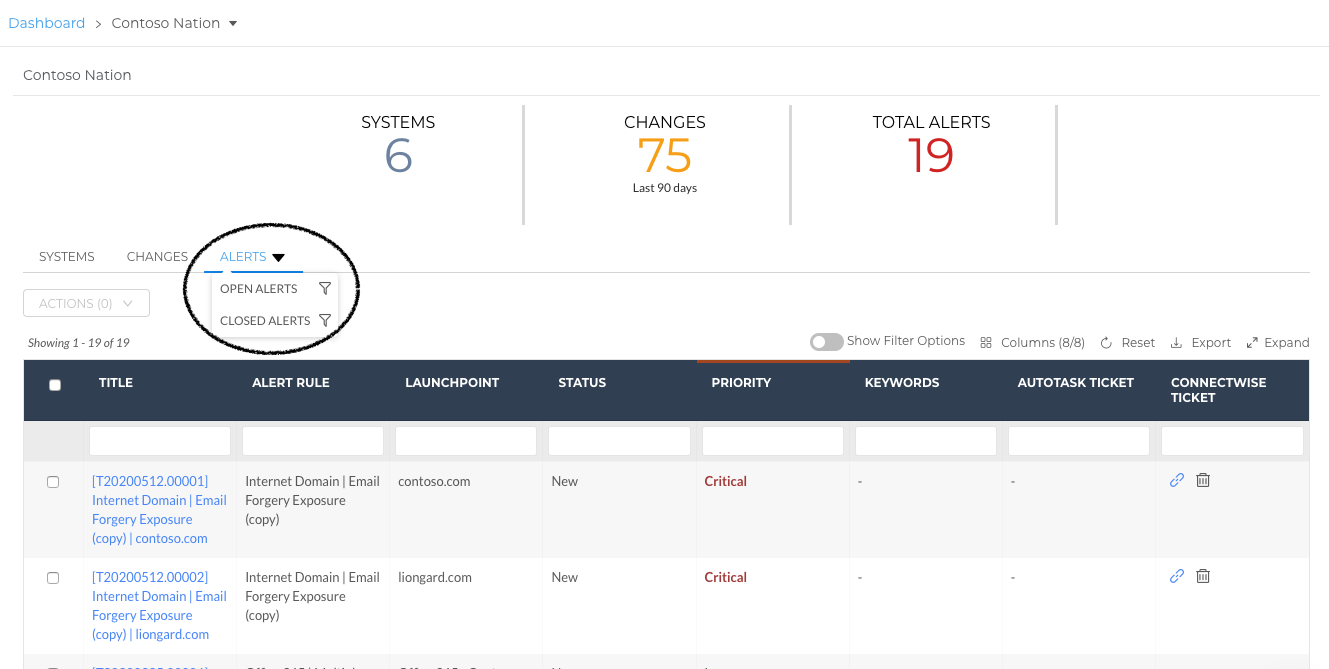
Now that you have successfully set up a template and applied it to Environments, alerts will start to trigger as the criteria for rules are met. To review open alerts, you can navigate to your Dashboard > Total Open Alerts, or you can navigate to an Environment's Dashboard Dashboard > Environments tab > Click into an Environment > Total Alerts
Closing Liongard's Actionable Alerts
Liongard's Actionable Alerts will automatically trigger if a rule's criteria are met. If you no longer want an alert to trigger for a rule, you must disable the rule in any active template(s). Disabling a rule that has open Actionable Alerts will hide those alerts from the Liongard platform; therefore, we recommend closing any tickets open in your PSA and Liongard prior to disabling the rule.
To disable a rule in an active template, navigate to Admin > Actionable Alerts > Templates > Select the Three Dots next to the Template > Edit the Template.
In the rules table, find the rule you want to turn off and turn the toggle, in the Enabled column, to "off." Once you save the template, Liongard will no longer push any alerts for this rule to Liongard, your PSA, or Email inbox(es).
As a best practice, we also recommend closing any tickets that the PSA already generated for this alert to avoid stale tickets. If you decide to turn the rule back on, this will enable Liongard to create a fresh alert in your PSA, instead of updating the stale ticket.
Bulk Close Alerts
Once a rule is triggered and an alert is created, you can close open alerts on the Dashboard > Open Alerts tab as well as on an Environment's Single Environment Dashboard > Total Alerts tab.
Closing an Alert will make the status of the alert "Closed-Complete."
- Navigate to the Dashboard > Open Alerts tab or the Environment's Single Environment Dashboard > Total Alerts tab.
- In the lefthand column, single or bulk select the alerts you would like to close
- In the Actions menu, select "Close Alerts"
- You will then be prompted to confirm you would like to close these alerts. If you are, select Yes.
You have now closed the selected alerts. If you would like to view closed alerts, navigate to an Environment's Single Environment Dashboard.
- Navigate to Dashboard > Environments tab > Click into an Environment
- Click into the Total Alerts tab and filter by "Closed Alerts"
Updated 5 months ago
