Turn on Liongard's IT Glue Flexible Asset Auto-Updating
Learn how to turn on IT Glue Flexible Asset updating, test the integration, and organize Liongard's Flexible Assets in IT Glue.
Enabling Liongard's IT Glue Integration will allow your team to access automated system configuration and status details directly in IT Glue.
Will Liongard update my existing Flexible Assets?
No, Liongard creates new Flexible Assets in IT Glue with rich HTML tables. Liongard's Flexible Assets will end in (auto). Existing Flexible Assets will not be overwritten.
The data in Liongard's Flexible Assets auto-updates upon each Inspectors' run, giving your team accurate and deep visibility across systems. This fast access to data means your team can spend less time logging into different systems.
Enabling the Flexible Asset Integration
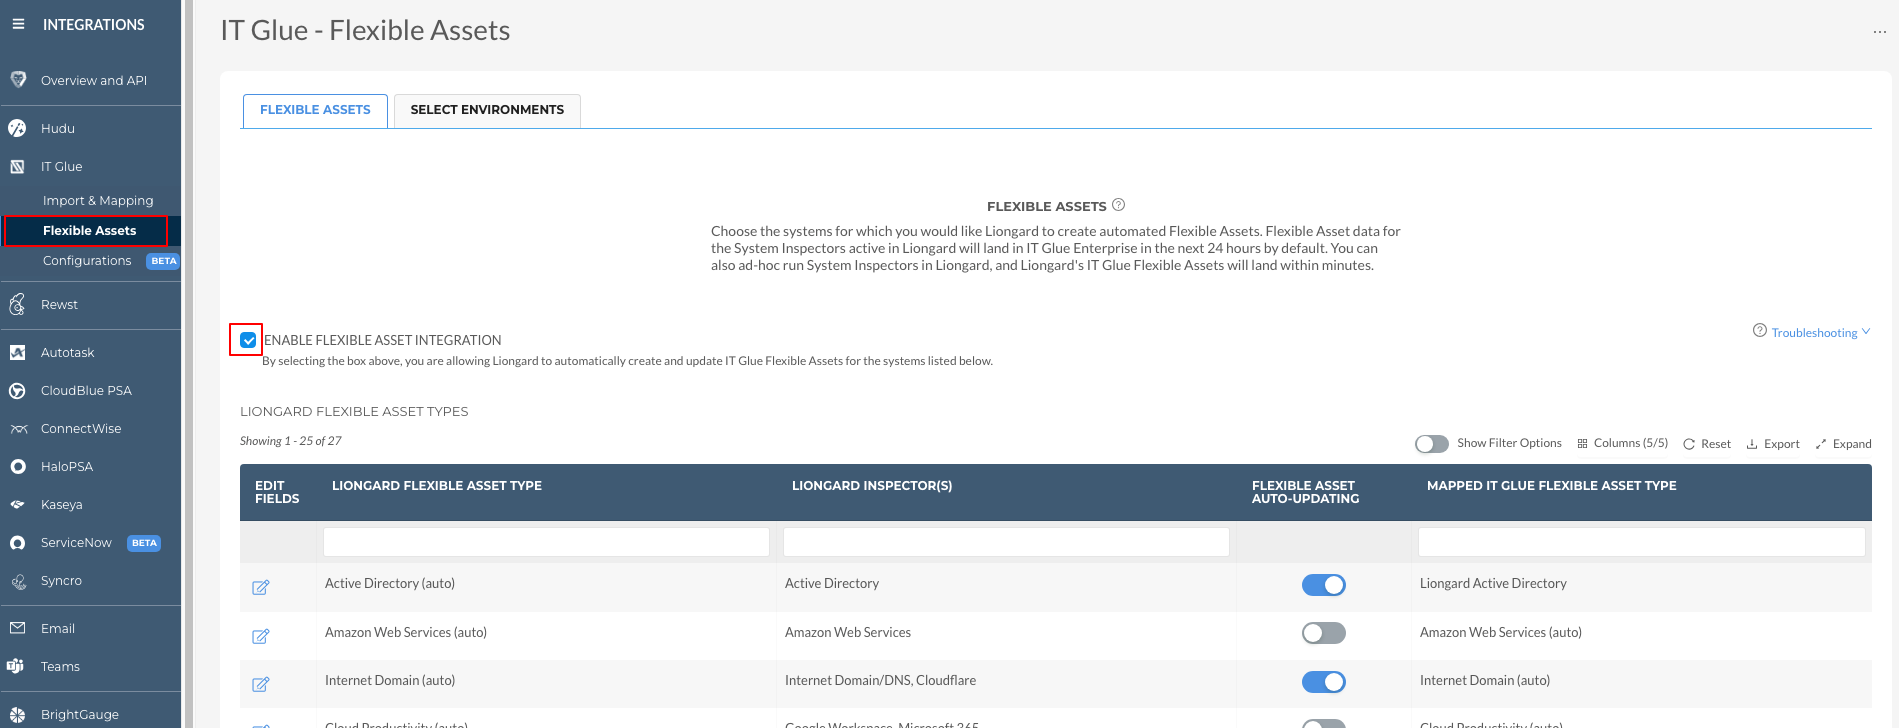
Step 1: Turn on the Global On/Off Switch
- In Liongard, navigate to Admin > Integrations > IT Glue > Flexible Assets
- Navigate to the Flexible Assets tab
- Check the Enable Flexible Asset Integration checkbox
Step 2: Turn on Flexible Asset Auto-Updating
Determine which Flexible Asset Types that you'd like to turn on by looking at the Liongard Inspector(s) column to see which Inspectors' data will be pushed into that Flexible Asset Type
- Select the Flexible Asset Types that you want Liongard to auto-update by toggling the switch under the Flexible Asset Auto-Updating column.
- Select Save
Turning Flexible Assets OnWhen you turn a Flexible Asset on for the first time, it will be created in IT Glue after you save your changes.
In order to see it in your IT Glue left sidebar, you will need to customize your sidebar, and add it in.

Step 3: Scope Down your IT Glue Flexible Asset Types
The Edit Fields column lets you select which Fields you want Liongard to push over for each Flexible Asset Type.
You have three options for each section of data:
- Include the full data in the Flexible Asset
- Include only a Link to Liongard for your team to view this data in Liongard
- Exclude the data from the Flexible Asset all together
To edit a Field, select the Pencil icon in the Edit Fields column.

Choosing Table Options
Liongard's data can be sent to IT Glue in table form or, for some Inspectors, as individual fields.
The following Inspectors currently have the option to select fields instead of tables (or both):
- Active Directory
- Amazon Web Services
- BitDefender
- Cisco Meraki
- Google Workspace
- Hyper-V
- Internet Domain/DNS
- Microsoft 365
- Network IP
- SQL Server
- VMware ESXi
- Webroot
- Windows Server

Selecting Individual Fields vs. Selecting Tables
Once you've edited the Fields, select Save in the upper right corner.
Liongard Tables and IT Glue Global SearchThe contents of Liongard Tables are not searchable using IT Glue's global search function. To ensure that the table data is searchable, set the table options for the individual table fields to "Include" (as illustrated in the screenshot above) and re-run any applicable Inspectors.
Step 4: Turn on Individual Environment's Flexible Asset Auto-Updating
- Navigate to the Select Environments tab to select which organizations you'd like Liongard to auto-update.
- If you would like to turn on the Flexible Asset Auto-Updating capability for new Environments by default, check the Flexible Asset Auto-Updating Enabled by Default checkbox.
- Toggle the switch on or off under the Flexible Asset Auto-Updating column

An Inspection must run for the Flex Asset to appear in IT GlueOnce you have configured the IT Glue integration and turned on the Flexible Asset auto-updating, you must either wait until a scheduled inspection runs or manually run the Inspector.
Once the inspection is complete, the inspection data will land in IT Glue.
Testing the Flexible Asset Integration
To do a controlled test of Liongard's IT Glue integration, you can toggle on auto-updating for one company and one system, along with the global on/off switch.
Make sure this company has an Inspector for the System you selected. The Flexible Asset in IT Glue will be generated the next time an inspection runs.
To run an inspection manually, navigate to Admin > Inspectors, and select the System you want to run. Clicking the play button next to any inspector will run it.
Customizing IT Glue Flexible Asset SidebarIf you customize your IT Glue sidebar and don’t see any assets, but you know they’ve been created, this is likely due to a bug that has been reported in IT Glue. To workaround this limitation, on the Account, select the Flexible Asset Type, Disable it, press Save, Enable it again, press Save, and they should appear.
Updated 9 months ago