

ThreatLocker (Beta)
Quick DetailsRecommended Agent: On-Demand
Supported Agents: On-Demand and Self-Managed
Is Auto-Discovered By: N/A
Can Auto-Discover: ThreatLocker Child Inspectors (one per Organization)
Parent/Child Type Inspector: Yes
Inspected via: API
Default Frequency: Daily. (max every 8 hours)
Data Summary: Here
Overview
ThreatLocker Inspector (Beta)
You can now use the ThreatLocker Inspector (Beta) to gain centralized visibility into your managed organizations' endpoint security posture directly from ThreatLocker. The inspector automatically discovers each organization in your ThreatLocker portal and creates a dedicated child inspection, giving you organization-specific insights without additional configuration.
What you can monitor
The ThreatLocker Inspector collects key security and configuration data for each organization, including:
- Endpoint inventory (computers and mobile devices)
- Application Control policies
- Network Control policies
- Storage Control policies
- Detect policies
- Configuration Manager settings
- Local administrator assignments
- Portal users
How it works
A parent launchpoint authenticates to your ThreatLocker MSP portal and automatically discovers each managed organization. Liongard then creates a child launchpoint for every organization, allowing each environment to independently collect and report its own device inventory, policies, and security posture.
Benefits
- Monitor endpoint security across all managed organizations from a single integration.
- Automatically discover and inventory ThreatLocker organizations.
- View organization-specific security policies and device posture in separate Liongard Environments.
- Simplify security reviews, compliance reporting, and operational visibility with continuously collected ThreatLocker data.
Inspector Setup Preparation
Prerequisites & Access RequirementsTo configure the ThreatLocker Inspector, ensure you have the following:
- A ThreatLocker Portal account with MSP/admin-level access
- An API token created in the ThreatLocker portal (Manage → Users → API Users), scoped to the topmost org it should read — scope is anchored at token creation and cannot be changed later
- The token's role must be Read Only — but the built-in Read Only role is not sufficient by itself. See Read Only Role — Required Permissions immediately below before creating the token.
- The Organization's Instance ID (MSP org GUID) and region segment (Instance)
Inspector Setup:
Read-Only Role — Required Permissions
The ThreatLocker Inspector requires a read-only service account with specific permissions to successfully collect data from the ThreatLocker Portal.
The built-in Read-Only role provides most of the required permissions, but it is not sufficient on its own. You must add several additional permissions before using the account with the Liongard ThreatLocker Inspector.
Important: The built-in Read-Only role does not include View Organizations. Without this permission, the parent inspector cannot discover managed organizations, resulting in zero child organizations being created.
Prerequisites
Before you begin, ensure you have:
- Administrator access to the ThreatLocker Portal
- A dedicated service account for the Liongard Inspector (recommended)
Step 1: Assign the Built-In Read-Only Role
Create or edit the user that will be used by the ThreatLocker Inspector.
Assign the built-in Read-Only role.
The built-in role already includes the following permissions:
- View Approvals
- View Administrators
- View Computers
- View Unified Audit
- View Health Center
- View Reports
- View System Audit
- View Configuration Manager
- View All ThreatLocker Detect Policies
- View All ThreatLocker Detect Remediations
- View All ThreatLocker Detect Threats
Note: ThreatLocker's documentation may refer to the Detect permissions without the word "All." When configuring permissions in the portal, use the actual permission names shown in the UI, which include "All."
Step 2: Add the Required Permissions
In addition to the built-in Read-Only permissions, manually enable the following permissions.
| Permission | Required | Purpose |
|---|---|---|
| View Organizations | ✅ | Required for parent discovery of managed organizations. Without this permission, no child organizations are discovered. |
| View Mobile Devices | ✅ | Collects mobile device inventory. |
| View Application Control Policies | ✅ | Collects Application Control policies. |
| View Local Admin Settings | ✅ | Collects Local Administrator settings and policies. |
| View Network Control Policies | ✅ | Collects Network Control policies. |
| View Storage Control Policies | ✅ | Collects Storage Control policies. |
| View Computer Groups | ✅ | Collects Computer Group membership information. |
Understanding View Computer Groups
The View Computer Groups permission is required separately from View Computers.
These permissions serve different purposes:
- View Computers allows the inspector to inventory computers.
- View Computer Groups allows the inspector to determine which Computer Group each device belongs to.
Both permissions are required to populate the Computer Groups data view.
Verify Permissions
Before configuring the ThreatLocker Inspector, verify that the service account has:
- The built-in Read-Only role
- All seven additional permissions listed above
Once these permissions are configured, the ThreatLocker Inspector can successfully discover organizations and collect inventory, policy, and configuration data across your ThreatLocker environment.
Step 3: Creating the API Token in the ThreatLocker Portal
-
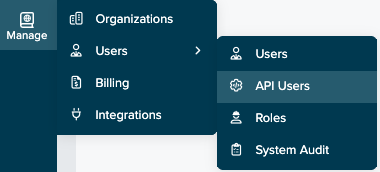
Log in to the ThreatLocker portal and navigate to API Users.
-
Manage -> Users -> API Users.
-
-
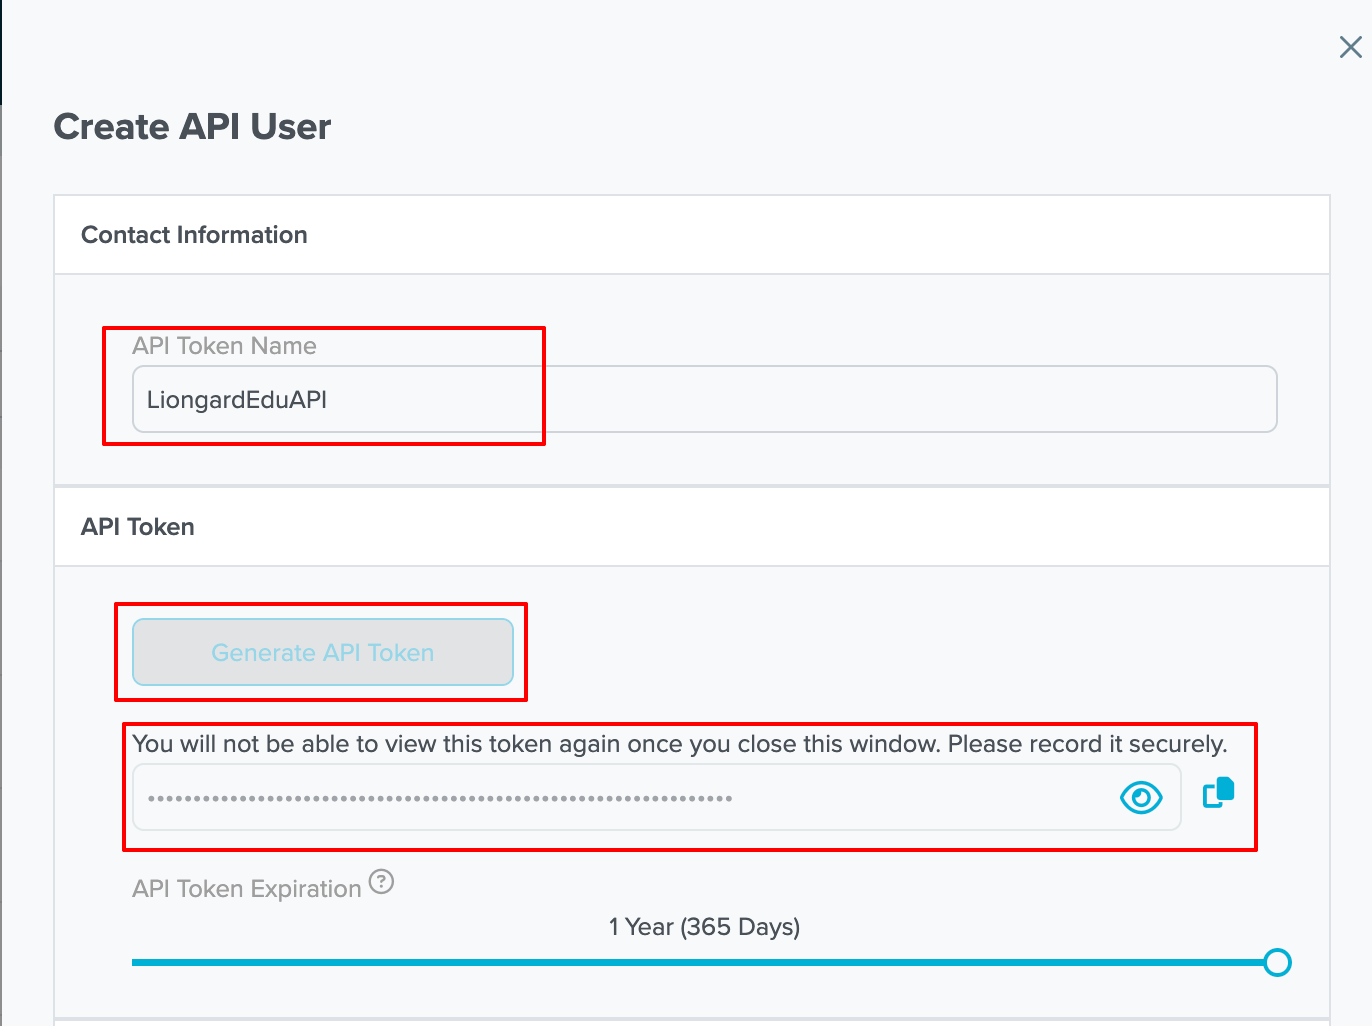
Select New API User.

-
API Token Name — enter a descriptive name (e.g., liongardAPI).
-
Click Generate API Token, copy the value, and securely document it. This is what gets pasted into the Liongard launchpoint's API Token field.
-
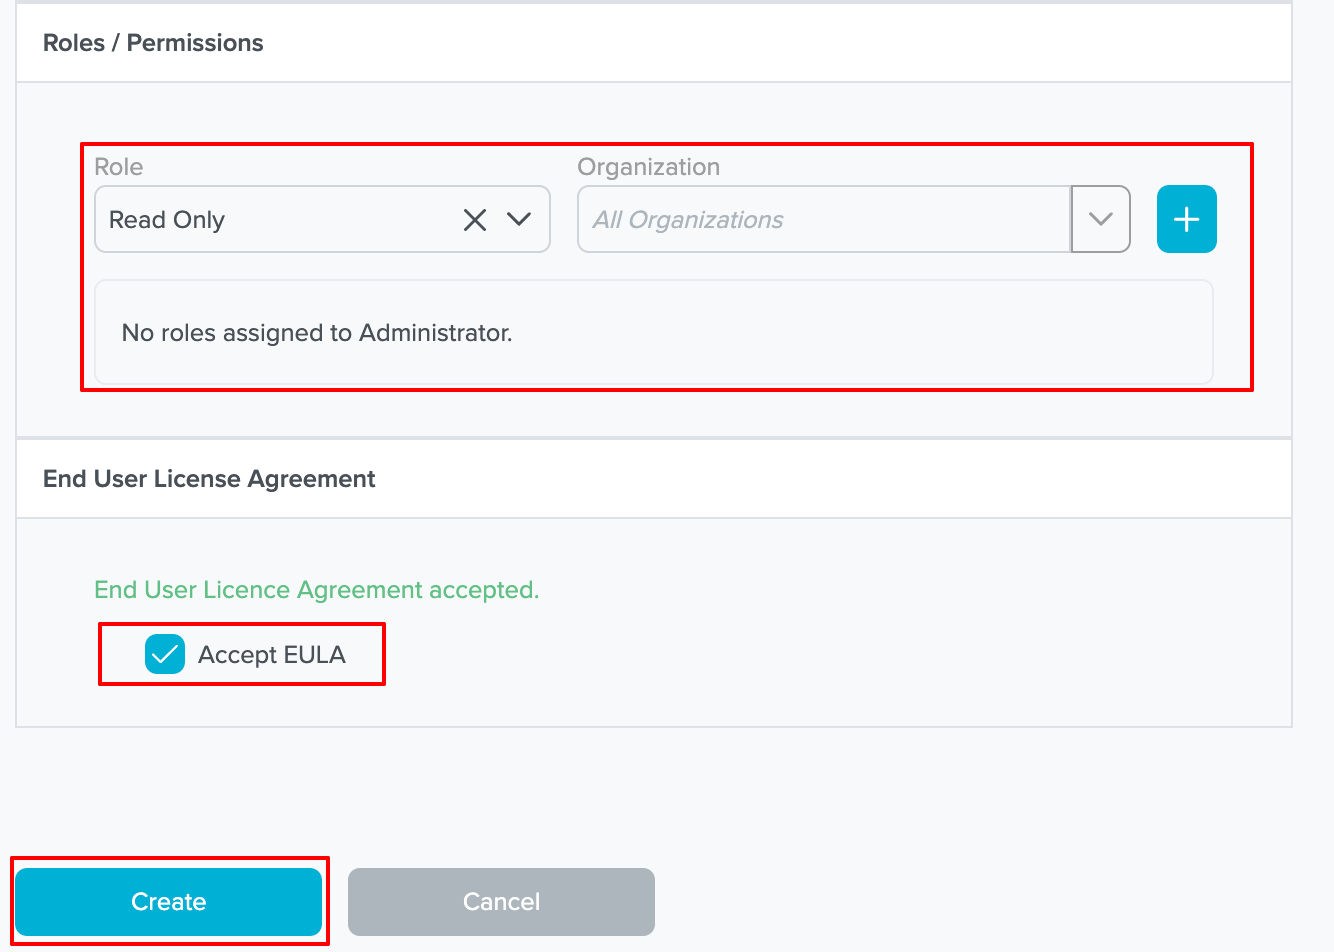
Role: Select Read Only from the dropdown, then add the permissions listed in Read Only Role — Required Permissions above — the built-in role alone is not sufficient. (Administrator, Billing, and Owner should not be used for this integration.)
-
Organization: Recommended to keep the default setting (All Organizations).
NOTE!! Role scoping is restrictive, not additive:- An unscoped Read Only role reads the parent/MSP and all children automatically.
- A role scoped to specific organizations is restricted to only those organizations—you must explicitly include the parent and every child you want inspected.
- A role scoped to the parent only silently returns just the MSP org with no children discovered — this comes back as an HTTP 200, not an error, so the only symptom is zero Discovered child launchpoints.
- Even with correct scope (parent + every desired child), the role also needs the correct permissions — most critically View Organizations, which is not included in ThreatLocker's built-in Read Only role by default. A permissions gap produces the exact same symptom as a scope mistake (HTTP 200, zero Discovered children). See Required Permissions above.
For full data coverage, the target Organization needs these ThreatLocker modules enabled:
- Allowlisting
- Elevation
- Storage Control
- Network Control
- Web Control
- Configuration Manager
- Endpoint/Cloud Detect
- Ringfencing
- Patch Management
A disabled module doesn't fail the inspector run, that section(s) just comes back empty.
-
Check Accept EULA, then select Create.
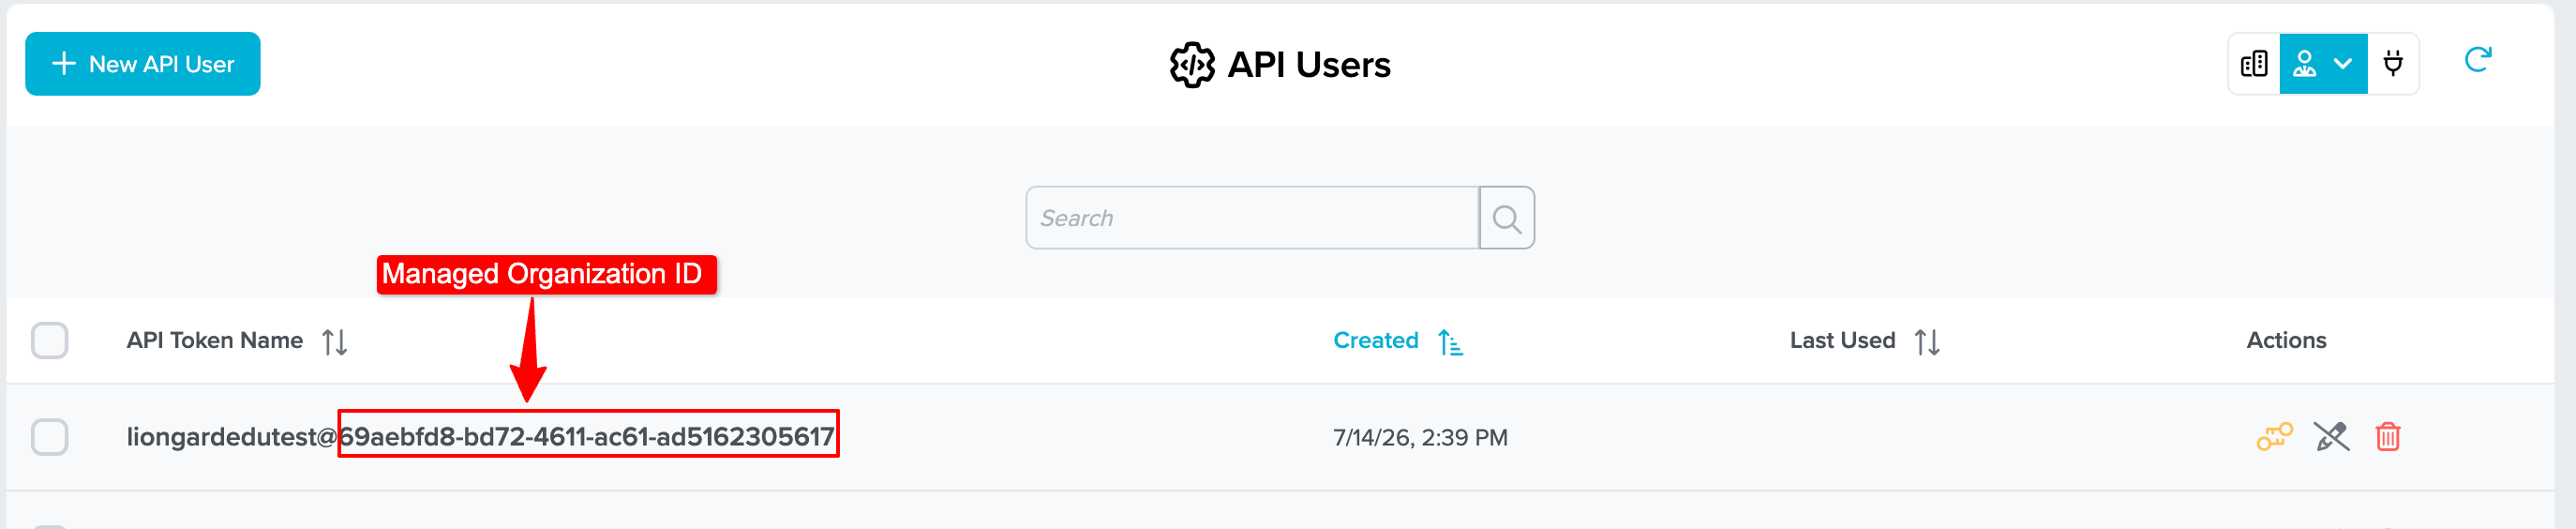
Once created, the token appears in the API Users list named [token name@GUID]. The GUID is the Managed Organization ID referenced throughout this guide, and it also appears as [?mo=GUID] in the portal's URL when that organization is selected.

Step 4: Configure the ThreatLocker Inspector in Liongard
- Log in to the Liongard platform.
- In Liongard, navigate to Admin > Inspectors > Inspector Types > Navigate to the ThreatLocker Inspector > Select Add System.
Since the ThreatLocker Inspectors are multi-tenant systems where a single portal can be used to manage many Environments, you will set up a single "Parent" Inspector that will then auto-discover "Child" Inspectors for each Environment.
Fill in the following information:
- Type of Inspector: Parent
- Environment: Select your MSP's Environment
- Friendly Name: Suggested Naming: [Customer Name] ThreatLocker Parent
- Agent: Select On-Demand Agent
- Inspector Version: Latest
- Region: Instance: Regional segment of the ThreatLocker API host (portalapi.{region}.threatlocker.com). To find it, click the Help button (top right of the ThreatLocker portal) and read the value in parentheses next to "ThreatLocker Access" (e.g. (g)).
- Managed Organization ID: The MSP (parent) organization's Managed Organization ID (GUID). Shown after the @ in the API token name on the Manage -> Users -> API Users page (e.g. sandbox@
- API Token: Generated under Manage -> Users -> API Users in the ThreatLocker portal.
- Scheduling: The Inspector will default to run once a day at the time the Inspector is set up. Here you can adjust the schedule
- Select Save. The Inspector will now be triggered to run within the minute.
Step 3: Child Inspector Setup
After the first run of the Parent Inspector, your client ThreatLocker organizations will be auto-discovered in the Discovered Systems tab on the Inspectors > Appropriate ThreatLocker Inspector page.
- Activate or Archive your Discovered Systems by ensuring that they're mapped to the correct Environment > Check the checkbox to the left of Inspector(s) > Select the Actions drop-down menu > Activate Launchpoints
- Click Save.
Troubleshooting
- Bad credentials on parent run — fails with an actionable setup error (token reset vs. Read Only guidance); the token itself is never logged.
- Some sections come back empty — check whether the relevant module is enabled for that Organization in the ThreatLocker portal; disabled modules degrade to empty arrays rather than erroring, and the Liongard UI logs a "Skipping
" breadcrumb for the affected endpoint. - No child launchpoints discovered — the token's role is likely scoped to the parent org only; re-scope it as unscoped Read Only, or explicitly add each child org to the role. Also check that the role has the View Organizations permission — ThreatLocker's built-in Read Only role does not include it by default, and a missing permission produces the identical symptom even with correct org scope.
- Local Admin sections empty on a specific child — confirm the Elevation module is enabled for that Organization.
- MSP's own internal ThreatLocker usage doesn't appear as an Organization — this isn't a discovery bug. ThreatLocker doesn't automatically create an organization object for your own internal usage; if you want Liongard visibility into your MSP's own ThreatLocker usage, create a dedicated child organization for it in the ThreatLocker portal, the same way you'd onboard any managed customer.
Known V1 Gaps
No standalone Applications catalog (covered by Application Policies; endpoint was also unstable), no standalone Web Control domain (folded into Network Policies under Portal 4.0), ActionLog/SystemAudit are out of scope, and grandchild organizations (an organization nested under a child organization) are not discovered — only direct children of the top-level/parent org are found.
Updated 3 months ago