Network Discovery
These instructions will assist with properly setting up the Inspector for network auto-discovery..
Quick DetailsRecommended Agent: Self-Managed
Supported Agents: Self-Managed
Is Auto-Discovered By: Windows Server Inspector
Can Auto-Discover: Fortinet Fortigate Inspector, HP ProCurve Inspector, SonicWall Inspector, Synology NAS Inspector, WatchGuard Inspector
Parent/Child Type Inspector: No
Inspection via: CLI
Data Summary: Here
Overview
See it In Action
NoteThis is a cross-platform Inspector that does NOT require any dependencies to be installed on the system.
Subnet LimitationThe Network Discovery inspector can not scan a subnet larger than a /17 which totals 32,768 hosts.
If this functionality is desired, please share your feedback using the in-app feedback form found in the Support dropdown in your Liongard.
Understanding The Scan
This Inspector performs a comprehensive network scan to identify connected devices and collect detailed system information. It is designed to operate with high concurrency, but please note that larger scans may take additional time to complete.
The scan consists of the following steps:
-
Ping Scan: The Inspector initiates a ping sweep across the specified subnet to identify live hosts that respond to ICMP ping requests.
-
TCP Port Scan: For each live host discovered in Step 1, the Inspector performs a TCP scan on the configured ports to determine which are open or closed.
-
SNMP Scan: The Inspector attempts SNMP sessions on live hosts with Port 161 open. If no SNMP credentials are provided, it defaults to using the community string
"public"and retrieves system-level details from the SysInfo subtree.When SNMP v2 or v3 credentials are supplied in the configuration template, the Inspector will:
- Use those credentials to attempt more secure and detailed SNMP sessions.
- Retrieve expanded metadata such as device vendor, model number, serial number, firmware version, operating system, hostname, and system description.
- Support multiple sets of SNMP v2/v3 credentials, trying each in succession to maximize discovery success across heterogeneous environments.
Additionally, the Inspector identifies:
- Local DHCP servers
- DNS servers listed by DHCP
- Rogue DHCP servers
- Open ports across devices
These capabilities allow for robust network visibility and security awareness across your environment.
MAC Level Info from an External SubnetOur Network Discovery Inspector cannot bring back MAC addresses or vendor information for devices outside of the Agent’s local subnet.
Enhanced Network Discovery
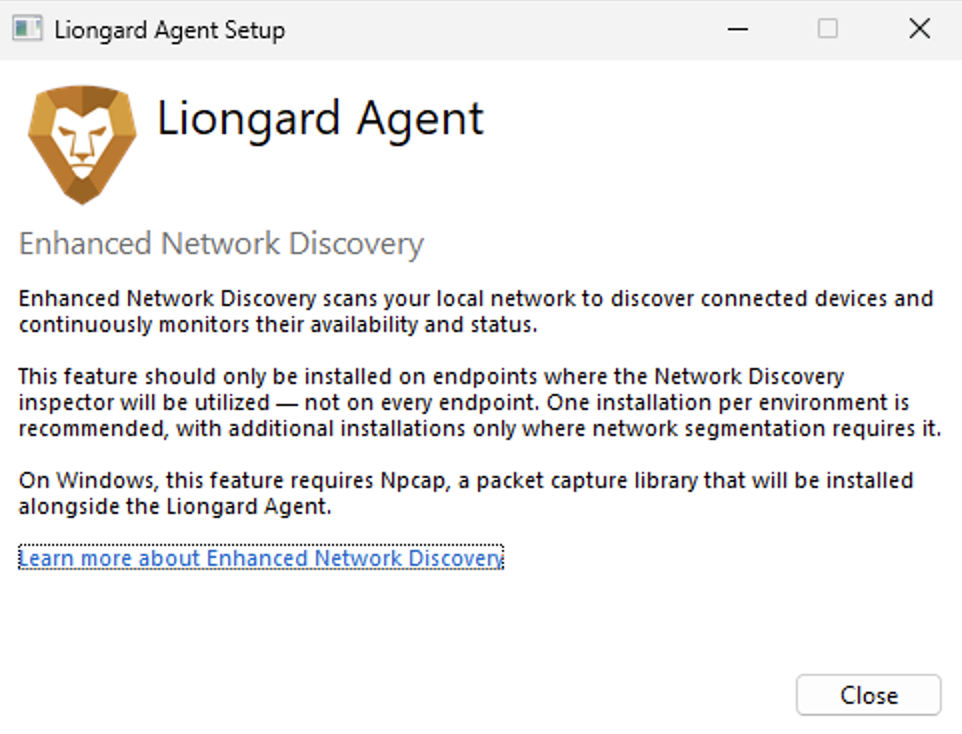
Enhanced Network Discovery scans your local network to discover connected devices and continuously monitors their availability and status.
This feature should only be installed on endpoints where the Network Discovery inspector will be utilized — not on every endpoint. One installation per environment is recommended, with additional installations only where network segmentation requires it.
On Windows, this feature requires Npcap, a packet capture library that will be installed alongside the Liongard Agent.
New Agent Version 5.3.1This feature requires the new 5.3.1 agent and the Network Discovery version 2.0
The agent deployment process is fundamentally the same:
Step 1. Access Key and Secret
Step 2. Download the MSI

-
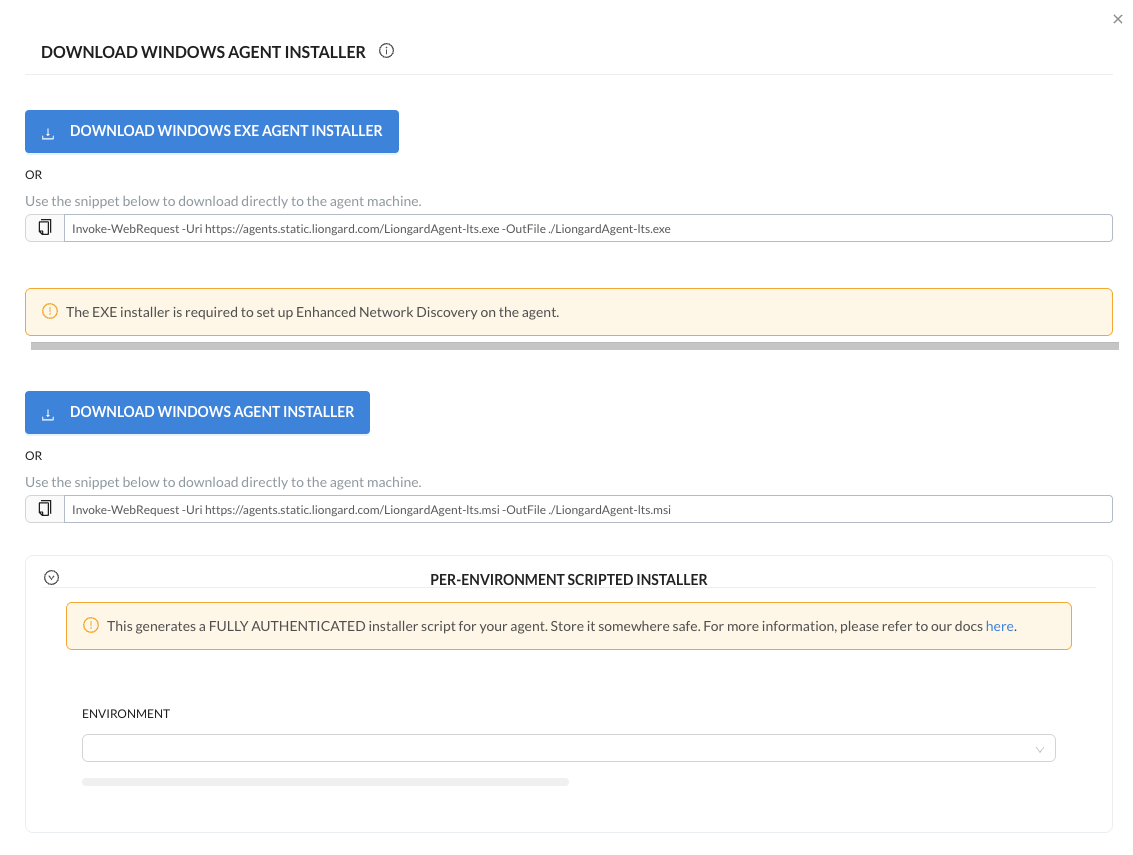
Navigate to Admin > Agents > Hover over "Download Agent Installer" > Select Windows
-
Copy the MSI link or download the MSI (If you choose the EXE installer for the Enhanced Network Discovery, review this documentation)
Step 3: Run the MSI
-
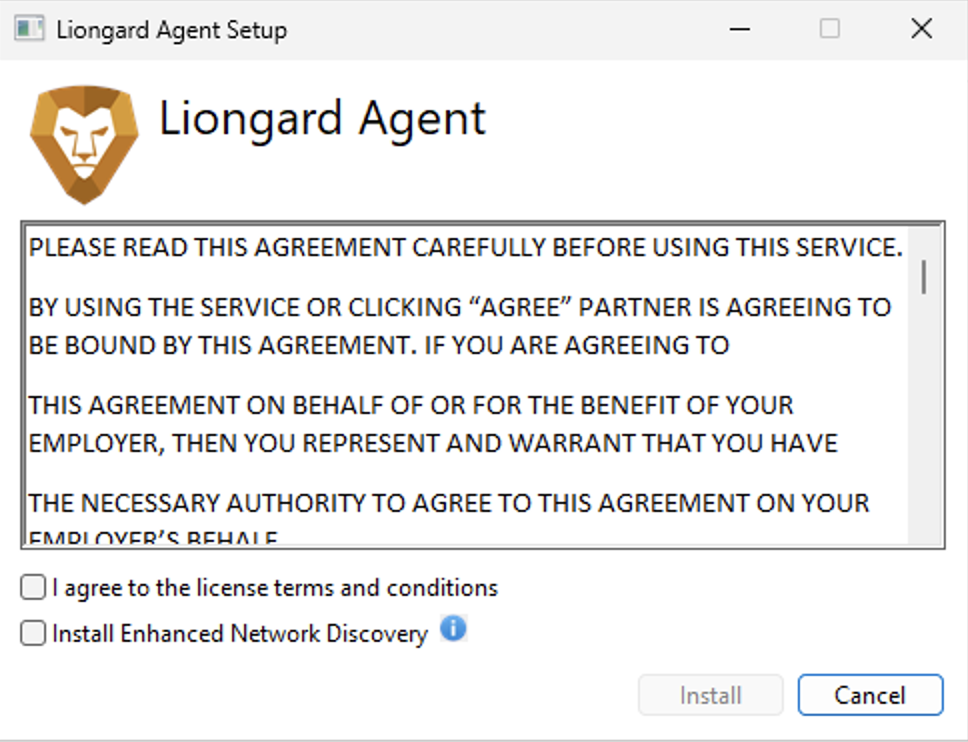
Open the MSI > Select Next
-
Check "I accept the terms in the License Agreement" >
-
Check the Install Enhanced Network Discovery Select Install
Enhanced Network Discovery
Click the blue Tool Tip to learn more about Enhanced Network Discovery.
- Complete the following standard agent install steps.
Post agent Install
You will see the following in your installed apps:
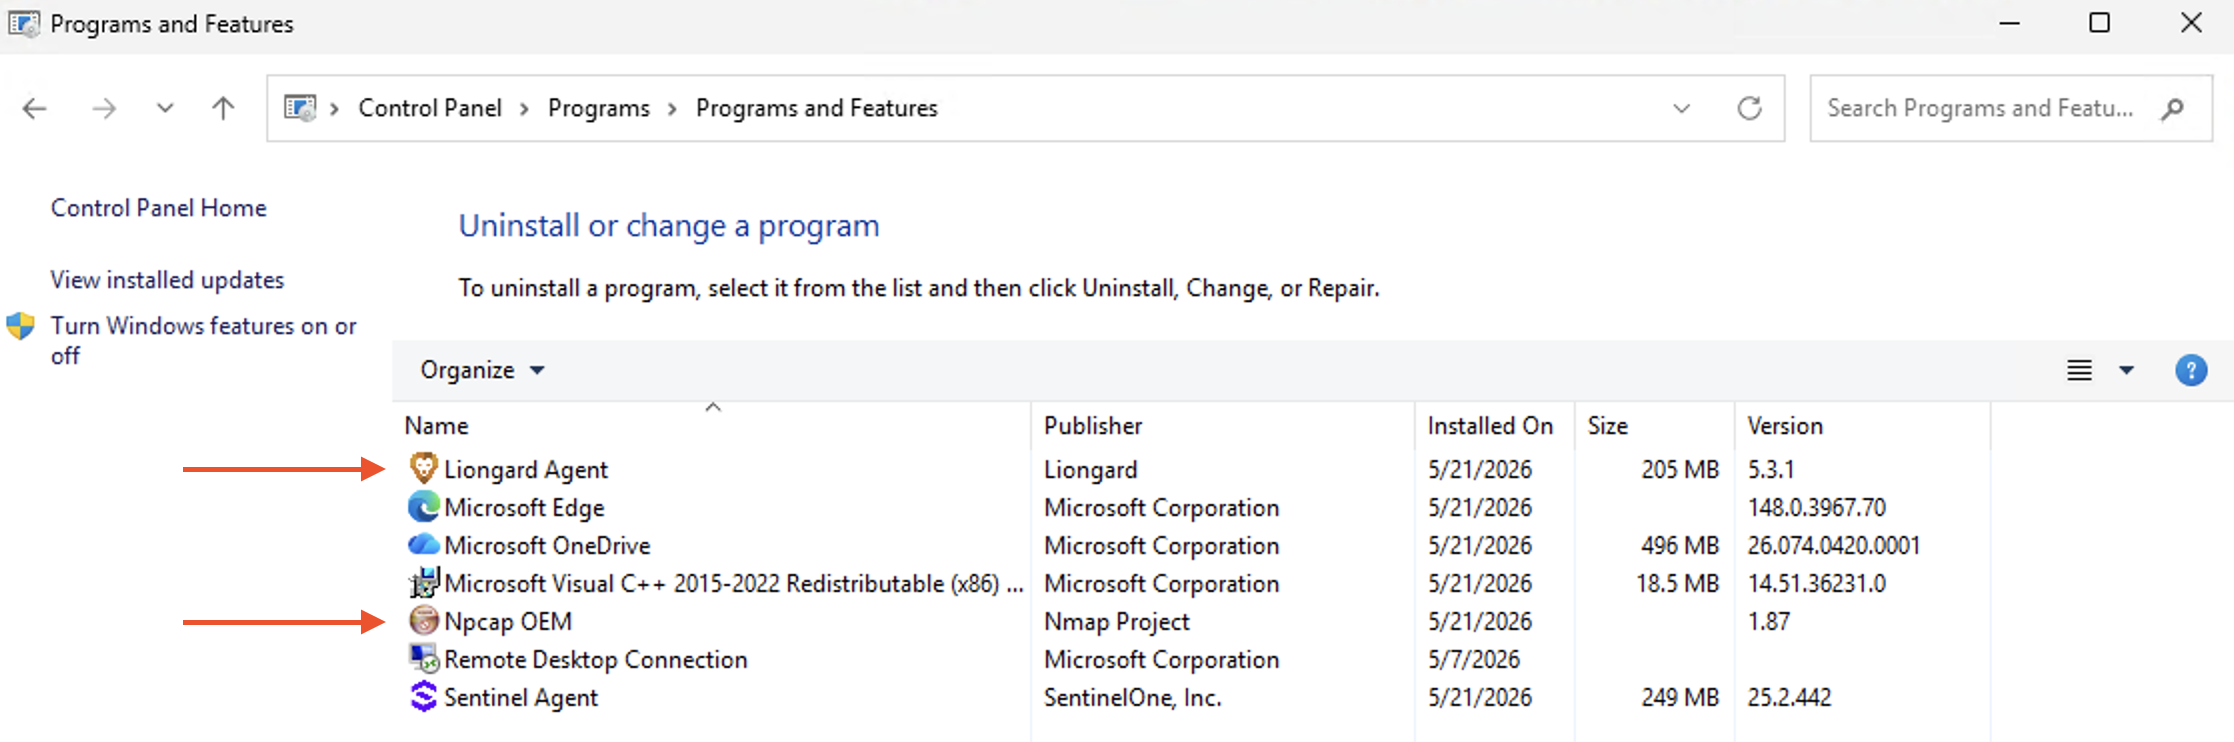
Liongard Inspector Setup
Setup via Auto-Discovery
Your first Network Discovery Inspector will likely be the one auto-discovered by the Windows Server Inspector installed on your On-premises Agent. Details for the Inspector setup are retrieved from the active NIC on the Windows server.
On the Network Discovery Inspector's first successful run, it will auto-discover network devices as detailed below.
Only 1 Discovered InspectorCurrently, the auto-discovery process only occurs for the first agent installed for that Environment. Afterwards, you may setup additional Network Discovery inspectors for that Environment but they will require the Individual Inspector Setup steps to be followed.
Individual Inspector Setup
In Liongard, navigate to Admin > Inspectors > Inspector Types > Navigate to the Network Discovery Inspector > Select Add System.
Fill in the following information:
- Environment: Select the Environment this System Inspector should be associated to
- Friendly Name: Suggested "Network Discovery nvironment Name]" "
- Agent: Select the On-premises Agent installed for this Environment
- Version: Latest (Auto-Update)
- Targets: A list of subnets to scan. This field will accept the following formats:
- 192.168.1.1 (single address)
- 192.168.1.1/24 (CIDR subnet mask notation)
- If the field is left blank, the Inspector will automatically scan the subnet of the Agent using the same subnet mask as the Agent machine's network interface, using the subnet mask applied to the interface of the Agent machine.
Target SubnetsIn order for the Network Discovery Inspector to pull MAC Addresses and Vendor Information, the Target Subnet needs to be on the same subnet as the Agent selected.
- Ports: List of ports you wish to scan. By default, if no ports are selected, then the port scan will be skipped. You may want to limit the number of ports you wish to scan to make the inspection more performant. Ports can be single values as well as ranges (e.g. 100-300)
Common Ports
| Port # | Protocol | Application |
|---|---|---|
| 20 | TCP | FTP Data |
| 21 | TCP | FTP Control |
| 22 | TCP | SSH |
| 23 | TCP | TELNET |
| 25 | TCP | SMTP |
| 53 | UDP, TCP | DNS |
| 67, 68 | UDP | DHCP |
| 80 | TCP | HTTP |
| 110 | TCP | POP3 |
| 443 | TCP | SSL / HTTPS |
| 3389 | TCP | RDP |
- Disable External IP Scan: This will disable the External IP scan.
- Enable SNMP: This will enable the use of SNMP collection
- SNMP Port: Port the SNMP agent is running on
- SNMP Version: SNNP Version the inspector should use
- SNMP V2 Community String: Community String of the agent.
Inspecting Multiple Community StringsOne Network Discovery Inspector can inspect one Community String.
If you would like to inspect multiple Community Strings, you will need to create an additional Inspector for each Community String you would like to inspect.
- Scheduling: The Inspector will default to run once a day at the time the Inspector is set up. Here you can adjust the schedule
Select Save. The Inspector will now be triggered to run within the minute.
Optional: Turn on Flexible Asset/Configuration Auto-Updating
If you would like this Inspector's data to be sent to ConnectWise and/or IT Glue, turn on Flexible Assets/Configurations for this Inspector:
- ConnectWise: Admin > Integrations > ConnectWise > Configuration Types > Confirm the "Configuration Auto-Updating" toggle is enabled
- IT Glue: Admin > Integrations > IT Glue > Flexible Assets > Confirm the "Flexible Asset Auto-Updating" toggle is enabled
Roll out Inspectors at Mass via CSV Import
For more information, please visit our documentation.
To import Network Discovery Inspectors via CSV Import, navigate to Admin > Inspectors > Network Discovery > Select the down arrow icon in the top right-hand to Download CSV Import Template.
In the CSV Template, each row, starting on row three, will represent an Inspector. Fill in the following information for each Inspector you want to roll out:
- Agent.Name: This column is case sensitive. Copy and paste the associated Agent name from the Admin > Agents screen
- Inspector.Name: Enter "autodiscovery-inspector"
- Environment.Name: This column is case sensitive. Copy and paste the associated Environment name from the Dashboard screen
- Alias: Enter the Desired Friendly Name
- Config.TARGETS[0]: Enter a subnet to scan by entering the four octets of an IP address. Examples:
- 192.168.1.1/24 - Entering will scan the range of IP addresses
- 192.168.1.1-192.168.1.254- Entering will scan the range of IP addresses
- 192.168.1.1: Entering will scan the entered IP address
If left blank, the Inspector will automatically scan the entire subnet of the Agent entered in the Agent.Name column. If you would like to inspect a list of subnets, you will need to add a column to the left called "Config.TARGETS[1]", "Config.TARGETS[2]", etc., and in each column enter the additional subnet that you would like to inspect.
- Config.PORTS[0]: By default, Liongard creates columns for ports 21, 22, 80, 161, and 443. Enter any additional ports you wish to scan. You may also choose to remove default columns. Ports can be single values as well as ranges (e.g. 100-300). You may want to limit the number of ports you wish to scan to make the inspection more performant. If you would like to inspect additional ports, you will need to add a column to the left called "Config.PORTS[5]", "Config.PORTS[6]", etc., and in each column enter the additional port that you would like to inspect
- Config.EXTERNAL_SCAN_DISABLED: Enter "true" or "false" depending on if you wish to disable the external IP scan. An entry of true will disable the scan.
- Config.SNMP_SCAN: Enter "true" or "false" depending on if you wish to perform SNMP scans for all open 161 ports across all hosts found
- Please note this will only return results if you have port 161 (a default) in the port list above.
- Config.SNMP_VERSIONS[0]: Enter v2c.
- Liongard is working to support additional SNMP versions.
- Config.SNMP_COMMUNITY_STRING: Enter the SNMP v2 community string. (Required only if scanning SNMP v2).
- FreqType: Enter "days"
- FreqInterval: Enter "1"
When ready to Import the CSV Template of Inspectors, navigate to Admin > Inspectors > Network Discovery > Select the up arrow icon in the top right-hand to Import CSV > Select your saved template.
After the successful import notification, reload your browser to find your imported Inspectors.
These Inspectors will automatically trigger themselves to run within a minute.
Auto-Discovery: Firewall/Network Inspectors
The Network Discovery Inspector can Auto-Discover Fortinet Fortigate, HP ProCurve, Sonicwall, Synology NAS, and WatchGuard devices.
To set up an auto-discovered Inspector, please see our documentation for that specific Inspector.
Customizing the Inspector's Default Settings
The Network Discovery inspector's configuration template can be customized in order to provide specific default values when you create a new inspector. For example, if you want all new Network Discovery inspectors to scan port 3389 by default, the inspector allows you to specify that port number in one central location and ensures that it is added as a default port number on all new inspectors.
To use this feature, go to Admin > Inspectors > Network Discovery and click the Default Inspector Settings button. You can then change any default configuration value and click Save. If you want to discard these changes and return to the Liongard-provided default values, click the Reset To Default Values button.
Updated about 1 month ago