Addigy (Legacy) [Deprecated]
This document provides the steps required to configure the Addigy Inspector.
Quick DetailsRecommended Agent: On-Demand
Supported Agents: On-Demand or Self-Managed
Is Auto-Discovered By: N/A
Can Auto-Discover: N/A
Parent/Child Type Inspector: No
Inspection via: API
Data Summary: Here
Deprecated InspectorThe Addigy (Legacy) inspector is a Deprecated inspector. Deprecated inspectors are inspectors that will be retired in the near future. They will continue to function normally until they are retired, but continued use is not recommended.
To learn more about our end-of-life and end-of-support processes for features, agents, and inspectors, please review our Product Lifecycle & Support Guidelines.
Overview
See it in Action
Addigy Parent/Child CapabilityThe Addigy Inspector is not a Parent/Child Inspector. When the Inspector returns data, it will return data for all Environments. To suggest feature or Inspector improvements, please share your feedback using the in-app feedback form found in the Support dropdown in your Liongard.
Inspector Setup Preparation
Step 1: Get your API Key
- Log in to Addigy
- On the left-hand navigation pane, expand Account and click on Integrations

- Click on the + Add API button on the right-hand side of the screen.

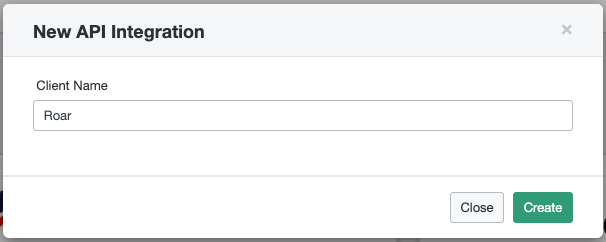
- Enter a Client Name such as "Liongard" in the modal dialog
- Click Create

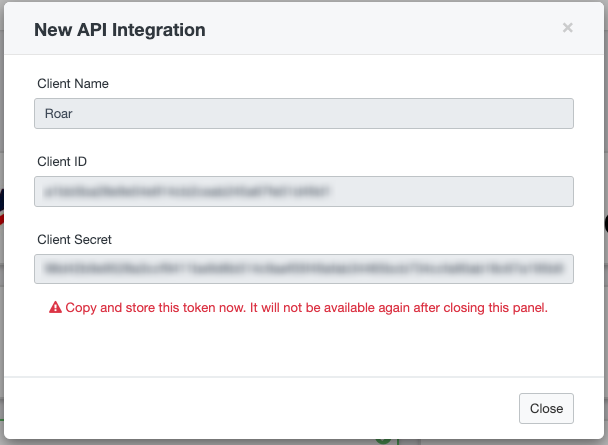
- Copy the Client Key and Client Secret that appear in the dialog.

Step 2: Get your URL
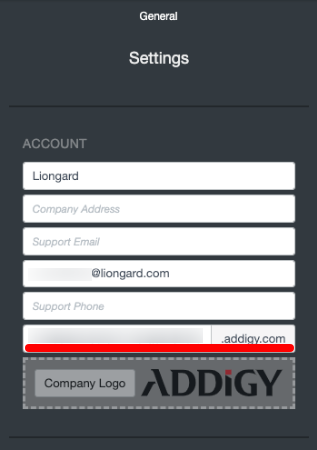
- In the top navigation bar, click on the settings icon on the far right hand side

- Copy the URL shown in the slide out panel

Liongard Inspector Setup
In Liongard, navigate to Admin > Inspectors > Inspector Types > Navigate to the Addigy Inspector > Select Add System.
Fill in the following information:
- Environment: Select the Environment this System Inspector should be associated to
- Friendly Name: Suggested "Addigy nvironment Name]" "
- Agent: On-Demand Agent
- Inspector Version: Latest
- Addigy API URL: The URL copied above
- Client Key: The Client Key copied above
- Client Secret: The Client Secret copied above
- Scheduling: The Inspector will default to run once a day at the time the Inspector is set up. Here you can adjust the schedule
Select Save. The Inspector will now be triggered to run within the minute.
Roll out Inspectors at Mass via CSV Import
For more information, please watch our How To video
To import Addigy Inspectors via CSV Import, navigate to Admin > Inspectors > Addigy > Select the down arrow icon in the top right-hand to Download CSV Import Template.
In the CSV Template, each row, starting on row three, will represent an Inspector. Fill in the following information for each Inspector you want to roll out:
- Agent.Name: This column is case sensitive. Copy and paste the associated Agent name from the Admin > Agents screen
- Inspector.Name: Enter "addigy-inspector"
- Environment.Name: This column is case sensitive. Copy and paste the associated Environment name from the Dashboard screen
- Alias: Enter the Desired Friendly Name
- Config.URL: Enter the URL assigned to you to access the Addigy API
- Config.CLIENT_KEY: Enter the client key generated to access the Addigy API
- SecureConfig.CLIENT_SECRET: Enter the client secret generated to access the Addigy Api
- Config.SOFTWARE_CATALOG_DISABLED: Enter true or false. A setting of True will disable exxtraction of public software information for your organization. This may help resolve issues with payload size.
- FreqType: Enter "days"
- FreqInterval: Enter "1"
When ready to Import the CSV Template of Inspectors, navigate to Admin > Inspectors > 3CX > Select the up arrow icon in the top right-hand to Import CSV > Select your saved template.
After the successful import notification, reload your browser to find your imported Inspectors.
These Inspectors will automatically trigger themselves to run within a minute.
Optional: Turn on Flexible Asset/Configuration Auto-Updating
If you would like this Inspector's data to be sent to ConnectWise and/or IT Glue, turn on Flexible Assets/Configurations for this Inspector:
- ConnectWise: Admin > Integrations > ConnectWise > Configuration Types > Confirm the "Configuration Auto-Updating" toggle is enabled
- IT Glue: Admin > Integrations > IT Glue > Flexible Assets > Confirm the "Flexible Asset Auto-Updating" toggle is enabled
Addigy Quick Tips/FAQs
If you are interested in making Addigy a Parent/Child Type Inspector, please share your feedback using the in-app feedback form found in the Support dropdown in your Liongard.
Updated 5 months ago
