Linux
This document provides the steps required to configure the Linux Inspector.
Quick DetailsRecommended Agent: Self-Managed
Supported Agents: Self-Managed
Is Auto-Discovered By: N/A
Can Auto-Discover: N/A
Parent/Child Type Inspector: No
Inspection via: SSH
Data Summary: Here
Overview
Endpoint Inspector CountThe Linux Inspector is an Endpoint Inspector. Endpoint Inspectors are billed per unit according to your agreement with Liongard. Usage beyond the contracted amount will be charged on your monthly invoices.
To view your Endpoint Inspector count per Environment, navigate to Admin > Environments > Review the "Endpoint Inspector" column
To view the number of included Endpoint Inspectors and your minimum commitment for Endpoint Inspectors, navigate to your username in the upper right-hand corner and select Company Settings.
Please contact your Account Manager for additional contract and pricing details.
See it in Action
Supported DistributionsCurrently, the Linux Agent only officially supports Ubuntu and Red Hat. Although most of the data collection is generic to any Linux distribution, thus far testing has only been completed on Ubuntu and Red Hat.
Local vs. RemoteLocal linux inspections can be run by installing the Linux Agent and registering it with Liongard.
Remote linux inspections are done via SSH. Please note the user specified for SSH access must be able to perform
sudolevel commands
Remote Inspection From WindowsYes, you can use a Windows agent to perform a remote inspection of Linux. The Windows agent doesn't need any special setup or dependencies. You only need to have SSH enabled on the Linux server and the Windows server be able to reach it over the network.
Inspector Setup Preparation
Setting up SSH Access (Remote Only)
If you wish to perform a remote inspection you must enable SSH access to the linux server.
Liongard Inspector Setup
Initial Setup
Unless performing a remote inspection as detailed above, Linux Inspectors are setup by installing a Linux Agent using our Installing a Linux Agent documentation.
Configuring Auto-Discovered Linux Inspectors
After the Linux Agent has been installed, the Linux Inspector will be Auto-discovered, and will need to be activated. Navigate to Total Discovered Systems on the Liongard home screen, or Admin > Discoveries.
Locate the newly discovered Linux Inspector on the Discoveries Dataview Table and verify that the correct Environment has been selected for the Inspector. Then, in the Actions column select the three dots and select Activate. Your Linux Inspector will be activated and the initial inspection will automatically be launched in about a minute.
Endpoint Inspector Auto-activation
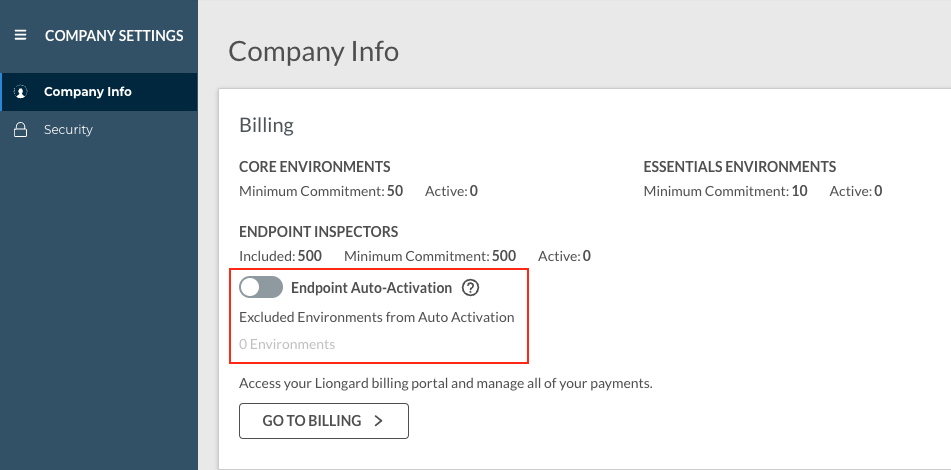
If you would like ALL Endpoint Inspectors to auto-activate after Auto-discovery, navigate to your Username > Company Settings and turn on the Endpoint Auto-Activation toggle as shown. After this toggle has been enabled, individual Environments can be excluded from the Endpoint auto-activation process by adding them to the list below the toggle.

Please keep in mind that Endpoint Inspectors are billed per unit, and usage beyond your minimum commitment (also found on the Company Settings screen) will incur additional costs.
Enabling auto-activation means that Endpoint Inspectors will be automatically Auto-discovered, activated, and billed accordingly.
Linux Quick Tips/FAQs
Updated 5 months ago
