Amazon Web Services
This document provides the steps required to configure the Amazon Web Services Inspector.
Quick DetailsRecommended Agent: On-Demand
Supported Agents: On-Demand or Self-Managed
Is Auto-Discovered By: N/A
Can Auto-Discover: N/A
Parent/Child Type Inspector: No
Inspection via: API
Data Summary: Here
Overview
See it in Action
Inspector Setup Preparation
Step 1: Create a CloudFormation Stack
- Log in to AWS
- After signing in to Amazon Web Services, navigate to AWS CloudFormation's "Quick Create" page to use our template. To do so, click this link.
- This template allows CloudFormation to automatically set up the necessary resources in AWS (referred to as a "Stack") for the AWS Inspector to return data to Liongard. This template, by default, creates the Stack in AWS's "Oregon" region, but you may choose another region by selecting the dropdown menu in the top right of the screen. The region has no effect on the functionality of the AWS Inspector.
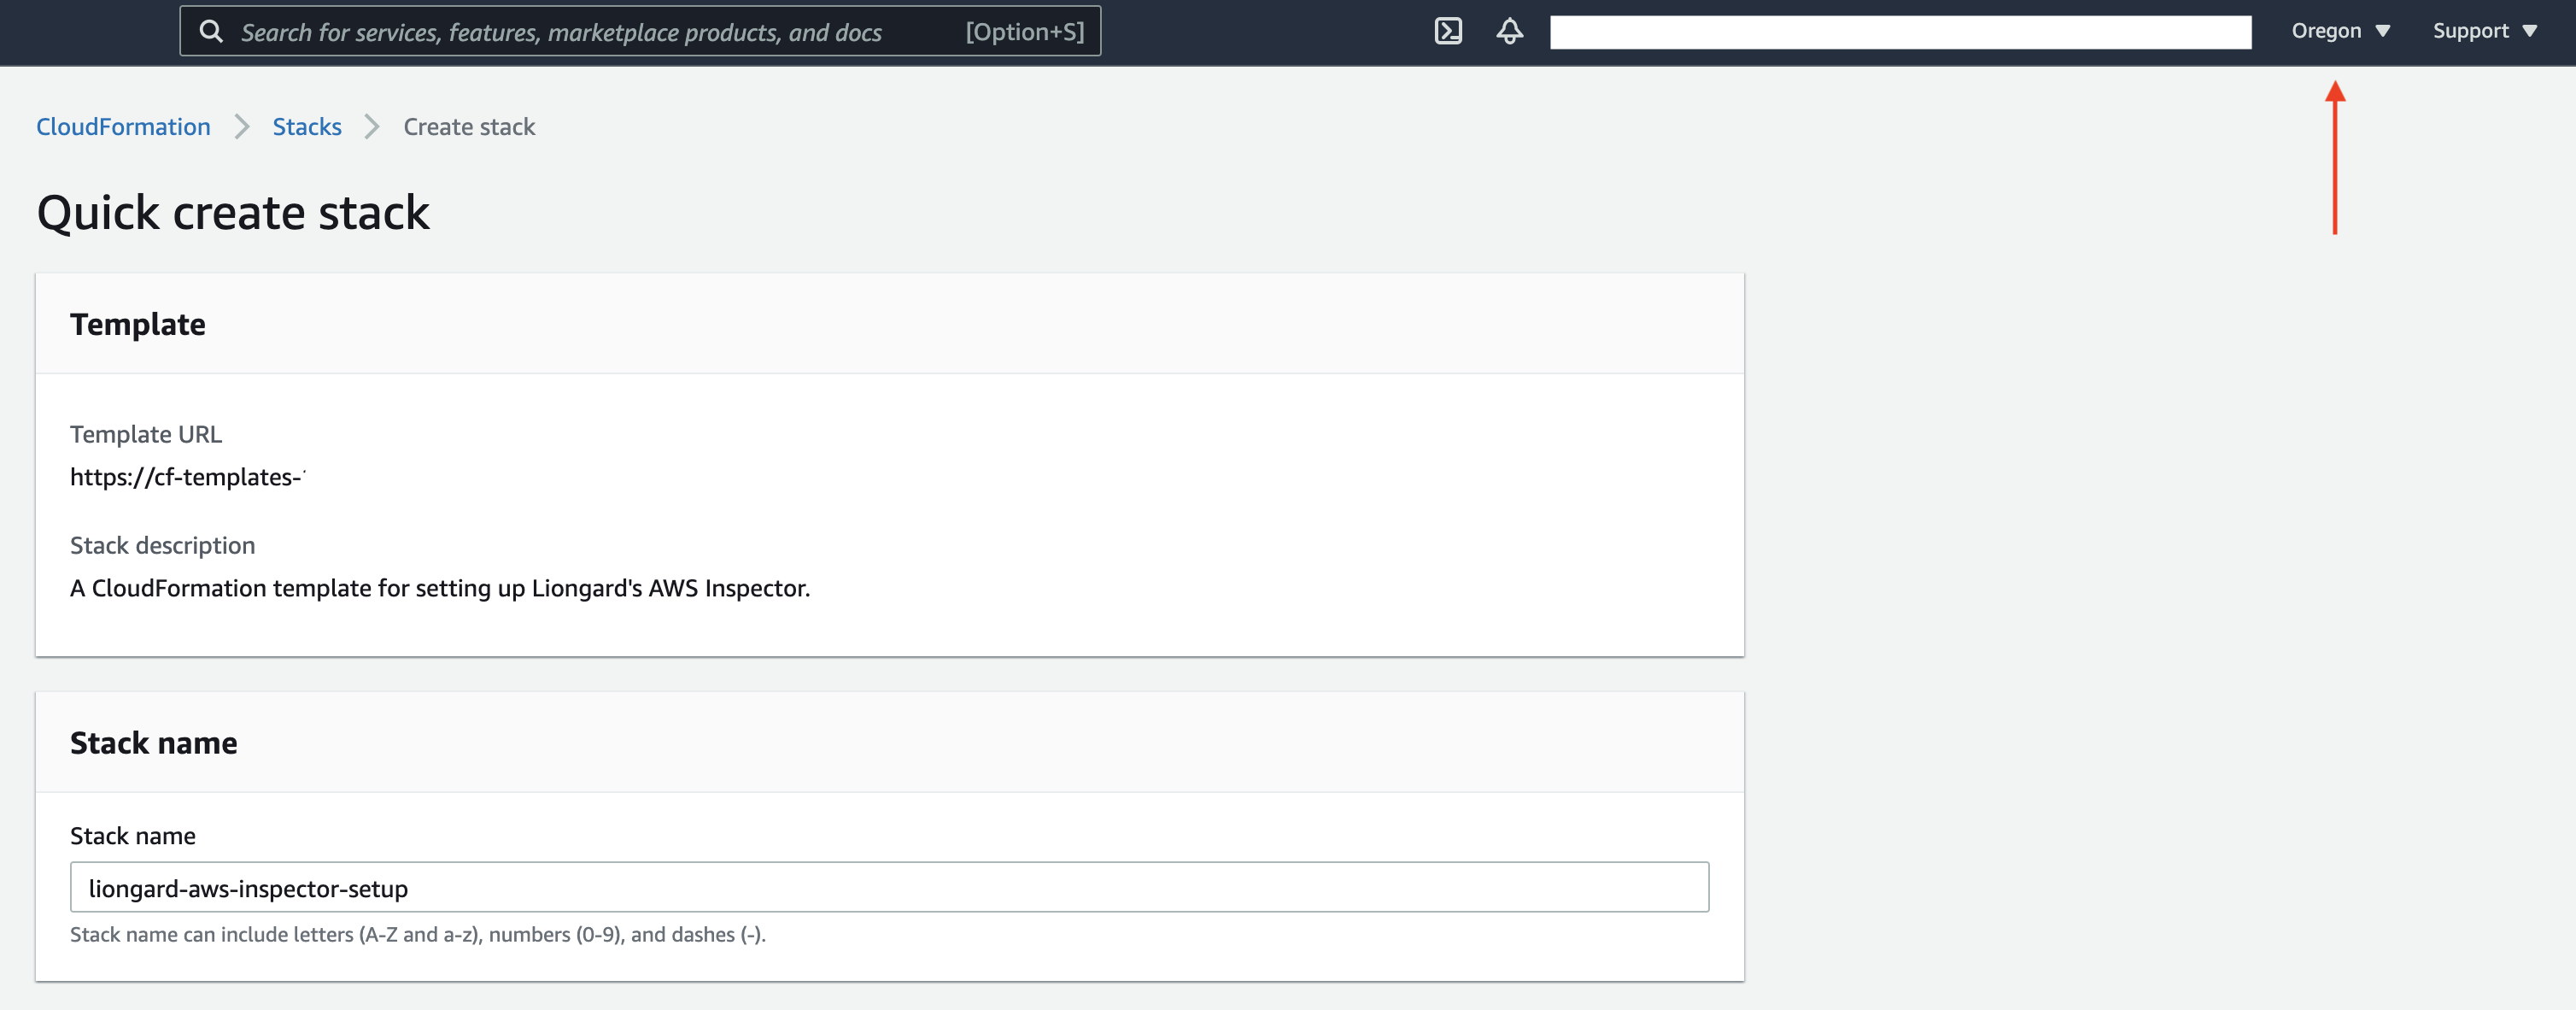
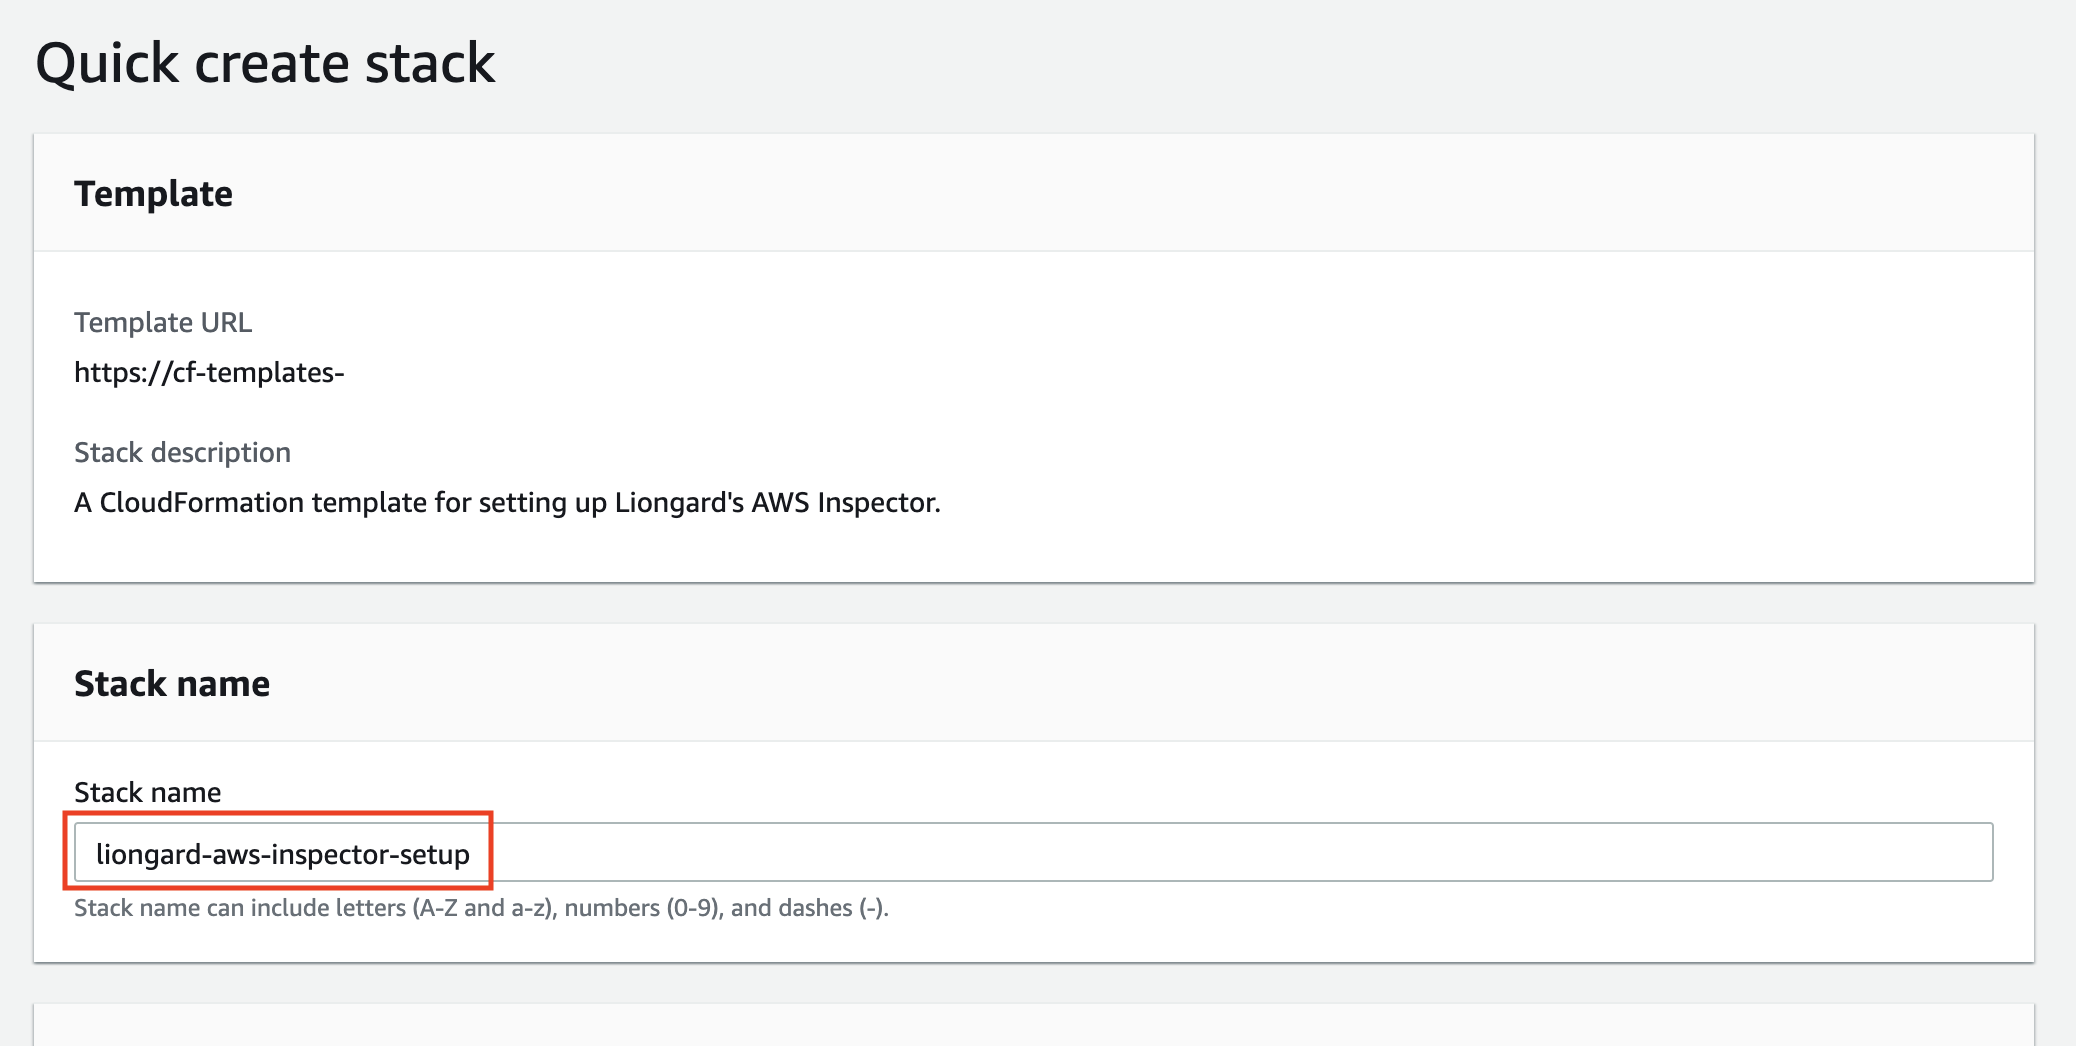
- The default name for the Stack should populate. However, you may change this name.
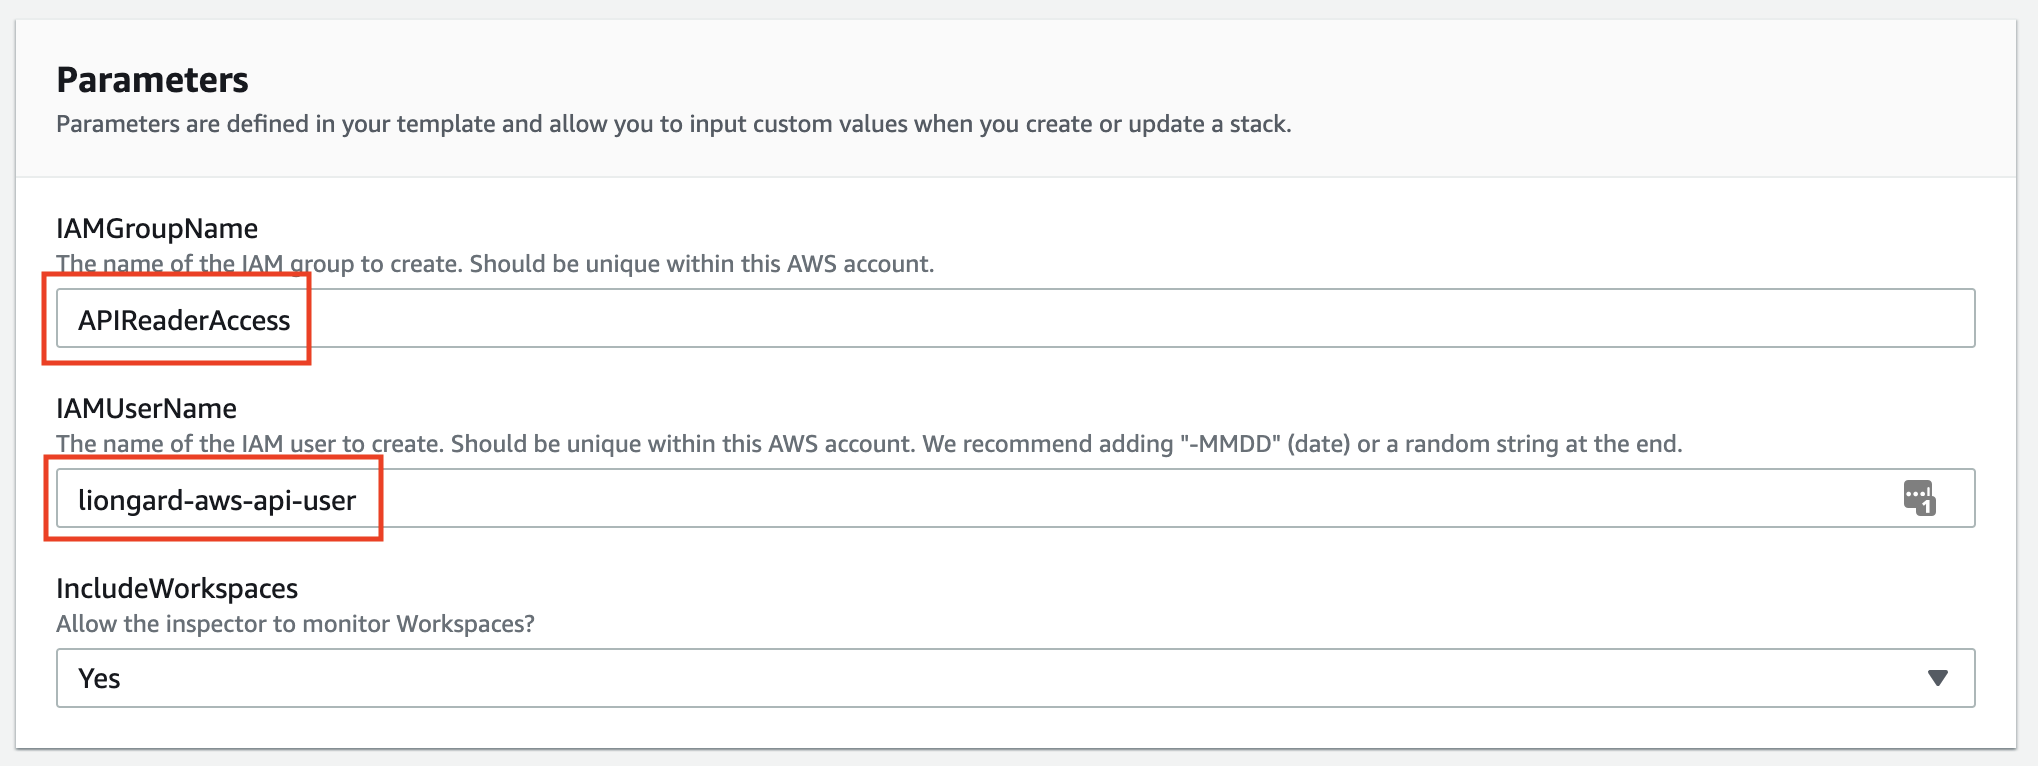
- This template will create an IAM Group and an IAM User. Default names for these fields will populate. You may change these names to fit your preferred naming conventions.
Naming ConventionsPlease refer to your organization's naming convention policies when creating your IAM Group and User names. Default names are suggestions.
Additionally, please consider the following AWS naming restrictions:
- Both names must only use alphanumeric or the following special characters: + (plus), = (equals),. (period), @ (at), - (hyphen), _ (underscore).
- The IAM Group name must not match any existing IAM Group names on this AWS account or be more than 128 characters.
- The IAM User name must not match any existing IAM Users on this account or be more than 64 characters.
If you proceed and your IAM resource names do not meet these restrictions, the Stack creation will fail and you must restart Step 1.
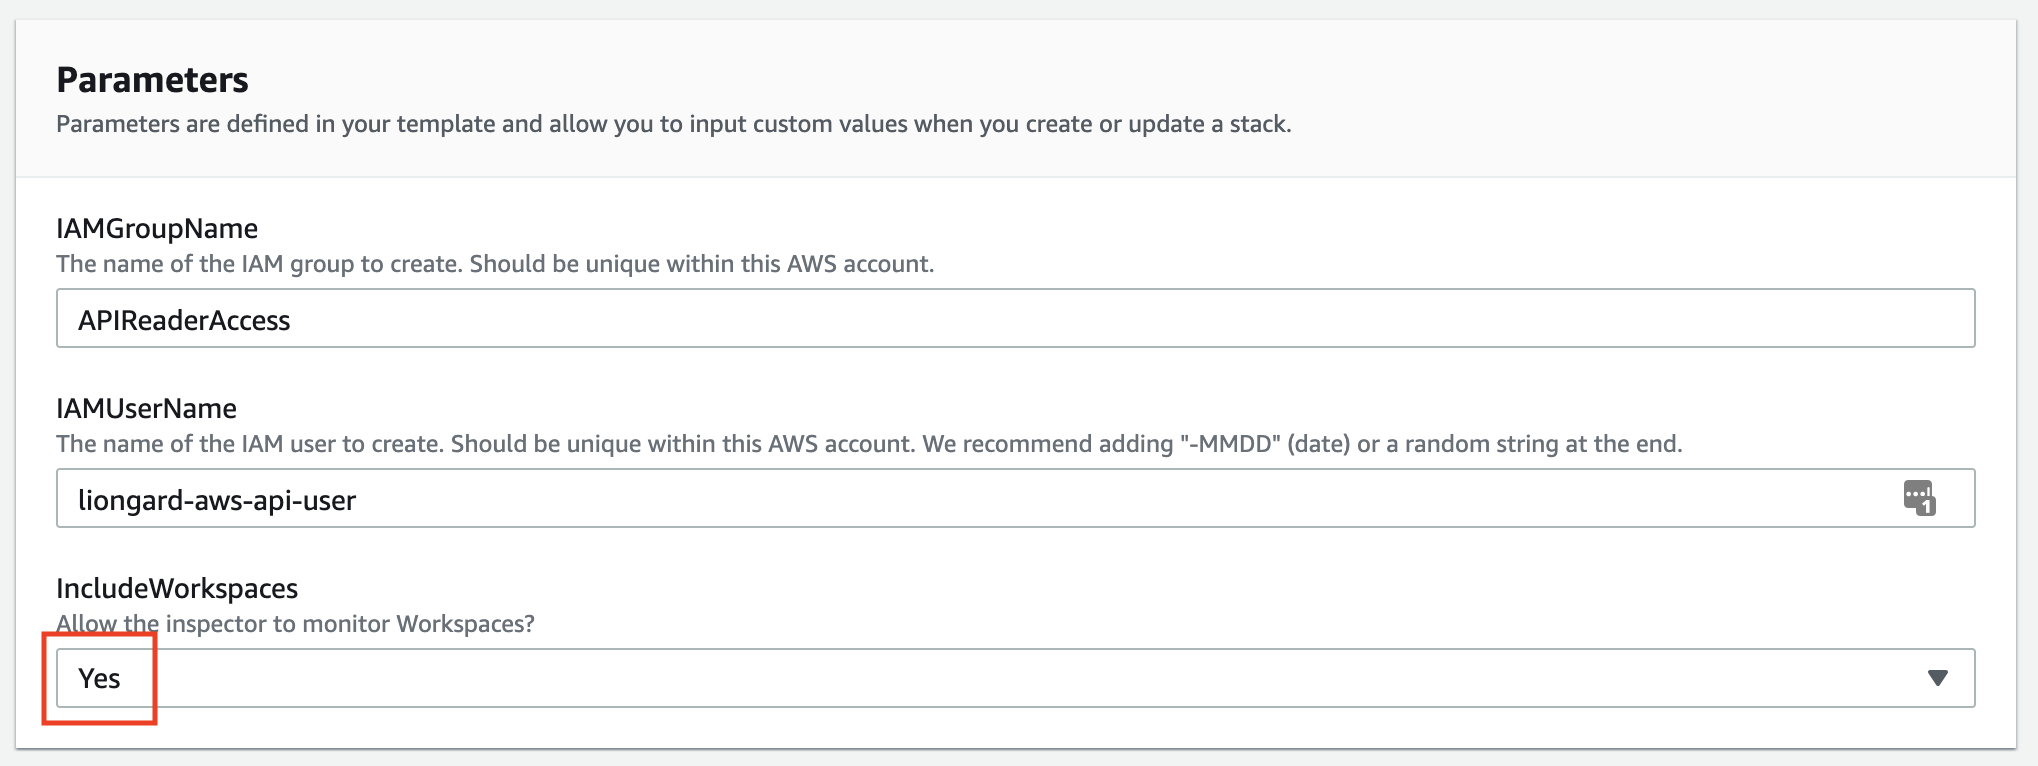
- If you would like to record Workspaces information, you may select that option. If selected, this feature will require the creation of a custom read-only permission set to be attached to the IAM Group. This will be taken care of automatically if you select this option.
- At the bottom of the review screen, check the acknowledgement box. Then click Create Stack.

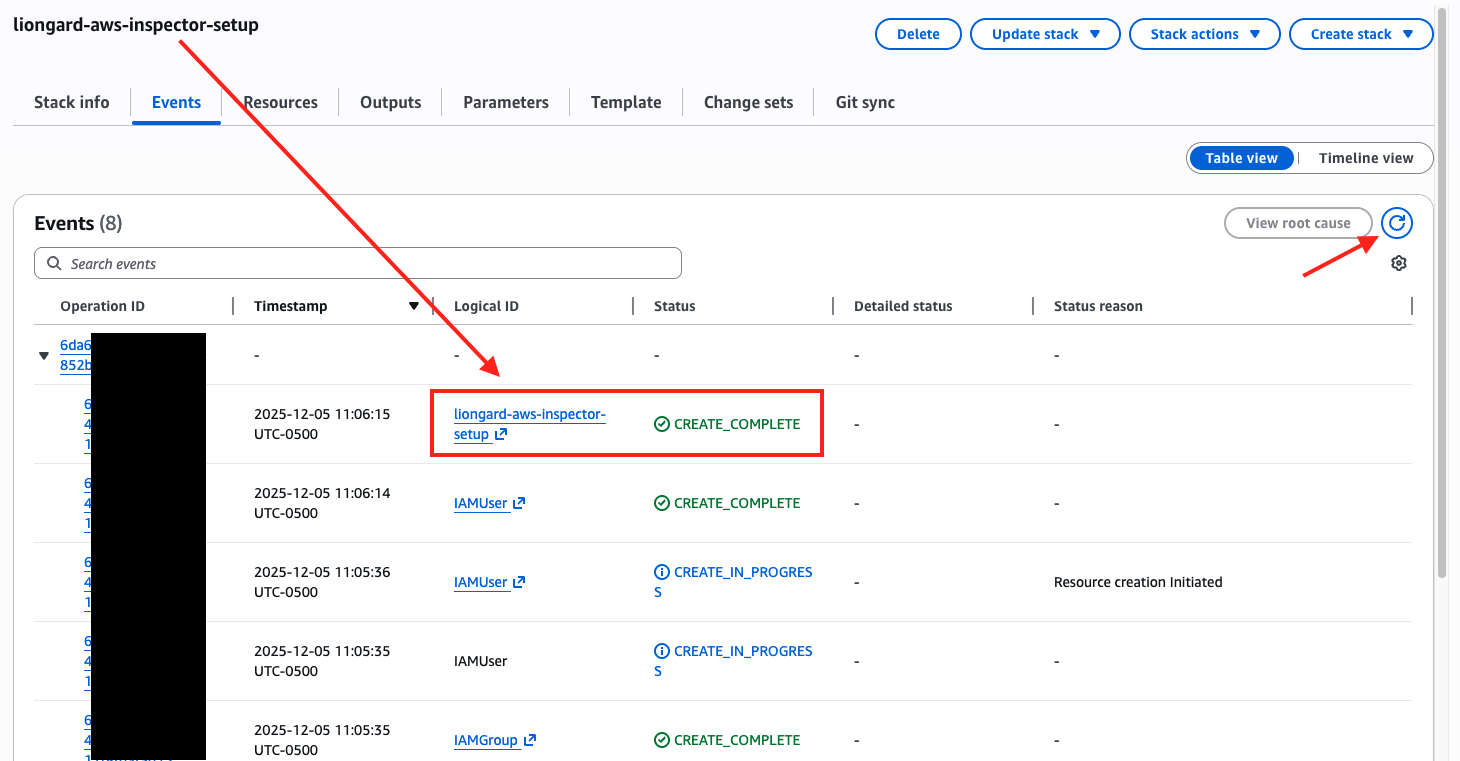
This will bring you to the new Stack's "Events" page, where you can see the tasks it is performing.
- Creating the Stack will take a few minutes. This page does not automatically update, so click the refresh button shown below until you see your Stack name in the "Logical ID" column with a status of "CREATE_COMPLETE" in the "Status" column.
Step 2: Create Security Credentials
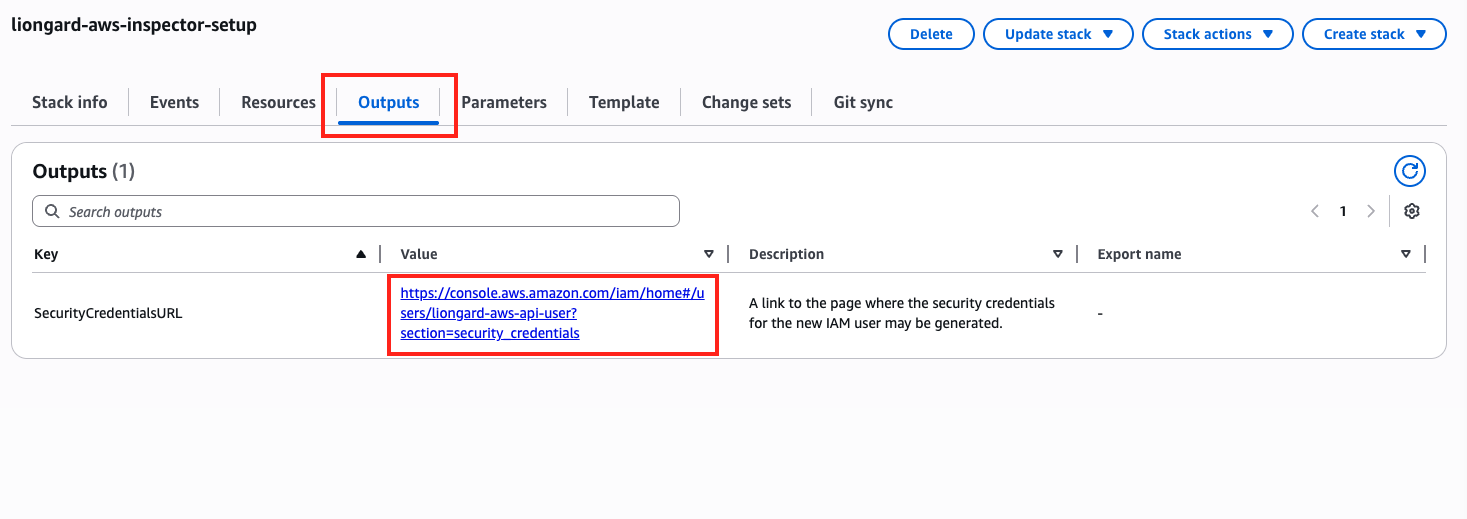
- Select the Outputs tab and click the "Value" link on the "SecurityCredentialsURL." row.
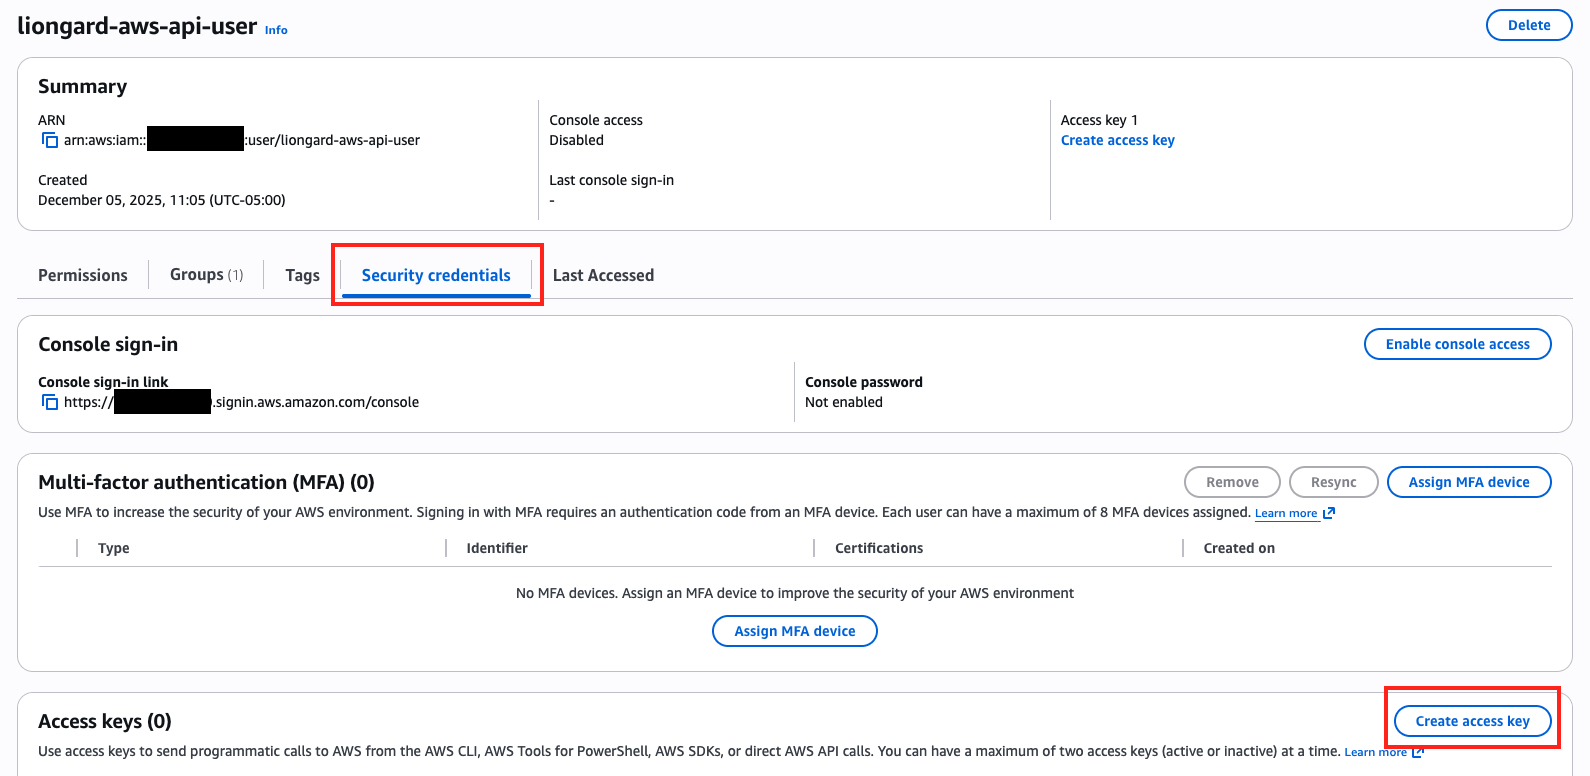
- This link will take you to the "Security Credentials" page for the new IAM User the Stack created. Click Create access key.
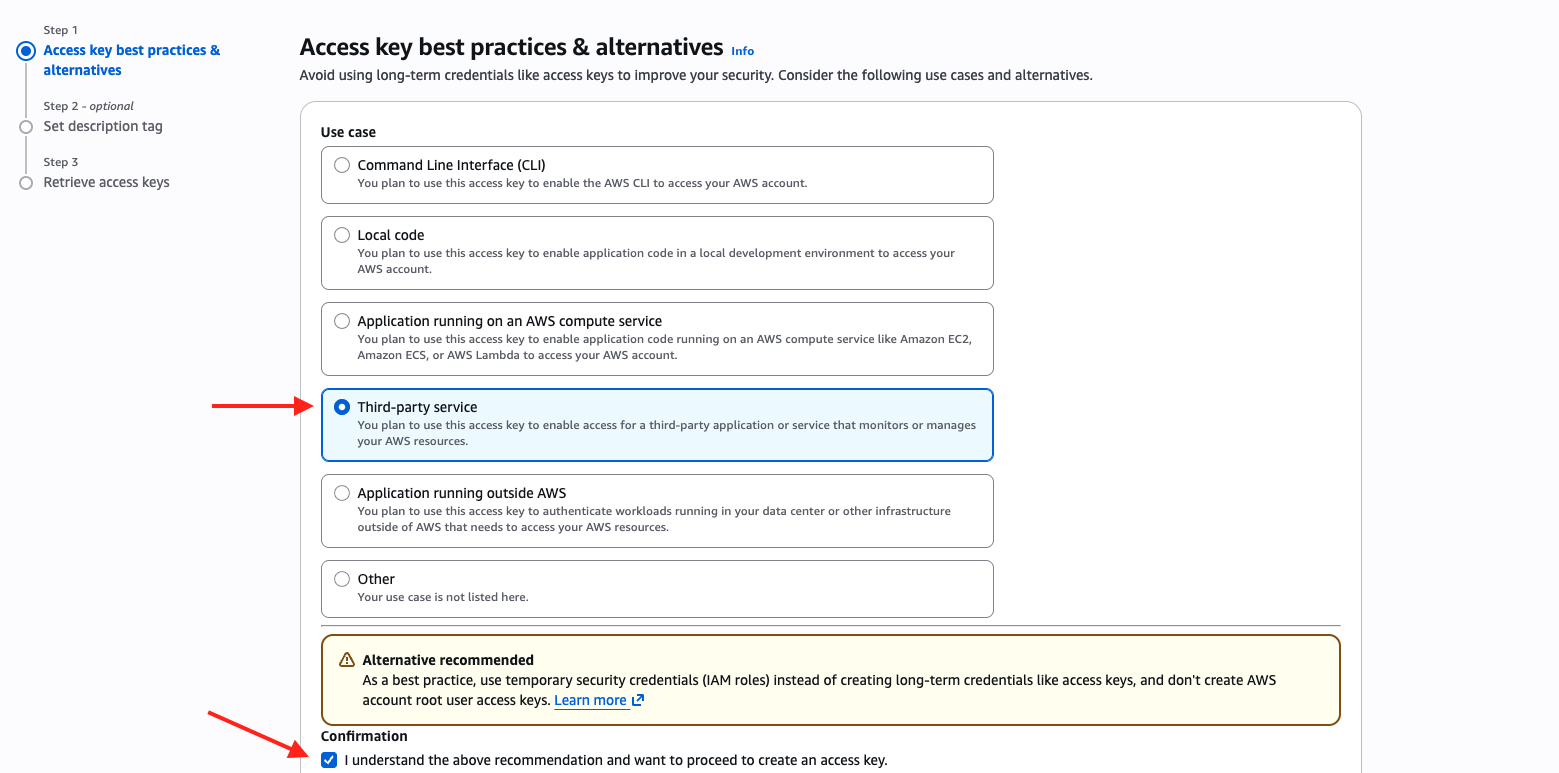
- On the following page, (Step 1) click the "Third-party service" option, click the Confirmation checkbox and click Next.
-
(Step 2) Add a description. This is optional.

-
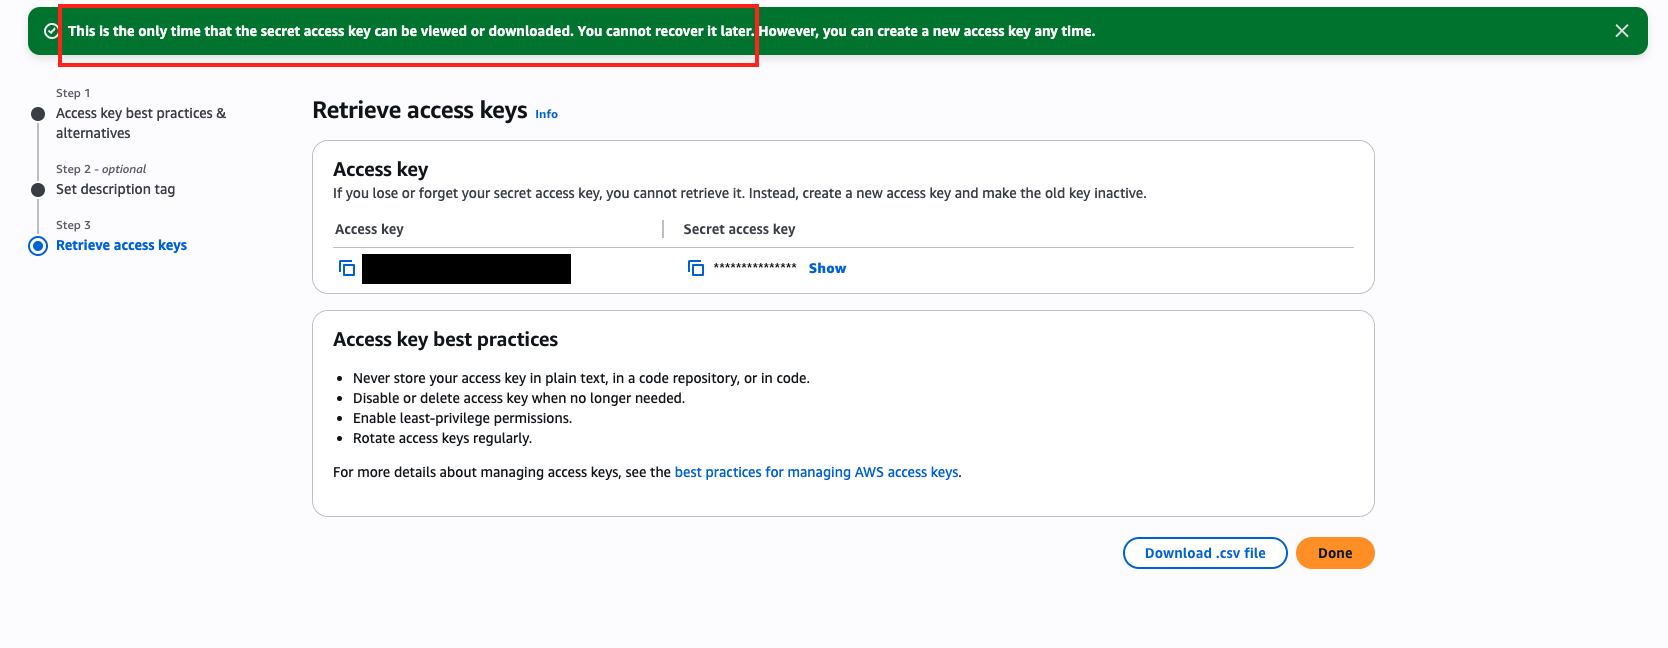
You can eith Download the csv file or copy the Access key and Secret. This information is needed to complete the inspector setup within Liongard. Please take note of the warning message about the availability of the key information on this page!
Liongard Inspector Setup
Individual Inspector Setup
In Liongard, navigate to Admin > Inspectors > Inspector Types > Navigate to the Amazon Web Services Inspector > Select Add System.
Fill in the following information:
- Environment: Select the Environment this System Inspector should be associated to
- Friendly Name: Suggested "AWS nvironment Name]" "
- Agent: On-Demand
- Inspector Version: Latest
- Access Key ID: The ID of the account you created in the steps above
- Secret Access Key: The Key should reside in the CSV document downloaded from the steps abovee
- Region: Specify the region(s) where the customer AWS stack resides. You may select more than one region.
- Scheduling: The Inspector will default to run once a day at the time the Inspector is set up. Here you can adjust the schedule
Select Save. The Inspector will now be triggered to run within the minute.
Optional: Turn on Flexible Asset/Configuration Auto-Updating
If you would like this Inspector's data to be sent to ConnectWise and/or IT Glue, turn on Flexible Assets/Configurations for this Inspector:
- ConnectWise: Admin > Integrations > ConnectWise > Configuration Types > Confirm the "Configuration Auto-Updating" toggle is enabled
- IT Glue: Admin > Integrations > IT Glue > Flexible Assets > Confirm the "Flexible Asset Auto-Updating" toggle is enabled
Roll out Inspectors at Mass via CSV Import
For more information, please visit our documentation.
To import Amazon Web Services Inspectors via CSV Import, navigate to Admin > Inspectors > Amazon Web Services > Select the down arrow icon in the top right-hand to Download CSV Import Template.
In the CSV Template, each row, starting on row three, will represent an Inspector. Fill in the following information for each Inspector you want to roll out:
- Agent.Name: Enter "On-Demand Agent"
- Inspector.Name: Enter "aws-inspector"
- Environment.Name: This column is case sensitive. Copy and paste the associated Environment name from the Dashboard screen
- Alias: Enter the Desired Friendly Name
- SecureConfig.AWS_ACCESS_KEY_ID: Enter the ID of the account you created in the Inspector Setup Preparation
- SecureConfig.AWS_SECRET_ACCESS_KEY: Enter the Key from the CSV document downloaded in the Inspector Setup Preparation
- Config.AWS_REGION[0]: Enter the region where the customer's AWS stack resides. If you would like to inspect multiple regions, you will need to add a column to the left called "Config.AWS_REGION[1]", "Config.AWS_REGION[2]", etc., and in each column enter the additional region that you would like to inspect
- FreqType: Enter "days"
- FreqInterval: Enter "1"
When ready to Import the CSV Template of Inspectors, navigate to Admin > Inspectors > Amazon Web Services > Select the up arrow icon in the top right-hand to Import CSV > Select your saved template.
After the successful import notification, reload your browser to find your imported Inspectors.
These Inspectors will automatically trigger themselves to run within a minute.
Amazon Web Services Quick Tips/FAQs
AWS Inspector FailureOften an AWS Inspector failure is due to the API Key no longer being valid. This usually means the API Key has been deleted.
Updated 2 months ago
