Agent Proxy Configuration
Overview
The Liongard Agent now supports configuring a proxy server for all agent communication. Upon Installation of the Agent a new field and parameter are now available that allows a user to specify the proxy server and authentication (if applicable) that the agent should use to communicate its traffic.
- Windows Agent Install with Proxy Settings
- Linux Agent Install with Proxy Settings
- Adding Proxy Settings to Existing Windows Agent
Proxy Setting for Windows Agent
The MSI for installing the Windows agent supports proxy configuration via the graphical interface of the Installer, or a user can use supported parameters to script the installation of the agent for mass deployment methods.
Using MSI Interface to setup Proxy Configuration
- Open the MSI > Select Next
- Check "I accept the terms in the License Agreement" > Select Next
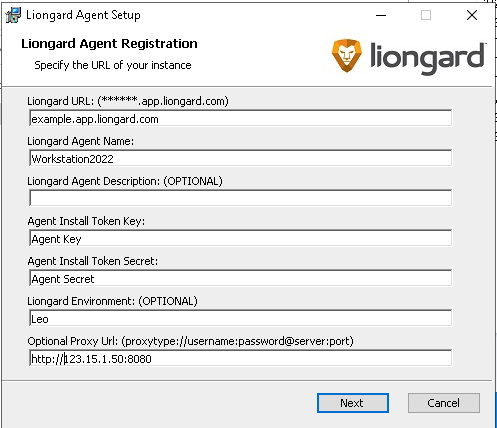
- Complete the following fields:
- Your Liongard URL (e.g., "us1.app.liongard.com"): Enter the core of your Liongard URL. Do NOT include "https://"
- Liongard Access Key ID and Secret: Enter the Access Key ID and Secret generated in Liongard from Step 1 above.
- Review the following field:
- Agent Name: Liongard will populate this field using the hostname of the device the Agent is being installed on. If the Agent name already exists, Liongard will auto-concatenate a numerical value (in parenthesis) to the new Agent name
Naming Your AgentAt the moment, the Agent name cannot accept =, <, >, (, ), {, }, nt D characters. Please avoid using them in the Agent name.
- If desired, complete the following fields:
- Liongard Agent Description: This field is optional, but can be used to give the Agent a description inside of Liongard.
- Liongard Environment: This field is optional, but if skipped the Environment must be assigned in Liongard on the Admin > Agents screen. For more information review our Agent Management documentation.
- Proxy Setting: This field is optional, but is used for environments with a proxy server where agent traffic needs to be redirected. The field supports proxy servers with and without authentication. The following formats are acceptable by the installer
proxytype://username:password@server:port-->http://lion:[email protected]:8888proxytype://server:port-->http://123.21.22.1:8888
Proxy TypeCurrently https is not a supported proxy type
- Select Next
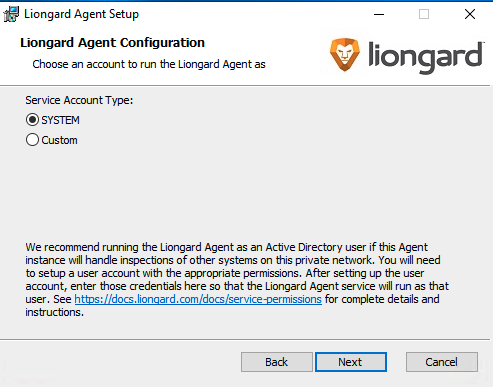
- For Service Account Type, select SYSTEM
- Select Next > Select Install > Select Finish
The Agent is now successfully installed.
Using MSI Parameters to setup Proxy Configuration
For partners that would like to utilize scripting methods to install the agent. The new MSI supports a new parameter to allow mass deployment options for setting the Proxy URL.
Elevated PromptPlease make sure that if you are scripting via Powershell or Windows Prompt that you use elevated permissions for the installation.
The new field for setting the Proxy URL is "PROXYURL", below is a snippet of an example of a silent install snippet for deploying the agent with proxy settings
msiexec /i LiongardAgent-lts.msi LIONGARDURL=yourinstance.app.liongard.com LIONGARDACCESSKEY="yourkey" LIONGARDACCESSSECRET="yoursecret" LIONGARDENVIRONMENT="Exact Environment Name, Inc."PROXYURL="proxytype://username:password@server:port" LIONGARDDESCRIPTION="optional description" /qnProxy Setting for Linux Agent
-
Make sure the Installer has executable permissions by Running
chmod 700 LiongardAgent-lts-x64.xz.run -
Run one of the following commands to install the agent with proxy settings:
sudo ./LiongardAgent-lts-x64.xz.run -- -u InstanceURL -k AccessKey -s AccessSecret -p proxytype://username:password@server:port
*sudo ./LiongardAgent-lts-x64.xz.run -- -u InstanceURL -k AccessKey -s AccessSecret -p proxytype://server:port

Initiating argumentsThe use of
--must precede any arguments used for the installer
The available arguments for the agent installer are as follows:
- -u: Liongard Instance URL (Required)
- -k: Agent Access Key (Required)
- -s: Agent Access Secret (Required)
- -n: Agent Name
- -e: Liongard Environment
- -d: Agent Description
- -p: Proxy URL
Adding Proxy Settings to an Existing Windows Agent
Using a Script to add Proxy URL
- Using the new Agent Installer, Run the command below from the same directory where you downloaded the new MSI installer. This will update the agent components to now look for the proxy settings if they exist.
msiexec.exe /i "LiongardAgent-lts.msi" /q- Use the following PowerShell snippet to set the Proxy URL for the Agent and restart the Agent Service to apply the change.
Set-Item -Path "Env:GLOBAL_AGENT_HTTP_PROXY" -Value "proxytype://username:password@server:port"; Get-Service | Where-Object {$_.Name -like "*roaragent.exe*"} | Restart-ServiceManually adding Proxy URL
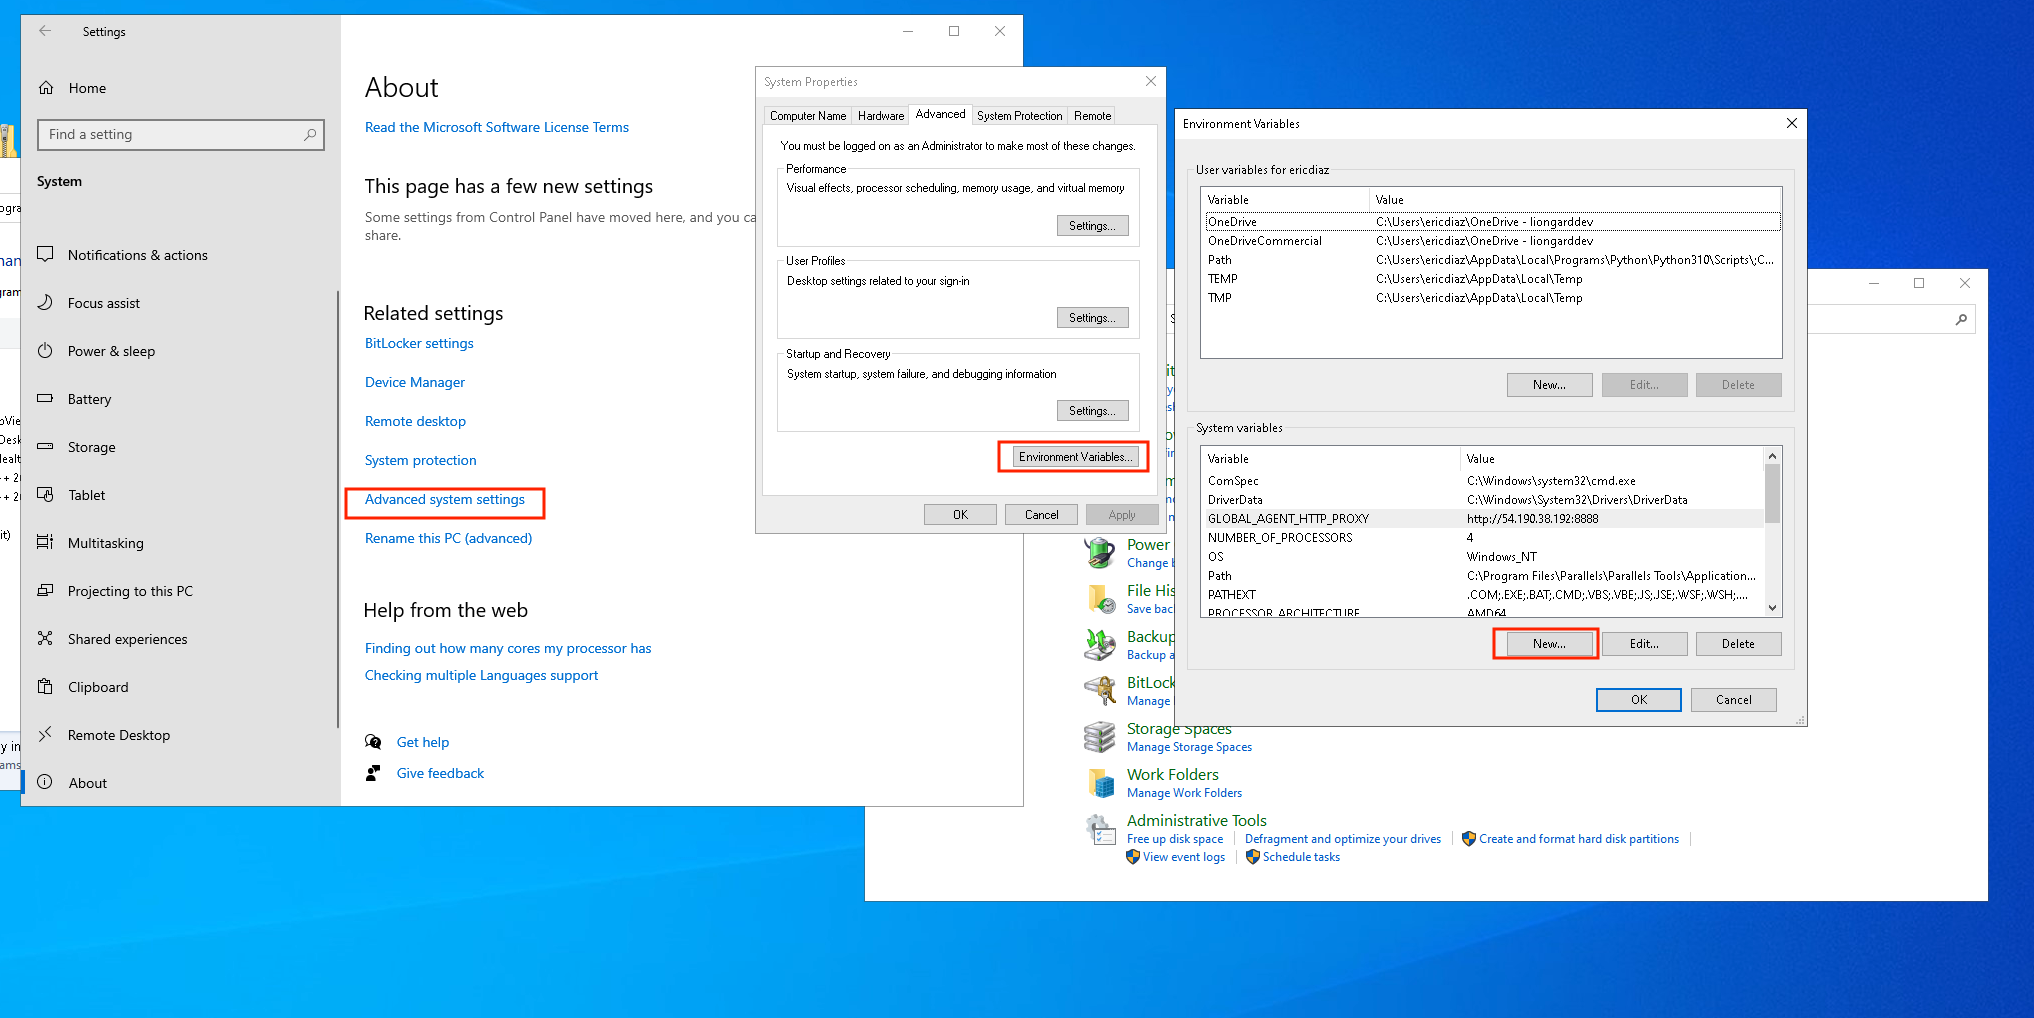
- Proxy URL settings are stored as an Environment Variable on the Windows System. These Variables can be found in your computers Advanced System Settings. Select New under System Variables
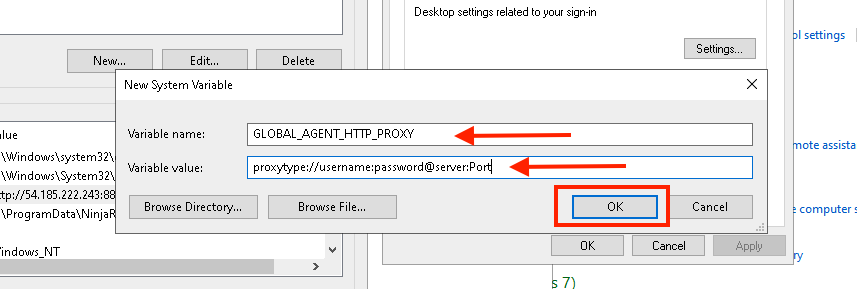
- Add a new System Variable for the agent proxy settings by using the following information:
- Variable Name:
GLOBAL_AGENT_HTTP_PROXY - Variable Value:
proxytype://username:password@server:port
Click Okay to save the changes
- Once the variable has been added, Restart the Liongard Agent Service
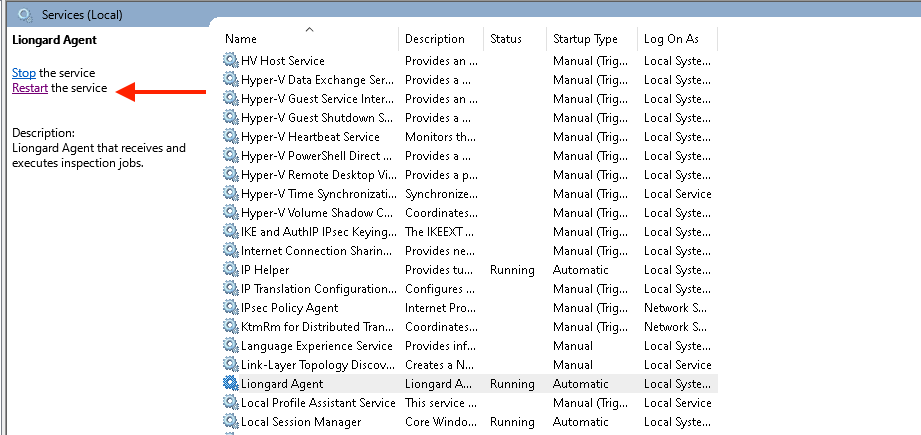
- The Agent should now be utilizing Proxy Server for Agent traffic
Updated 5 months ago
