Microsoft 365
Quick DetailsRecommended Agent: On-Demand
Supported Agents: On-Demand or Self-Managed
Is Auto-Discovered By: N/A
Can Auto-Discover: Child Inspectors (Delegated Access), Internet Domains
Parent/Child Type Inspector: Yes
Inspection via: API
Data Summary: Microsoft 365
Overview
The Microsoft 365 Inspector inspects the Microsoft Cloud Service products suite within a dedicated customer tenant, including Microsoft 365, Azure Active Directory, Teams, SharePoint, and OneDrive.
Microsoft Azure InspectorThe Microsoft Azure Inspector pulls data for Azure infrastructure services. For example, virtual machines, virtual networks, etc. If you are looking to deploy that inspector, please reference our documentation here.
GCC High Inspector Support"GCC High" stands for Microsoft 365 Government Community Cloud High - Microsoft 365 GCC High is the cloud platform developed by Microsoft for cleared personnel and organizations supporting the Department of Defense. GCC High is hosted in Microsoft servers across the United States in order to meet strict compliance requirements for small to medium-sized contractors as they control the flow of Controlled Unclassified Information (CUI).
At this time, Liongard is not able to support Inspections for Microsoft 365 tenants hosted in GCCH.
Deployment
Inspector Setup Preparation
Liongard Microsoft 365 Inspector is set up using an Entra ID enterprise application, and configured similarly.
Depending on the relationship with the tenant(s) that you manage, your configuration steps will differ. Microsoft Cloud Service Inspectors in Liongard fall into one of two categories: Multi-Tenant or Single-Tenant configurations.
| Setup | Description |
|---|---|
| Multi-Tenant | I use a Microsoft account to manage my customer relationships via the Microsoft Partner Center. |
| Single-Tenant | I have a Microsoft account that I access directly to manage my customer on their behalf. I do not manage this customer in the Microsoft Partner Center |
To set up all Microsoft Cloud Services Inspectors, click on the following guide according to your tenant relationship:
Liongard Multi-Tenant Setup
PrerequisitesLiongard is an application that interacts with many parts of Microsoft 365 to surface critical data points. In order to comply with Microsoft's granular delegated admin privileges the following roles are recommended for the Liongard Inspector. You may experiment with less/more permissive roles at your own risk. You may also visit our Knowledge Base for a more detailed explanation of these roles. Additionally, be aware that at minimum, an assigned Microsoft 365 Basic Business or Microsoft 365 Basic license is required to use Liongard's Microsoft 365 Inspector.
To proceed, Liongard requires an Entra ID user account in your parent tenant with the Privileged Role Administrator, Cloud Application administrator, Directory Writers, Global reader, Security Reader, Teams Administrator, and Reports Reader Entra ID roles. Additionally, the user must be a member of the AdminAgents security group. Please review this Microsoft document for direction on how to achieve this step.
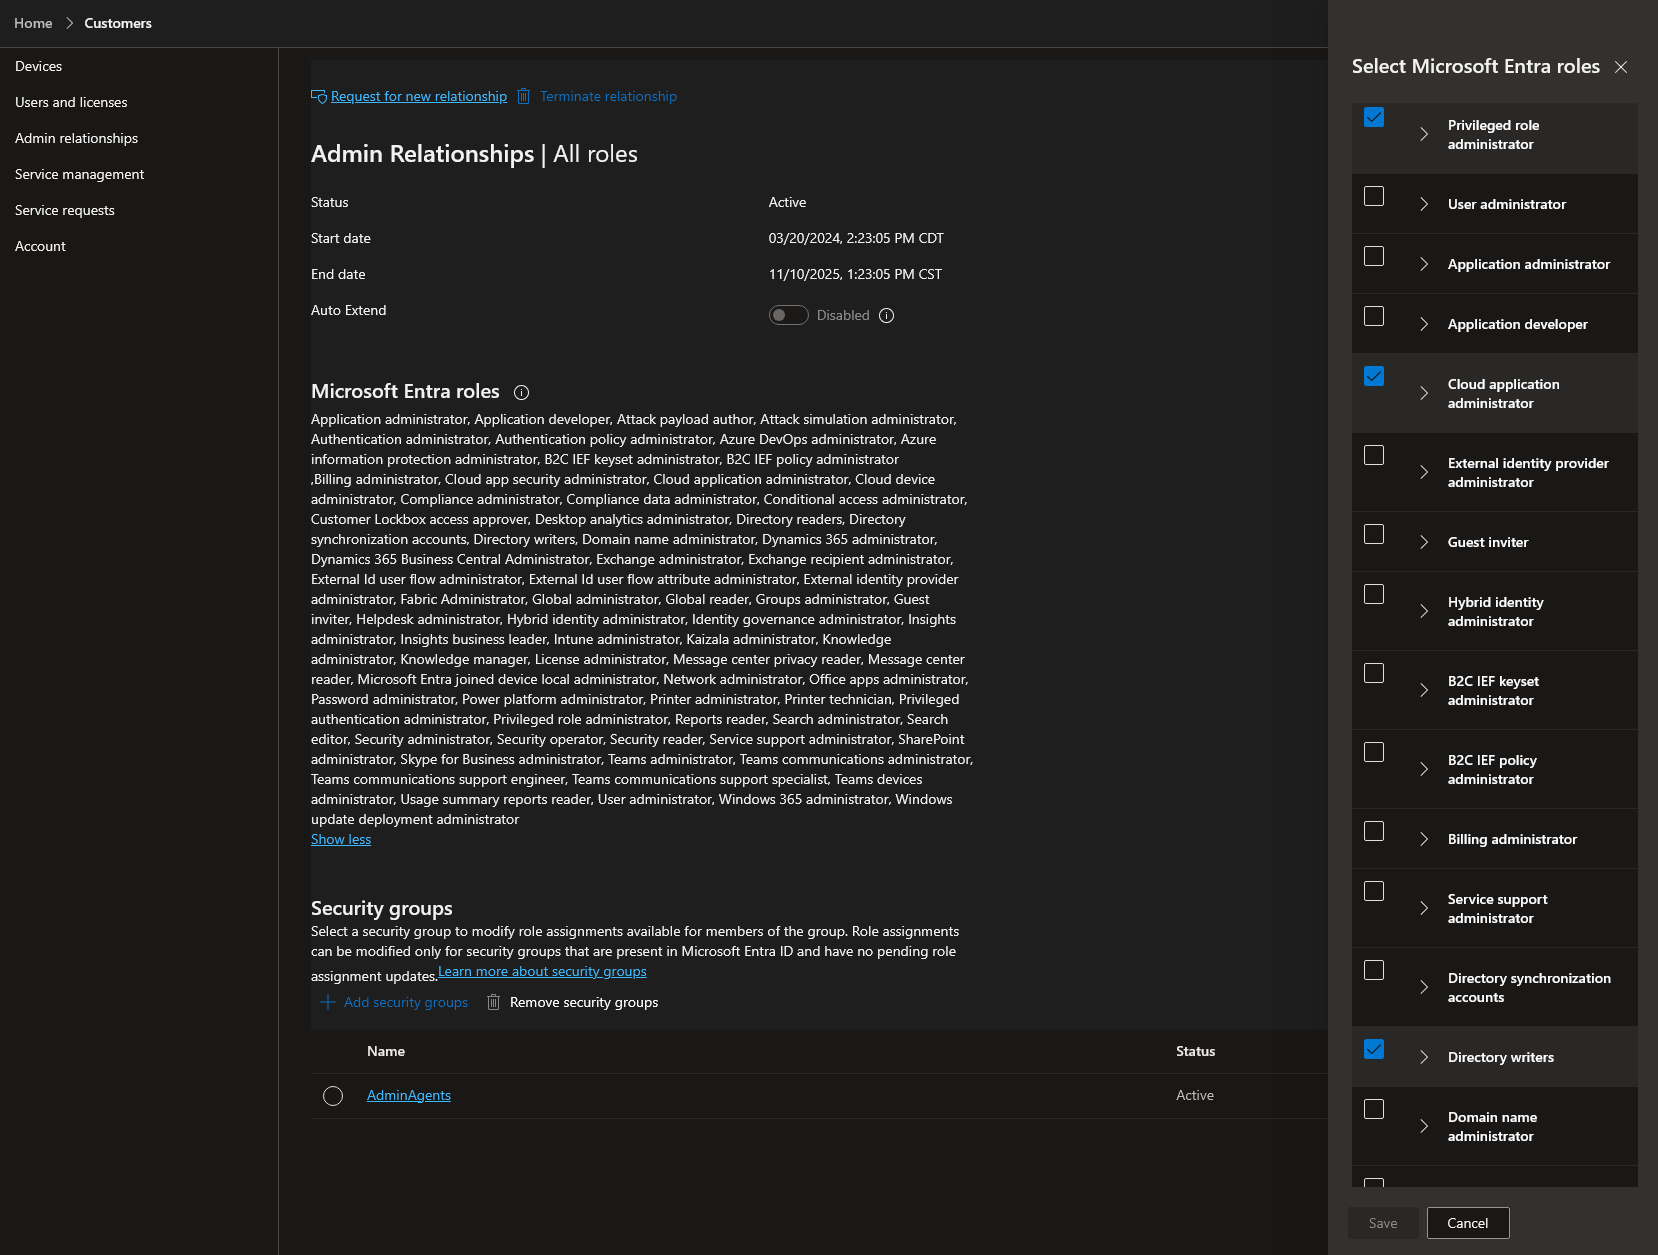
For each Microsoft 365 child tenant that you wish to inspect, you are required to create a GDAP relationship from Admin Relationships in Partner Center and apply the following Entra ID roles:
- Privileged Role Administrator
- Cloud Application Administrator
- Directory Writers
Additionally, you must apply the AdminAgents security group to each Admin Relationship and assign the Privileged Role Administrator, Cloud Application Administrator, and Directory Writers Entra ID roles to the security group as shown in the screenshot below.
For more information on GDAP relationships, please visit Microsoft's documentation.
Step 1: Obtain your Entra Tenant ID
- Log in to your Entra account (i.e. portal.azure.com)
- On the left-hand menu select Entra ID Directory
- On the next screen, make sure you have the Overview tab selected and locate the Tenant ID displayed.
- Copy the Tenant ID
Step 2: Parent Inspector Setup: Multi-Tenant
The Microsoft 365 Inspector can function as a “Multi-Tenant” inspector by utilizing the existing relationship established through Microsoft’s Partner Portal to manage many environments.
You will configure a Microsoft Parent Inspector for the associated Microsoft account that you use to manage your tenant(s) and to access the Microsoft Partner Center.
Those customers you've configured for GDAP relationships will be Auto-Discovered as Child Inspectors after the successful run of the Parent Inspector. Upon those discoveries, map the Child Inspectors to the correct Liongard Environment and activate them.
In Liongard, navigate to Admin > Inspectors > Inspector Types > Navigate to the Appropriate Microsoft Inspector > Add System.
Fill in the following information:
- Type of Inspector: Parent
- Environment: Select your MSP's Environment
- Friendly Name: Suggested Naming: SP Name] [nspector Name] P Parent
- Agent: Select On-Demand Agent
- Inspector Version: Latest
- Tenant Settings: Select Multi-Tenant Application
- Enable Application Based Permissions: Toggle On
- This setting, and its subsequent Features application options, enable Liongard to use application permissions via Microsoft Partner Center across child tenant environments. While optional, this configuration is necessary to surface certain data points related to mailboxes, OneDrive, Teams, and SharePoint within Microsoft 365 Child Inspectors.
- Entra (Tenant) ID: Paste in your Entra Tenant ID copied in Step 2
- Select the "Open Microsoft Sign-In" button
- Authenticate by signing into the organization for the associated Tenant ID with an account that is assigned the Privileged Role Administrator, Cloud Application Administrator, Global Reader, Reports Reader, Teams Administrator, Security Reader, and Directory Writer Entra ID roles and is a member of to the Admin Agents security group.
- Follow the prompts to accept the requested permissions by selecting the checkbox to consent and selecting Accept.
- A green check will appear to validate that you successfully completed the step.
- ❗️Note❗️Ensure you are prompted to satisfy an MFA claim during the login process. Additionally, please know that signing in with a user that has legacy MFA methods will result in Child Inspectors not being discovered. Please see this KB for more details.
- Scheduling: The Inspector will default to run once a day at the time the Inspector is set up. Here you can adjust the schedule
- Select Save. The Inspector will now be triggered to run within the minute.
Step 3: Child Inspector Setup
After the first run of the Parent Inspector, your client Microsoft Cloud Services organizations will be auto-discovered in the Discovered Systems tab on the Inspectors > Appropriate Microsoft Inspector page.
Navigate to the Discovered Systems tab in your Inspectors > Appropriate Microsoft Inspector page
- Activate or Archive your Discovered Systems by ensuring that they're mapped to the correct Environment > Check the checkbox to the left of Inspector(s) > Select the Actions drop-down menu > Activate Launchpoints
Optional: Turn on Flexible Asset/Configuration Auto-Updating
If you would like these Inspector's data to be sent to ConnectWise and/or IT Glue, turn on Flexible Assets/Configurations for these Inspectors:
- ConnectWise: Admin > Integrations > ConnectWise > Configuration Types > Confirm the "Configuration Auto-Updating" toggle is enabled
- IT Glue: Admin > Integrations > IT Glue > Flexible Assets > Confirm the "Flexible Asset Auto-Updating" toggle is enabled
Liongard Single-Tenant Setup
PrerequisitesLiongard is an application that interacts with many parts of Microsoft 365 to surface critical data points. In order to comply with Microsoft's granular delegated admin privileges the following roles are recommended for the Liongard Inspector. You may experiment with less/more permissive roles at your own risk. You may also visit our Knowledge Base for a more detailed explanation of these roles.
Liongard requires an Entra ID user with the Privileged Role Administrator, Cloud application administrator, Directory Writers, Global reader, Security Reader, Teams Administrator, and Reports Reader Entra ID roles.
For more information on GDAP relationships, please visit Microsoft's documentation.
Step 1: Obtain your Customer's Azure Active Directory Tenant ID
- Log into your customer's Entra ID account (i.e. portal.azure.com)
- On the left-hand menu select Entra ID Directory
- On the next screen, make sure you have the Overview tab selected and locate the Tenant ID displayed
- Copy the Tenant ID
Step 2: Parent Inspector Setup: Single-Tenant
You will configure a Microsoft Parent Inspector for each associated customer's Microsoft account. For those customers you manage as a Single-Tenant, there will be no auto-discovery of Child Inspectors.
In Liongard, navigate to Admin > Inspectors > Inspector Types > Navigate to the Appropriate Microsoft Inspector > Add System.
Fill in the following information:
- Type of Inspector: Parent
- Environment: Select your MSP's Environment
- Friendly Name: Suggested Naming: SP Name] [nspector Name] P Parent
- Agent: Select On-Demand Agent
- Inspector Version: Latest
- Tenant Settings: Select Single-Tenant Application
- Entra (Tenant) ID: Paste in your Entra Tenant ID copied in Step 2
- Select the "Open Microsoft Sign-In" button
- Authenticate by signing into the organization for the associated Tenant ID with an account that is assigned the Privileged Role Administrator, Cloud Application Administrator, Global Reader, Reports Reader, Teams Administrator, Security Reader, and Directory Writer roles within Entra ID.
- Follow the prompts to accept the requested permissions by selecting the checkbox to consent and select Accept
- A green check will appear to validate that you successfully completed the step.
- ❗️Note❗️Ensure you are prompted to satisfy an MFA claim during the login process.
- Scheduling: The Inspector will default to run once a day at the time the Inspector is set up. Here you can adjust the schedule
- Select Save. The Inspector will now be triggered to run within the minute.
Optional: Turn on Flexible Asset/Configuration Auto-Updating
If you would like these Inspector's data to be sent to ConnectWise and/or IT Glue, turn on Flexible Assets/Configurations for these Inspectors:
- ConnectWise: Admin > Integrations > ConnectWise > Configuration Types > Confirm the "Configuration Auto-Updating" toggle is enabled
- IT Glue: Admin > Integrations > IT Glue > Flexible Assets > Confirm the "Flexible Asset Auto-Updating" toggle is enabled
Troubleshooting
Please check the following if you are receiving an error message:
- Ensure that there is an entry for Liongard in the Enterprise Applications section in the associated Azure Active Directory Tenant

Updated 2 months ago