Publishing and Refreshing Reports
Publishing Reports to the Power BI Cloud and Configuring Automatic Refresh
After you have created a resource (report, dashboard, etc.) or implemented a Liongard created Power BI Template in Power BI Desktop, you may wish to share it with your colleagues. One way to do that is to publish it to your organization's Power BI Cloud service and install and configure the Microsoft Power BI Gateway to do scheduled refreshes of your report's dataset. To do so, follow the steps below:
Publish Reports to Power BI Cloud
- When you are finished with your report and ready to publish it to Power BI online, select the Publish button in the Home ribbon on the far right of the ribbon bar

- You will be asked to select a cloud workspace from your account as the destination for your report. You can select any workspace that meets your needs. Then, press Select.
In this example, we will use "My Workspace."

- The report will publish in Power BI Cloud. How long this takes is dependent on how many tables and queries are in your report. Once completed, you will get a confirmation message.

- Once your report is published, you can log into Power BI and navigate to Workspaces > The workplace selected for your report,, and you will see your newly published report as well as its Dataset(s).
Configure the Gateway and Automatic Data Refresh
Because Liongard uses a custom Power BI connector, the Power BI Gateway must be installed to allow the Power BI service to refresh Liongard Data. This runs as a background service on the machine.
Step 1: Install the Gateway
-
Download, install, and configure the Microsoft Power BI Gateway from https://powerbi.microsoft.com/en-us/gateway/. Note: There is a Learn More link on this page for additional information about the Power BI Gateway.
-
Once installed, sign in and register your gateway to your Microsoft 365 account when prompted.

- After your gateway is registered you will need to make sure the gateway recognizes the Liongard connector. Navigate to the Connectors tab in your gateway and adjust the folder path to where your Liongard Data Connector is located. If correct, you should see the Liongard connector populate at the top.
File PermissionsThe service account used for the data connector must have full access to the file path in which the connector is installed.
Moving the connector to c:\custom connectors (directory must be created) can alleviate permission issues and can be used as a workaround if permission issues are persistent or if you are unable to view the connector using the gateway.
You may need to restart the Connector after changing the path for the gateway to reflect the new location.

- When you have successfully configured the gateway, a message at the top of the Status page should indicate the gateway is online and ready to use.

Configure the Gateway in Power BI Online
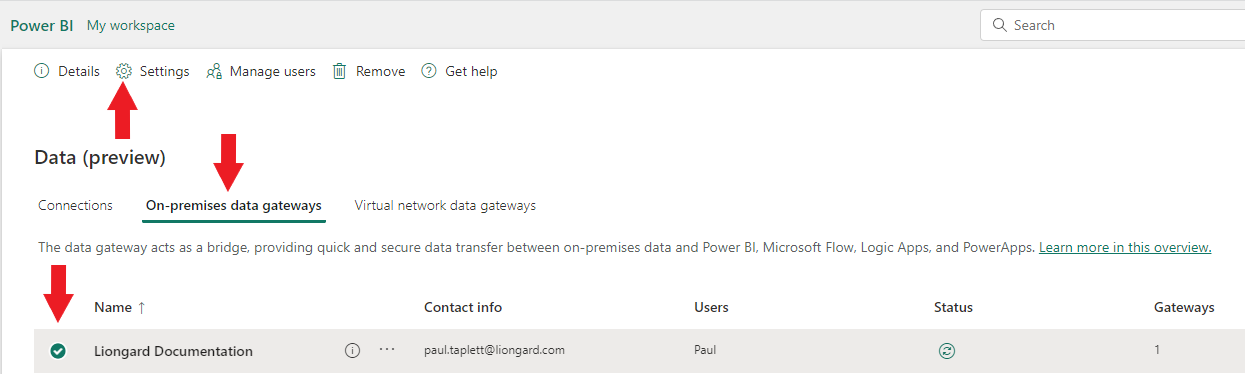
- Log into Power BI. Navigate to the gear icon in the top right and select Manage connections and gateways

- Select the On-premises data gateways tab and select the checkbox next to the gateway you just installed. Then, select the settings option at the top.
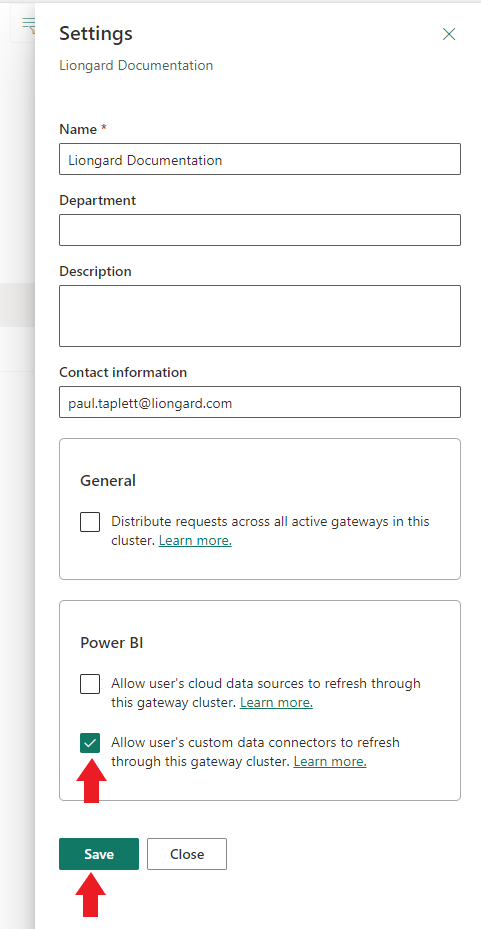
- Select the checkboxnext to the setting Allow user's custom data connectors to refresh through this gateway cluster and select Save.
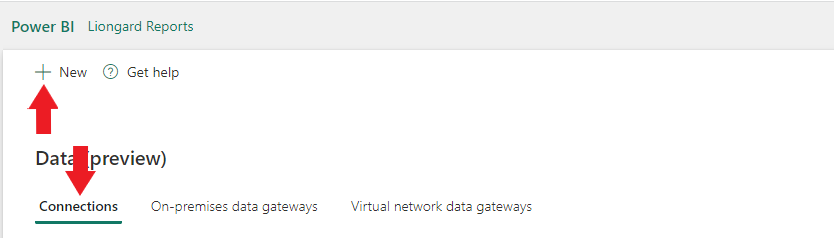
- Next, select the Connections tab and then select New in the top-left to add a new Data Source connection.
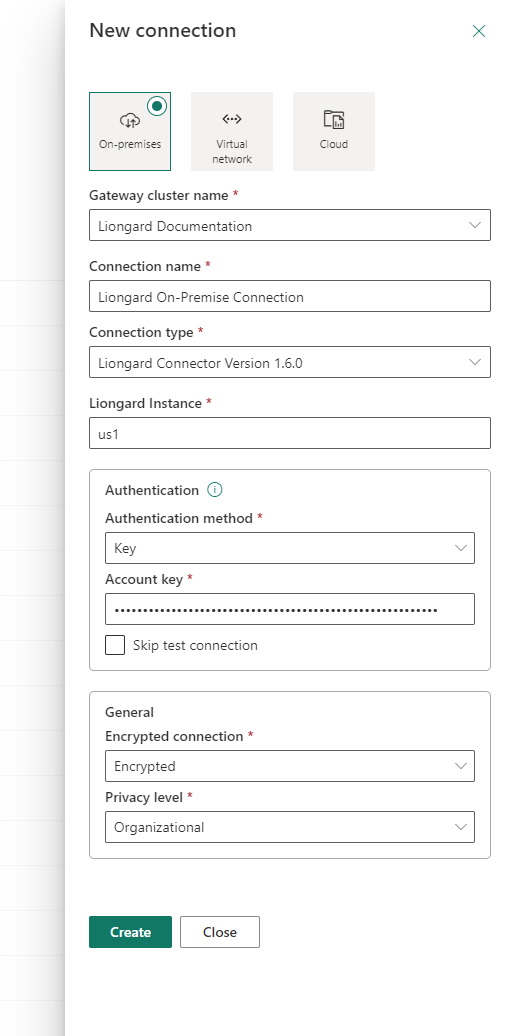
- Set up the new DataSource connection by filling out the following information:
- Gateway Cluster Name: Select the on-premises data gateway from step 2
- Connection Name: Provide a connection name of your choice
- Connection Type: Liongard Connector Version 1.6.0
- Liongard Instance: Your Liongard Instance URL (i.e. us1, us2, eu1, etc...)
- Authentication method: Key
- Account key: Your Base64 encoded API token
- Encrypted connection: Encrypted
- Privacy Level: Organizational
Once you have entered the information, select Create
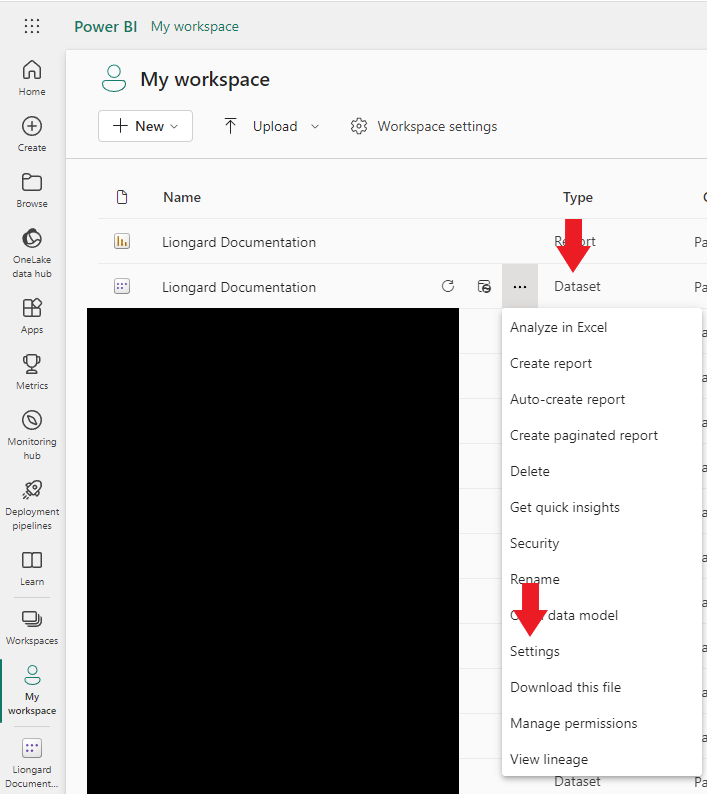
- Close the connection window. Navigate to your report's dataset, Workspaces > The workplace you selected for your report > Menu of the dataset > Select Settings*
- Navigate to the Gateway and Cloud Connections drop-down section and map the correct gateway to the Data Source created in Step 8. Then, click Apply.
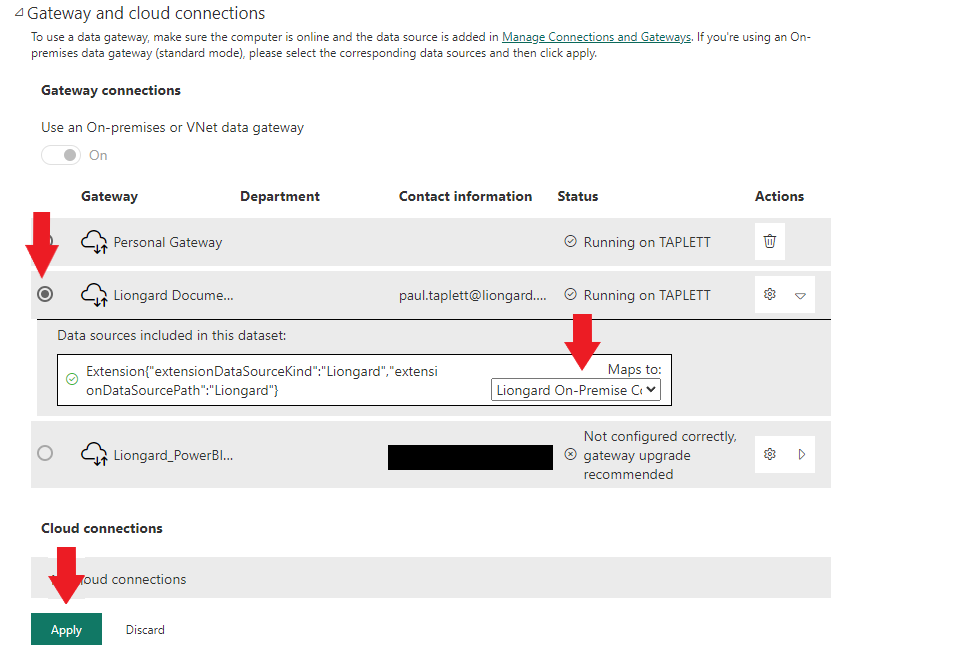
- Once the gateway is connected and mapped to your Data Source, a schedule can be set to keep the report refreshed.
While in the settings for the dataset, open the Scheduled refresh section. Here you can enable and configure the frequency and time of the refresh. Select Apply when finished to save your changes.

- You can test if the connector is set up successfully by returning to Workspaces > Your workspace. Select Refresh now on the dataset to trigger the gateway to run through connecting and refreshing the dataset.
Updated 9 months ago