ConnectWise Asio (Beta)
Quick DetailsRecommended Agent: On-Demand
Supported Agents: On-Demand or Self-Managed
Is Auto-Discovered By: N/A
Can Auto-Discover: ConnectWise Asio Child Inspectors
Parent/Child Type Inspector: Yes
Inspected via: API
Data Summary: TBD
ConnectWise Asio Integration Overview
Platform Alignment
Asio RMM is ConnectWise’s actively supported Remote Monitoring and Management (RMM) platform. By aligning Liongard’s integration with Asio RMM, you ensure that your organization receives accurate, up-to-date device data while benefiting from long-term platform stability and roadmap alignment.
Value to Your Liongard Environment
By pulling Asio RMM devices into Liongard, you can apply your existing Liongard workflows directly to your RMM device inventory, including:
- Reporting
- Environment visibility
- Auditing
- Historical change tracking
This integration allows you to manage, analyze, and track your RMM devices using the same consistent Liongard experience you rely on across the rest of your environment.
Inspector Setup Preparation
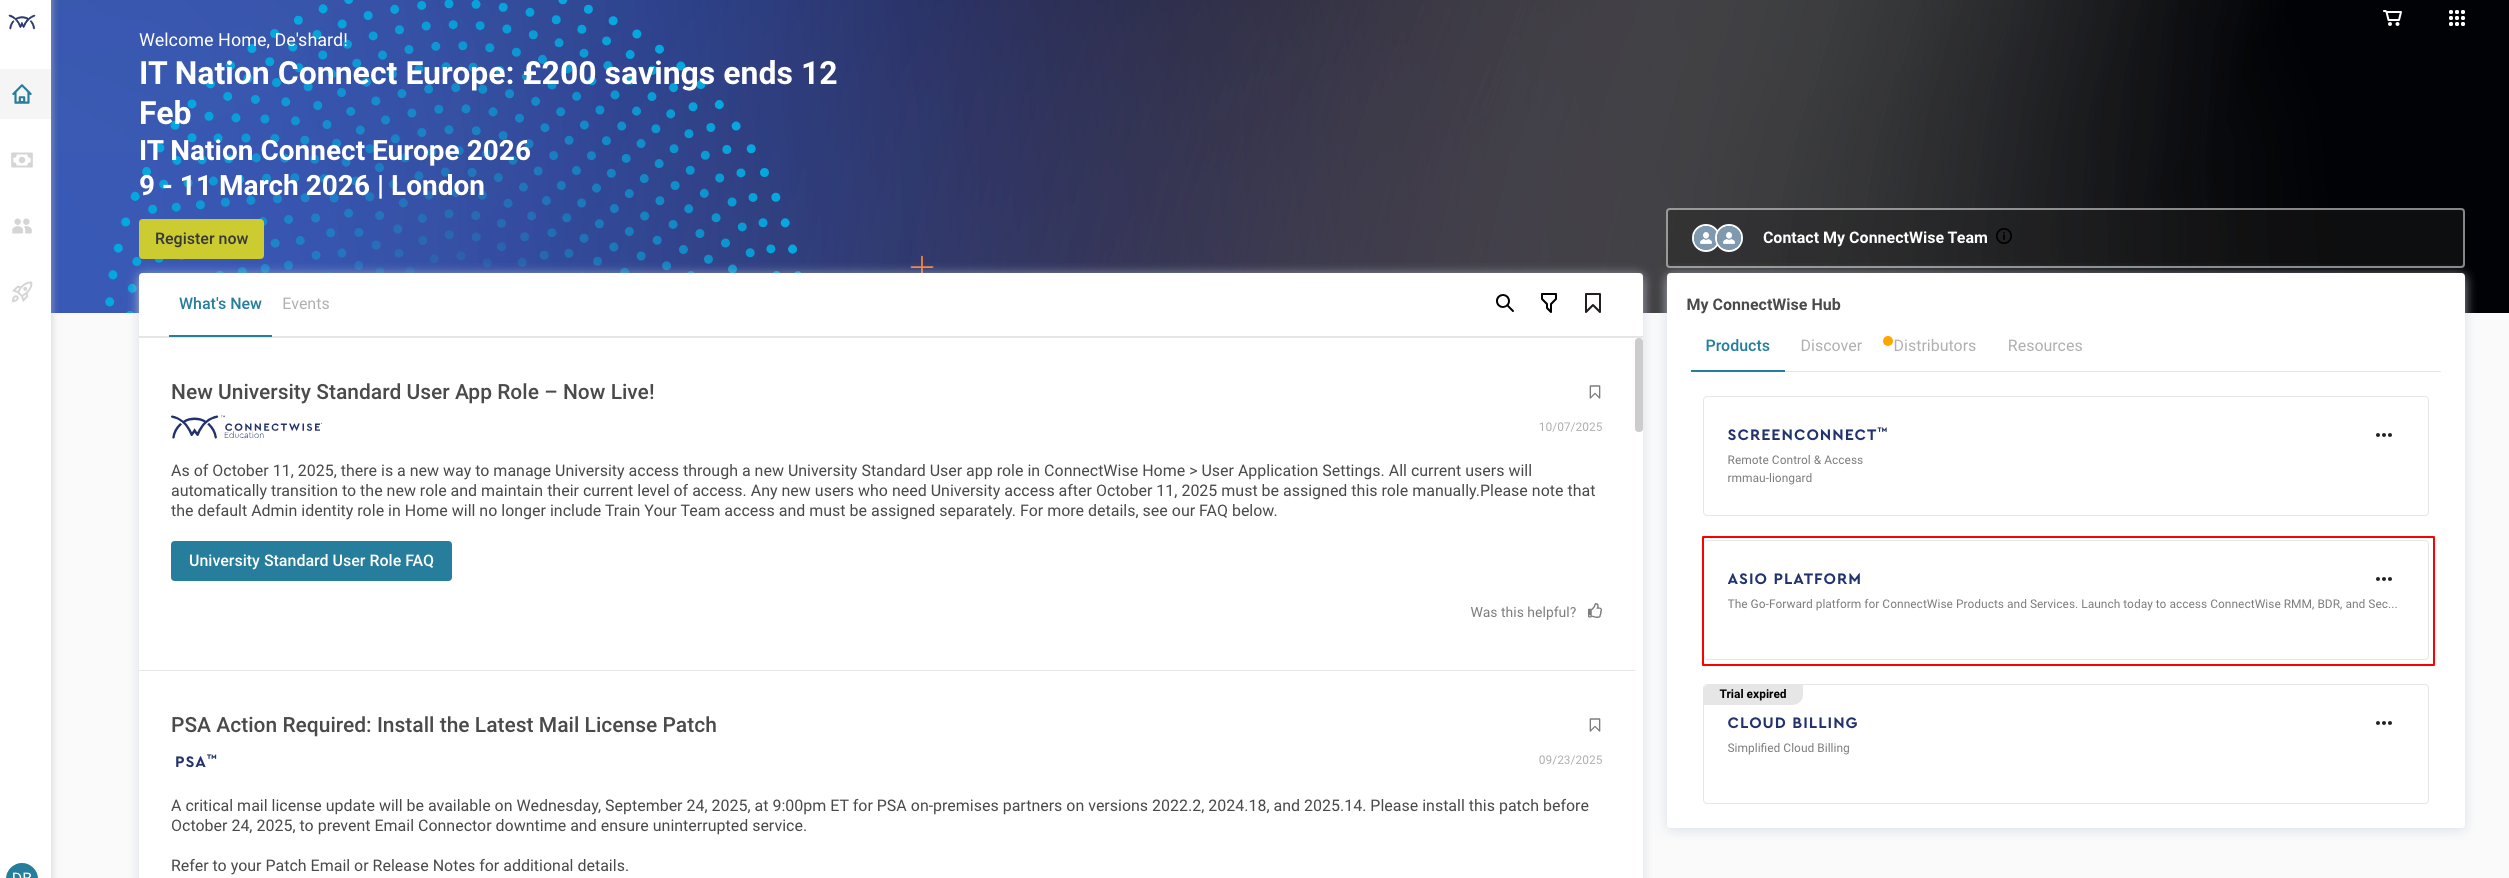
Step 1: Access the Asio RMM Platform
-
Navigate to home.connectwise.com and sign in.
-
Under the "My ConnectWise Hub > Products Tab", select the Asio Platform and Launch.
Step 2: Set Up API Access
-
Expand the side menu and navigate to Integrations > API Access.
-
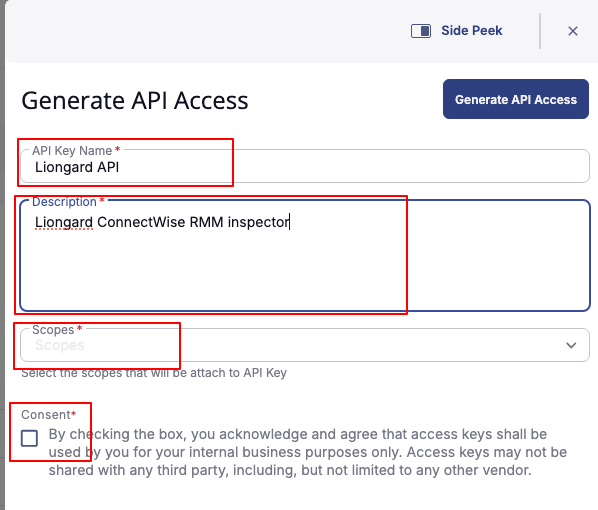
Click the + Generate API Access button to initiate the configuration process.

-
In the configuration window, provide an API Key Name for the API access.
-
Add a Description to provide additional context or details about the access.
-
Select the following API Scopes from the available list of Scopes.
-
Platform - Agent - Read Platform - Custom Fields Values - Read Platform - Policy - Read Platform - AgentToken - Read Platform - DataMapping - Read Platform - Sites - Read Platform - Assets - Read Platform - DeviceGroups - Read Platform - Tickets - Read Platform - Automation - Read Platform - Devices - Read Security - Threats - Read Platform - Companies - Read Platform - Os Patching Endpoint Patches - Read Platform - Custom Fields Definitions - Read Platform - Performance - Read
-
-
Select the Consent checkbox to agree to the terms of the API Access agreement.
-
Click Generate API Access.
-
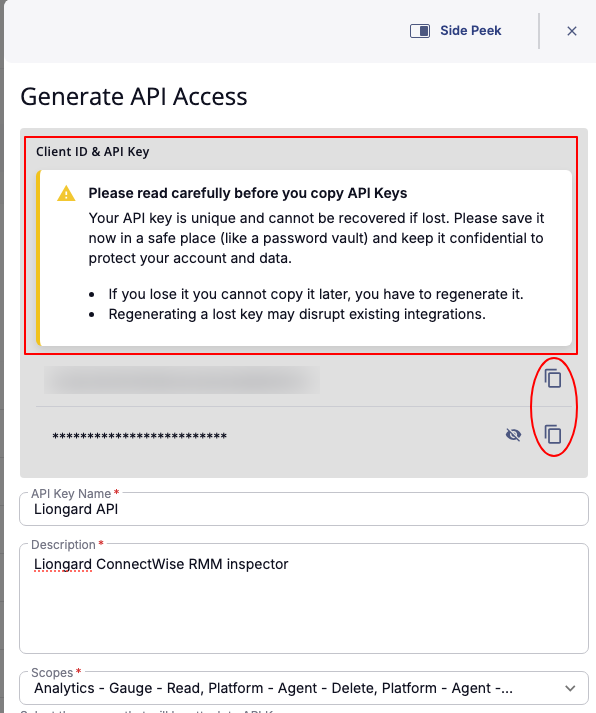
Copy the Client ID and Client secret before closing the configuration window.
Step 3: Identify your Region.
Your region can be identified within your URL
- Europe: https://euplatform.connectwise.com/
- Australia: https://auplatform.connectwise.com/
- North America: https://control.itsupport247.net/
Liongard Inspector Setup
Step 1: Parent Inspector Setup
Since ConnectWise Asio is a multi-tenant system, where a single portal is used to manage many Environments, you will set up a single "Parent" Inspector that will then auto-discover "Child" Inspectors for each Environment.
In Liongard, navigate to Admin > Inspectors > Inspector Types > Navigate to the ConnectWise Asio Inspector > Select Add System.
Fill in the following information:
- Type of Inspector: Parent
- Environment: Select your MSP's Environment
- Friendly Name: Suggested Naming: SP Name] CConnectWise Asio Parent
- Agent: Select On-Demand
- Inspector Version: Latest (Auto-Update)
- Region: Your ConnectWise Asio region (Can be found within your ConnectWise Asio URL)
- Client ID: The ConnectWise Asio API Key created in the earlier steps.
- Client Secret: The ConnectWise Asio API Secret created in the earlier steps.
- Scheduling: The Inspector will default to run once a day at the time the Inspector is set up. Here you can adjust the schedule
Select Save. The Inspector will now be triggered to run within the minute.
Step 2: Child Inspector Setup
After the first run of the Parent Inspector, your client ConnectWise Asio organizations will be auto-discovered and surfaced on the Discovered Systems page.
Navigate to the Discovered Systems tab in your Inspectors > ConnectWise Asio page
- Activate your Discovered Systems by ensuring they're mapped to the correct Environment > Select the checkbox to the left of Inspector(s) > Select the Actions drop-down menu > Activate Launchpoints.
- Users may also Archive Discovered Systems by Selecting the checkbox to the left of the Inspector(s) > Select the Actions drop-down menu > Archive Launchpoints.
Updated about 1 month ago