Deployment via Continuum
Liongard Agent MSI Name ChangeStarting with version 2.0.2, the Liongard Agent MSI package was renamed to "LiongardAgent-lts" as part of our new brand messaging.
Deployment scripts using the old naming conventions (RoarAgent.msi, ROARURL, ROARACCESSKEY, etc.) will still work if necessary, but we do recommend updating the scripts when possible to ensure consistency across the platform.
New installations using the MSI will change the Windows service name to "Liongard Agent." Upgrading an existing installation will leave the service name as "Roar Agent."
On-Premises Agent Overview
On-Premises Agent Installation Best Practices
- Install On-premises Agents on Domain Controllers
- We support On-premises Agents installed on servers; however, installing an On-Premises Agent on a Domain Controller will result in more Inspector auto-discovery, and therefore, less manual work.
- Generally, install One On-premises Agent per Network
- Our Agents speak across VPN tunnels
- Our Agents DO NOT speak across Active Directory Domains, so if you have two Active Directory Domains in one network, then you'll need an Agent within each Active Directory Domain.
- Install an additional On-premises Agent on any server NOT tied to an Active Directory Domain
- The additional Agent will auto-activate an Inspector for the local Windows server, and that Inspector will auto-discover a Network Discovery, Hyper-V, and/or SQL Server Inspectors if present
- Agent Names must be unique. Include a unique identifier in the Agent script to ensure all Agents will have a unique name.
On-Premises Agent Installation = Inspector Auto-DiscoveryWhen you roll out an On-premises Agent, there is a potential for the auto-discovery of several other Inspectors:
- Upon install, an On-premises Agent will auto-activate an Inspector for the local Windows Server
- After the Windows Inspector runs, it will auto-discover an Active Directory Inspector
- Once activated and successfully run, the Active Directory Inspector will auto-discover Inspectors for any additional Windows servers within its Domain
- Once activated and successfully run, the Windows Inspectors will auto-discover Inspectors for any installed Hyper-V or SQL Server Inspectors
- After the first Windows Inspector runs, it will also auto-discover a Network Discovery Inspector
- After the Network Discovery Inspector is activated, it will auto-discover Inspectors for several makes/models of network devices. See our Network Discovery Inspector docs for more information.
Script Overview
The script below provides for a basic install of the Liongard Windows Agent via Continuum RMM using our MSI Installer. It takes in variables associated with your Liongard instance, such as the URL and Access Key ID and Secret, to complete the install.
- This script will be supported on a best-effort basis.
This script can:
- Install an On-Premises Agent
- (Optionally) Assign the Agent to it's Associated Environment
- (Optionally) Assign the Agent to "Run As" a Domain Admin User
This script can not:
- Create a Domain Admin User
Step 1: Create a Service Account
"Run As" a System AccountIf you would like to set this Agent to "run as" the Local System user rather than a specific user account, then skip this step.
In order to run remote inspections, On-Premises Agents must be set to "Run As" an Active Directory user with Domain Admin credentials.
Follow Step 1 in our Deployment via MSI Installer documentation to create a Domain Admin Active Directory user for this Agent to "Run As".
Step 2: Import the Script
Initially, you will need to import the script by saving it as a Custom Task.
Part 1: Import the Script
In Continuum, navigate to Quick Access drop down menu > select Devices
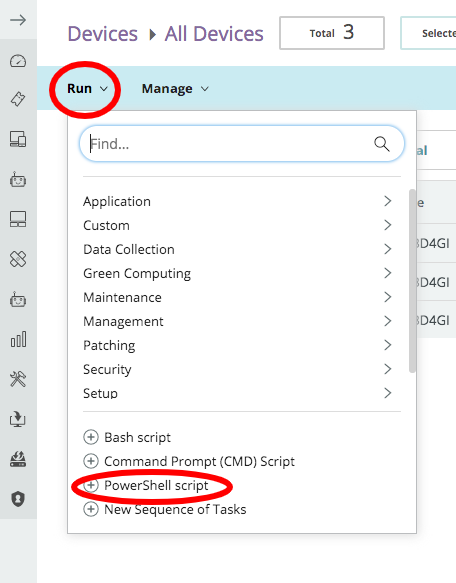
- Select the Run drop down menu > (+) Powershell script
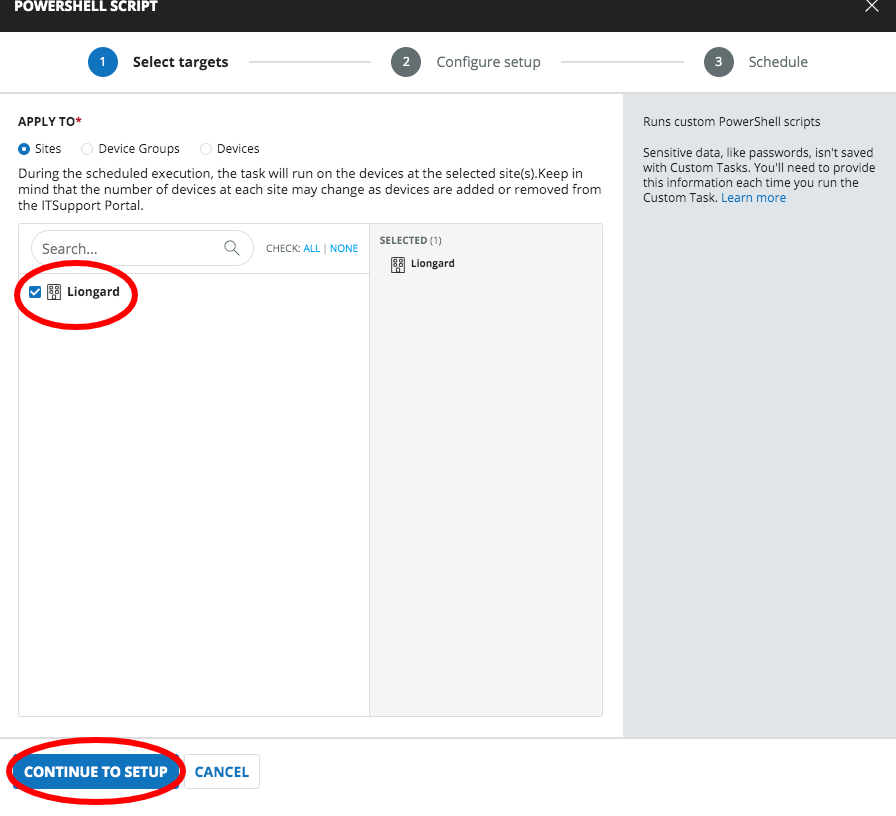
- Select a target (any target) > Continue to setup
- Paste the powershell script (below) into the Powershell Script field
<#
.SYNOPSIS
    Installs the Liongard Agent via the Continuum RMM.

.DESCRIPTION
    Provides a paramaterized script that lets you install the Liongard Agent based on the specific setup you want.

.PARAMETER LiongardUrl
  The Liongard url for your instance, e.g. us1.app.liongard.com

  $LiongardUrl = 'xxxxx.app.liongard.com'

.PARAMETER LiongardAccessKey
  The Liongard API access key generated from Liongard

  $LiongardAccessKey = "xxxxxx"

.PARAMETER LiongardAccessSecret
  The Liongard API secret generated from Liongard

  $LiongardAccessSecret = "xxxxxx"

.PARAMETER LiongardSvcUsername
  The username of the Liongard service account to use associate the service with, i.e. "Run As"

  $LiongardSvcUsername = "DOMAIN\LiongardSvcAccount"

.PARAMETER LiongardSvcPassword
  The password of the Liongard service account to use associate the service with, i.e. "Run As"

  $LiongardSvcPassword = "xxxxxx"

.PARAMETER UseSiteName
    Default to False. If set it will associate the agent to the Environment which matches the site name. Change this to $True if and only if the Liongard Environment names EXACTLY MATCH the Continuum Site names. We recommend you model Liongard environment names after your Continuum site names as they are easy to change and Continuum is not.
NOTE: The Continuum agent does not produce the 'SITENAME' registry key for ~30 minutes after initial Continuum agent installation. You will need to run this script after the Continuum agent has properly registered and the registry key for the site name is populated if you use this feature.

    $UseSiteName= "$True"

.PARAMETER Environment
    If you want to manually specify the Environment in Liongard to associate the agent with.

    $Environment = "Liongard"

.NOTES
    Version: 1.0.0
    Date: 09/05/2019
#>
[Net.ServicePointManager]::SecurityProtocol = [Net.SecurityProtocolType]::Tls12
$X64 = 64
$X86 = 32
$InstallerName = "LiongardAgent-lts.msi"
$DownloadURL = "https://agents.static.liongard.com/" + $InstallerName
$InstallerPath = Join-Path $Env:TMP $InstallerName
$DebugLog = Join-Path $Env:TMP LiongardDebug.log
$MsiLog = Join-Path $Env:TMP install.log


<#
Edit the following parameters to include your Liongard URL, Access Key and Secret, (optionally) the Username and Password to a Service Account, and (optionally) the name of the Environment that you would like this Agent to be associated to in Liongard
#>

$LiongardURL = 'xxxxx.app.liongard.com'
$LiongardAccessKey = "xxxxxx"
$LiongardAccessSecret = "xxxxxx"
$LiongardSvcUsername = "DOMAIN\LiongardSvcAccount"
$LiongardSvcPassword = "xxxxxx"
$Environment = "xxxxxx"


function Get-TimeStamp {
    return "[{0:MM/dd/yy} {0:HH:mm:ss}]" -f (Get-Date)
}
function Get-WindowsArchitecture {
    If ($env:ProgramW6432) {
        $WindowsArchitecture = $X64
    } Else {
        $WindowsArchitecture = $X86
    }
    return $WindowsArchitecture
}
function Get-ContinuumKeyPath {
    $WindowsArchitecture = Get-WindowsArchitecture
    If ($WindowsArchitecture -eq $X86) {
        $ContinuumKeyPath = "HKLM:\SOFTWARE\SAAZOD"
    } ElseIf ($WindowsArchitecture -eq $X64) {
        $ContinuumKeyPath = "HKLM:\SOFTWARE\WOW6432Node\SAAZOD"
    } Else {
        $ArchitectureError = "Failed to determine the Windows Architecture. Received $WindowsArchitecure."
        Add-Content $DebugLog "$(Get-TimeStamp) $ArchitectureError"
        throw $ArchitectureError
    }
    return $ContinuumKeyPath
}
function Get-ContinuumKeyObject {
    $ContinuumKeyPath = Get-ContinuumKeyPath
    If ( ! (Test-Path $ContinuumKeyPath)) {
        $ContinuumRegistryError = "The expected Continuum registry key $ContinuumKeyPath did not exist."
        Add-Content $DebugLog "$(Get-TimeStamp) $ContinuumRegistryError"
        throw $ContinuumRegistryError
    }

    $ContinuumKeyObject = Get-ItemProperty $ContinuumKeyPath

    If ( ! ($ContinuumKeyObject)) {
        $ContinuumRegistryError = "The Continuum registry key was empty."
        Add-Content $DebugLog "$(Get-TimeStamp) $ContinuumRegistryError"
        throw $ContinuumRegistryError
    }
    return $ContinuumKeyObject
}
function Get-SiteCode {
    $ContinuumValueName = "SiteCode"
    $ContinuumKeyObject = Get-ContinuumKeyObject
    If ( ! (Get-Member -inputobject $ContinuumKeyObject -name $ContinuumValueName -Membertype Properties)) {
        $ContinuumKeyPath = Get-ContinuumKeyPath
        $ContinuumRegistryError = ("The expected Continuum registry value $ContinuumValueName did not exist within " +
                                   "$ContinuumKeyPath")
        Add-Content $DebugLog "$(Get-TimeStamp) $ContinuumRegistryError"
        throw $ContinuumRegistryError
    }
    $SiteCode = $ContinuumKeyObject.$ContinuumValueName
    return $SiteCode
}

function Get-SiteName {
    $ContinuumValueName = "SITENAME"
    $ContinuumKeyObject = Get-ContinuumKeyObject
    If ( ! (Get-Member -inputobject $ContinuumKeyObject -name $ContinuumValueName -Membertype Properties)) {
        $ContinuumKeyPath = Get-ContinuumKeyPath
        $ContinuumRegistryError = ("The expected Continuum registry value $ContinuumValueName did not exist within " +
                                   "$ContinuumKeyPath")
        Add-Content $DebugLog "$(Get-TimeStamp) $ContinuumRegistryError"
        throw $ContinuumRegistryError
    }
    $SiteName = $ContinuumKeyObject.$ContinuumValueName
    return $SiteName
}
function Get-Installer {
    $WebClient = New-Object System.Net.WebClient
    try {
        $WebClient.DownloadFile($DownloadURL, $InstallerPath)
    } catch {
        Add-Content $DebugLog "$(Get-TimeStamp) $_.Exception.Message"
    }
    If ( ! (Test-Path $InstallerPath)) {
        $DownloadError = "Failed to download the Liongard Agent Installer from $DownloadURL"
        Add-Content $DebugLog "$(Get-TimeStamp) $DownloadError"
        throw $DownloadError
    }
}

# Generate the agent name here. We use Continuum SiteCode + Name of the computer to ensure uniqueness
function Get-AgentName {
    $SiteCode = Get-SiteCode
    $AgentName = $SiteCode + "-" + $env:computername
    return $AgentName
}

function Install-Liongard {
    $AgentName = Get-AgentName
    If ( ! (Test-Path $InstallerPath)) {
        $InstallerError = "The installer was unexpectedly removed from $InstallerPath"
        Add-Content $DebugLog "$(Get-TimeStamp) $InstallerError"
        throw $InstallerError
    }

    $LiongardArgs = "LiongardURL=" + $LiongardURL + " LiongardACCESSKEY=" + $LiongardAccessKey + " LiongardACCESSSECRET=" + $LiongardAccessSecret + " LiongardAGENTNAME=" + "`"$AgentName`""
    If ($LiongardSvcUsername -and $LiongardSvcUsername.Length -gt 0) {
    	$LiongardArgs += " LiongardAGENTSERVICEACCOUNT=" + "`"$LiongardSvcUsername`"" + " LiongardAGENTSERVICEPASSWORD=" + "`"$LiongardSvcPassword`""
    }

    If ($UseSiteName) {
      $SiteName = Get-SiteName
      $LiongardArgs += " LiongardENVIRONMENT=" + "`"$SiteName`""
    } ElseIf ($Environment) {
    	$LiongardArgs += " LiongardENVIRONMENT=" + "`"$Environment`""
    }

    $InstallArgs = @(
        "/i"
        "`"$InstallerPath`""
        $LiongardArgs
        "/qn"
        "/L*V"
        "`"$MsiLog`""
        "/norestart"
    )

    Start-Process msiexec.exe -ArgumentList $InstallArgs -Wait -PassThru
}
function main {
    If (!(Get-Service "Liongardr Agent" -ErrorAction SilentlyContinue)) {
    	Get-Installer # Download the MSI
      Install-Liongard # Install the MSI
    }
}
main- Set Expected time of script execution in seconds to 300
Part 2: Customize the Parameter Block
Towards the top of this script you'll find a block of parameters.
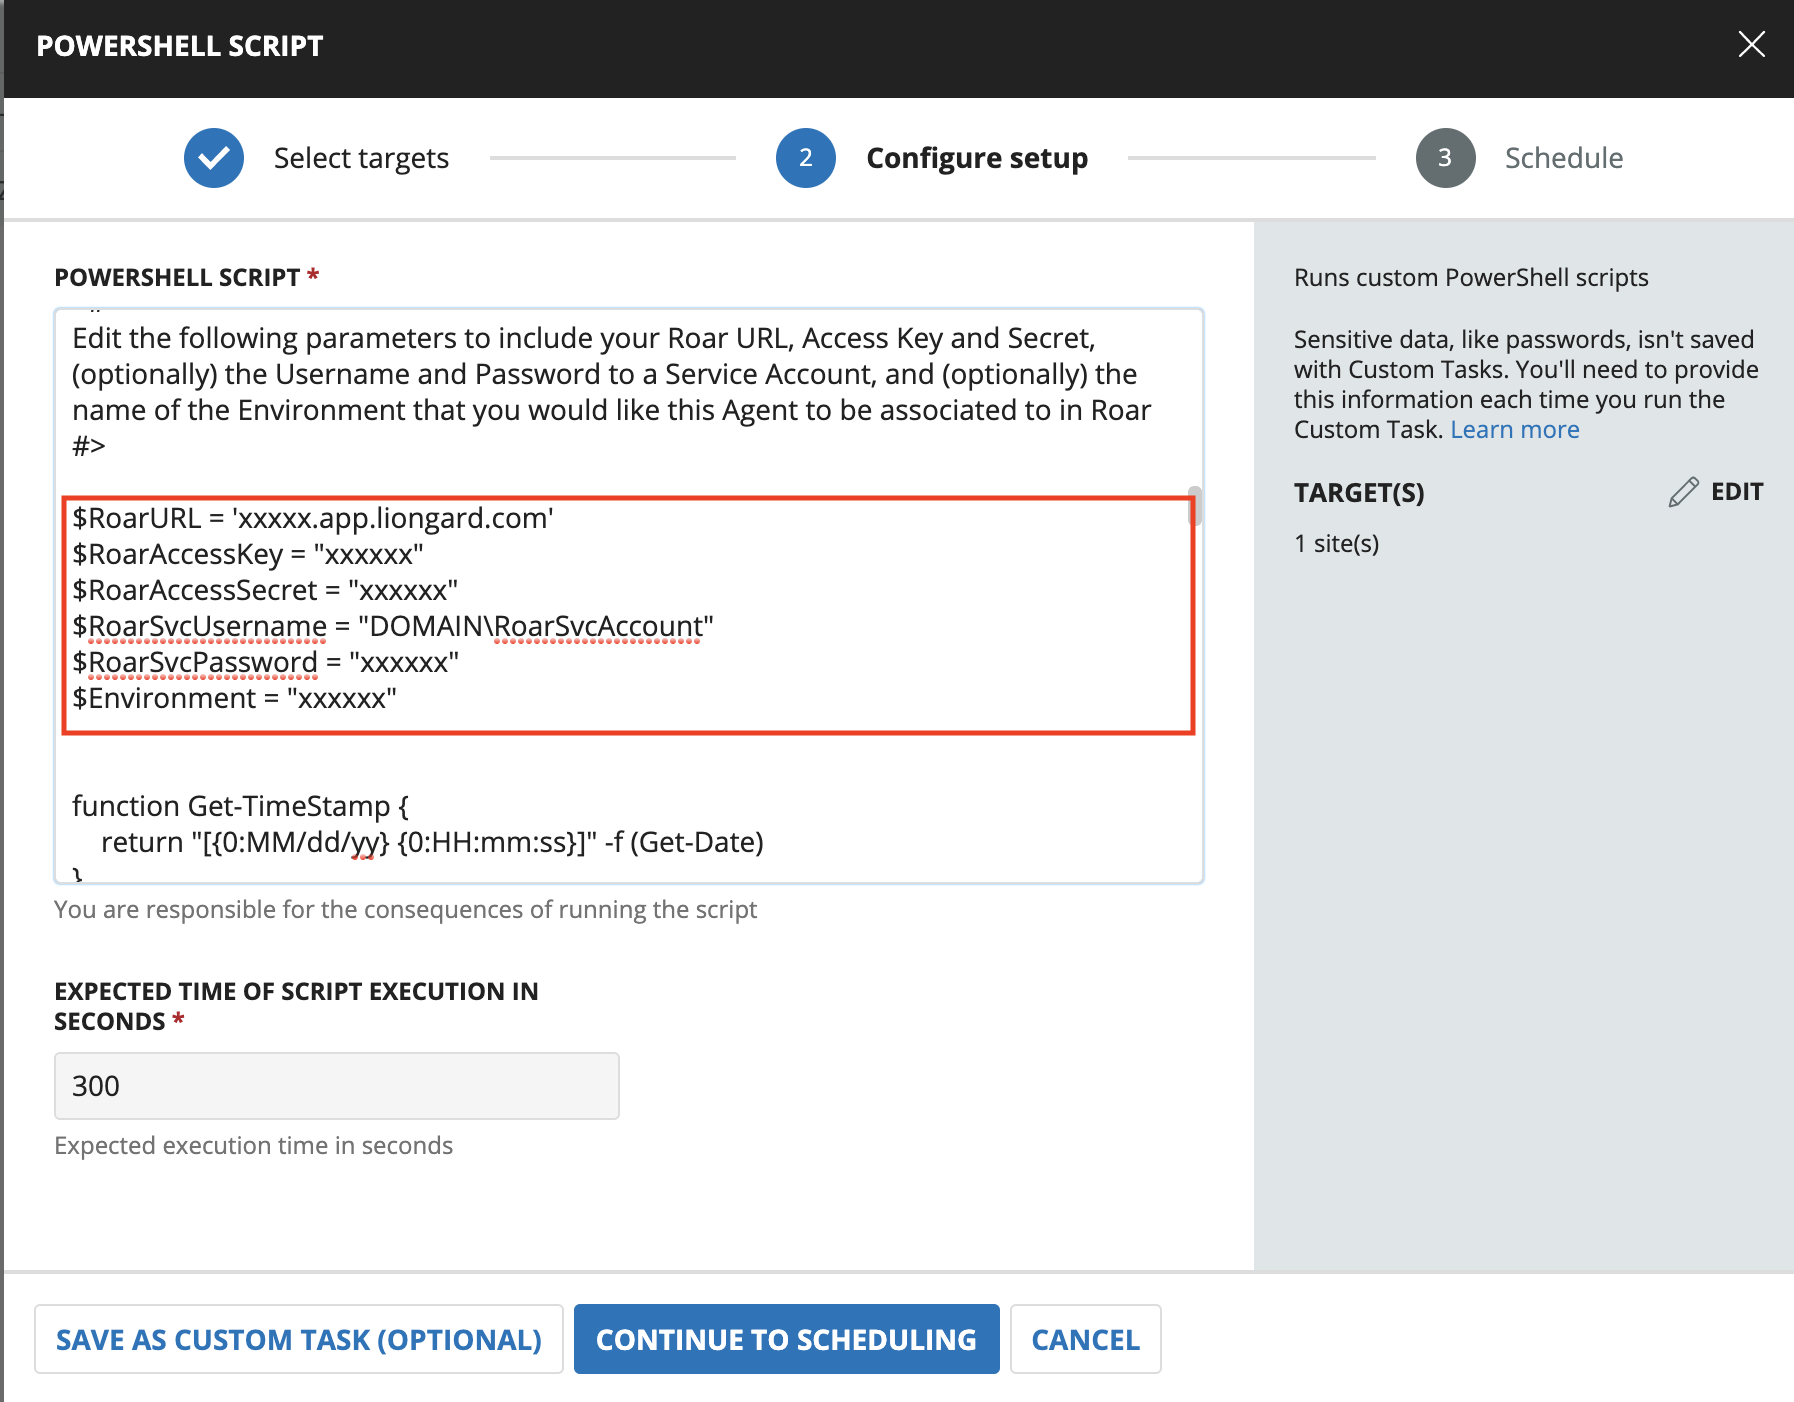
This block can be customized and edited to include your information. Below are examples of how you might customize the install via the command line parameters:
Entering your Information
Certain information in this parameter block will not change between runs, such as your Liongard URL, and Access Key and Secret, so you can edit this parameter block to include these details.
Associating the Agent to an Environment
- If your Site Names in Continuum RMM exactly match the name of your Environments in Liongard, then you can add in the parameter $UseSiteName = "$True", and take out the parameter $Environment = "xxxxxx"
- If you would NOT like to associate the Agent(s) to an Environment in Liongard upon install, then you can take out the parameter $Environment = "xxxxxx"
- If your Site Names in Continuum RMM do NOT exactly match the name of your Environments in Liongard, and you would like to associate the Agent to an Environment in Liongard upon install, then you can leave the parameter $Environment = "xxxxxx" and edit this to include a Liongard Environment name (this must exactly match the associated Environment's name in Liongard).
Associating the Agent to an Environment in LiongardIf you do NOT associate the Agent to an Environment in Liongard upon install, then you will need to do this after the installation.
You can do this in Liongard by navigating to Admin > Agents > Select the Agent installed > Fill the Environment field with the associated Environment.
Assigning the Agent to "Run As" a Specific User
- If you would like the Agent(s) to "Run As" a local system user, then you can take out the $LiongardSvcUsername = "DOMAIN\LiongardSvcAccount" $LiongardSvcPassword = "xxxxxx"
- If you would like the Agent(s) to "Run As" a Domain Admin user, but would not like to include this as part of this script, then please follow our Agent Service Permissions Documentation.
Select Save as Custom Task (Optional)
- Task Name: Liongard Agent MSI
- Select Save
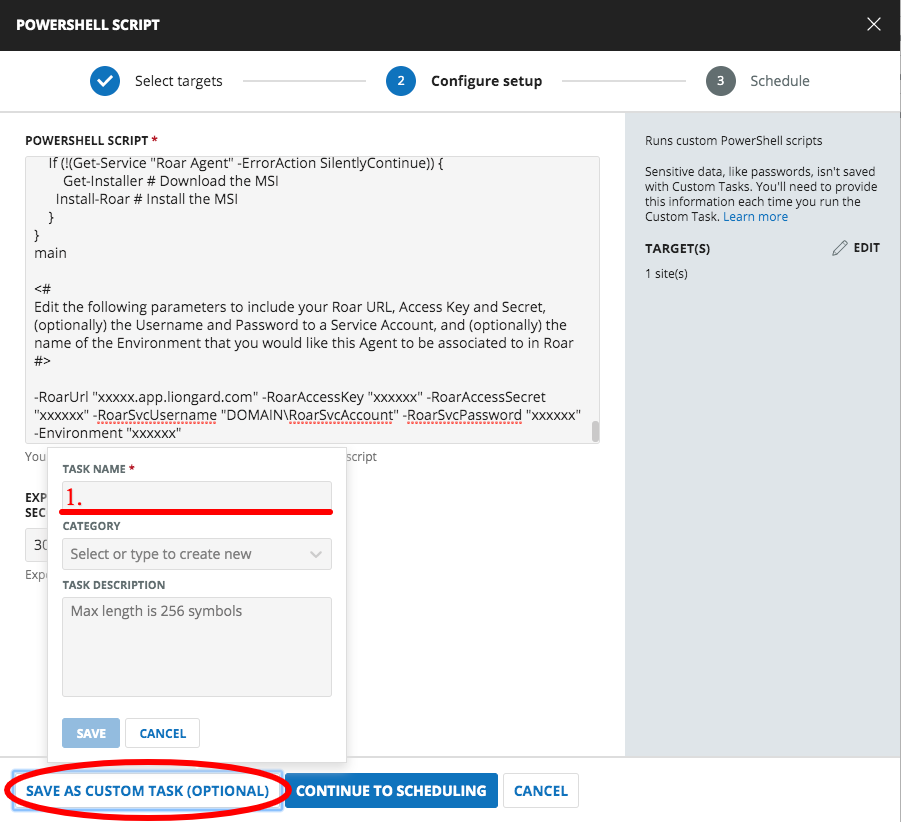
Once you see the Your setup has been saved as a Custom Task successfully message > select Cancel
This will serve as a generic task that you can further edit upon install.
Step 3: Run the Script
Part 1: Select Devices
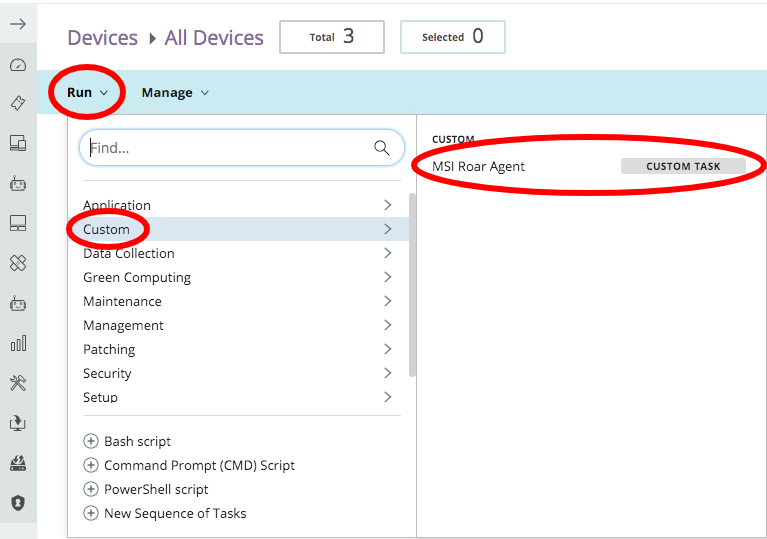
Run > Custom > select your Liongard MSI Agent custom task
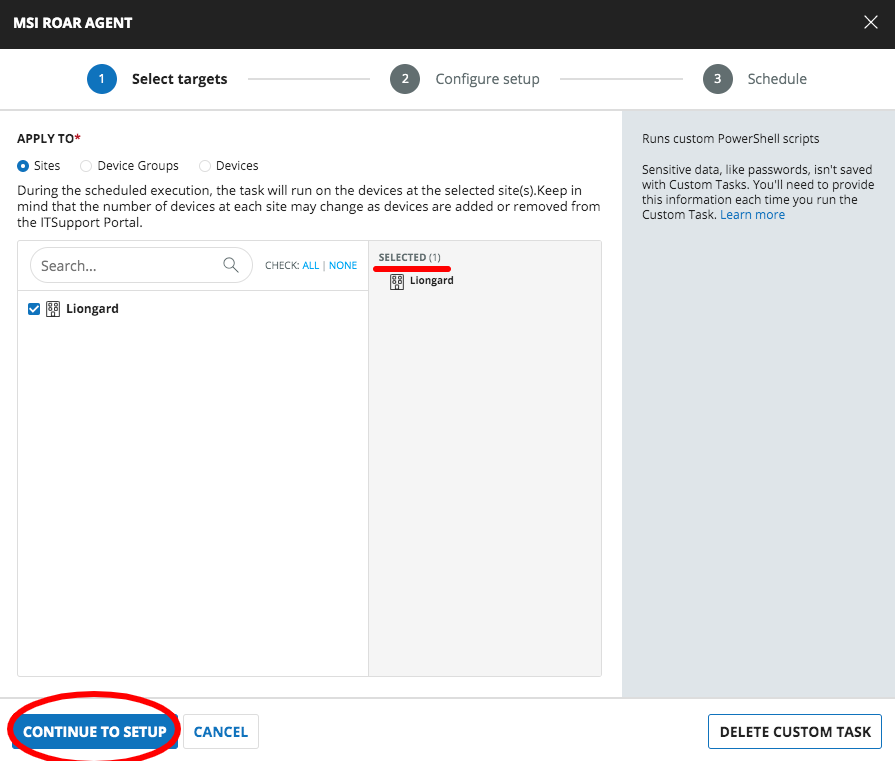
Select the Sites that you would like to roll out the Liongard MSI Agent to on this run of the script > Continue to Setup
Part 2: Edit Parameter Block
Depending on how you customized the parameter block, will change what information you will need to enter at this stage, if any. If there are any remaining parameters in this block that need to be edited, now is when you will do so.
Select Continue to Scheduling > select when you would like this script to run > Run Task
Agent Fail Logs
If this script fails, you can find an install log in the temporary folder c:\Windows\Temp, called install.log.
Using Automation with Liongard
Thanks to one of our Liongard partners for sharing the above Continuum script. If you'd like to share how your team is using automation with Liongard, email us at [email protected].
Updated 5 months ago
