SonicWall
This document provides the steps required to configure the Sonicwall Inspector.
Quick DetailsRecommended Agent: Self-Managed
Supported Agents: Self-Managed
Is Auto-Discovered By: Network Discovery Inspector
Can Auto-Discover: N/A
Parent/Child Type Inspector: No
Inspection via: SSH (6.x) or API (7.x)
Data Summary: Here
Overview
See it in Action
SonicWall Version SupportWhile our SonicWall Inspector will work with firmware versions older than 6.5.4.9, version 6.5.4.9 is the only version fully supported by SonicWall, and therefore, the only version fully supported by Liongard. For best results, update your SonicWall devices to version 6.5.4.9.
Additionally, Liongard is able to support NSv SonicWall OSX 7 (NSv) devices.
SonicWall Inspector Deployment
The setup steps for the SonicWall Inspector vary depending on the firmware version installed on the device.
- Deploying a SonicWall Inspector for Firmware Version 7.x
- Deploying a SonicWall Inspector for Firmware Version 6.x
Deploying a SonicWall Inspector for Firmware Version 7.x
SonicWall v8
The v7 setup for SonicWall will work for v8 as well.
Deployment Methods
There are three deployment methods for setting up a SonicWall Inspector in Liongard:
- Deployment using an On-Premises Agent
- Deployment using a Self-Hosted Agent
- Deployment via Auto-Discovery
If you would like to roll out the SonicWall Inspector through an On-Premises Agent, you must first install the Windows Agent on a server within the network residing behind the firewall of the SonicWall device.
If you would like to roll out the SonicWall Inspector through a Self-Hosted Agent, you must first install the Self-Hosted Agent in your data center.
If you would like to roll out the SonicWall Inspector with auto-discovery, you must first deploy a Network Discovery Inspector
Deployment using an On-Premises Agent or Self-Hosted Agent
Inspector Setup Preparation
Disabling the User Login Status Pop-upTo disable the user login status pop-up, follow SonicWall's documentation.
Step 1: Create API User Account and Assign Group Membership
- Navigate to Device > Users > Local Users & Groups and select Add User
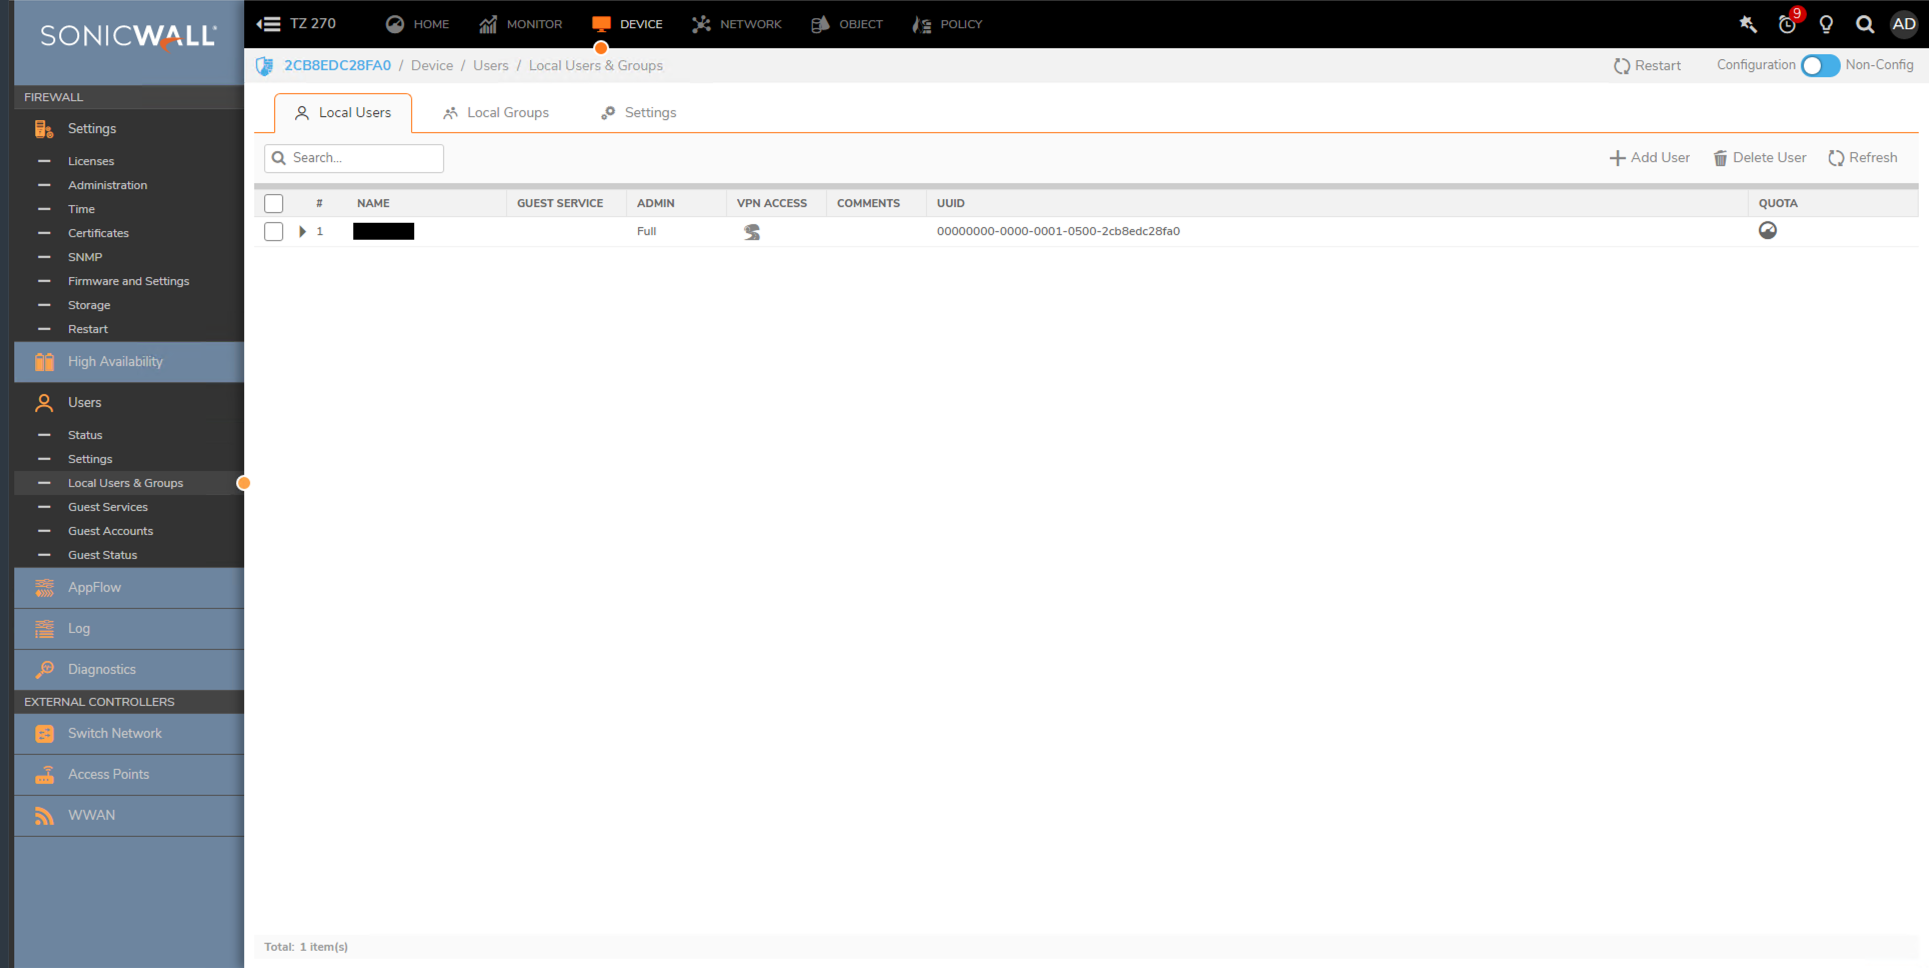
- Complete the Name, Password, and Confirm Password fields
- Select the Groups tab
- Add the user account to the Everyone, SonicWALL Administrators, and Trusted Users Groups. For least privileges, you may be able to use the Read Only Administrator group, but this may not work on all firmware versions.

- Navigate to Device > Users > Local Users & Groups > Local Groups.
- Edit the SonicWall Administrators Group and navigate to the Administration tab.
- Enable the Members go straight to the management UI on web login option and click Save.

Step 2: Enable API
- Navigate to Device > Administration > Audit/SonicOS API, scroll down to SonicOS API, and enable SonicOS API and RFC-2617 HTTP Basic Access authentication. Click Accept.
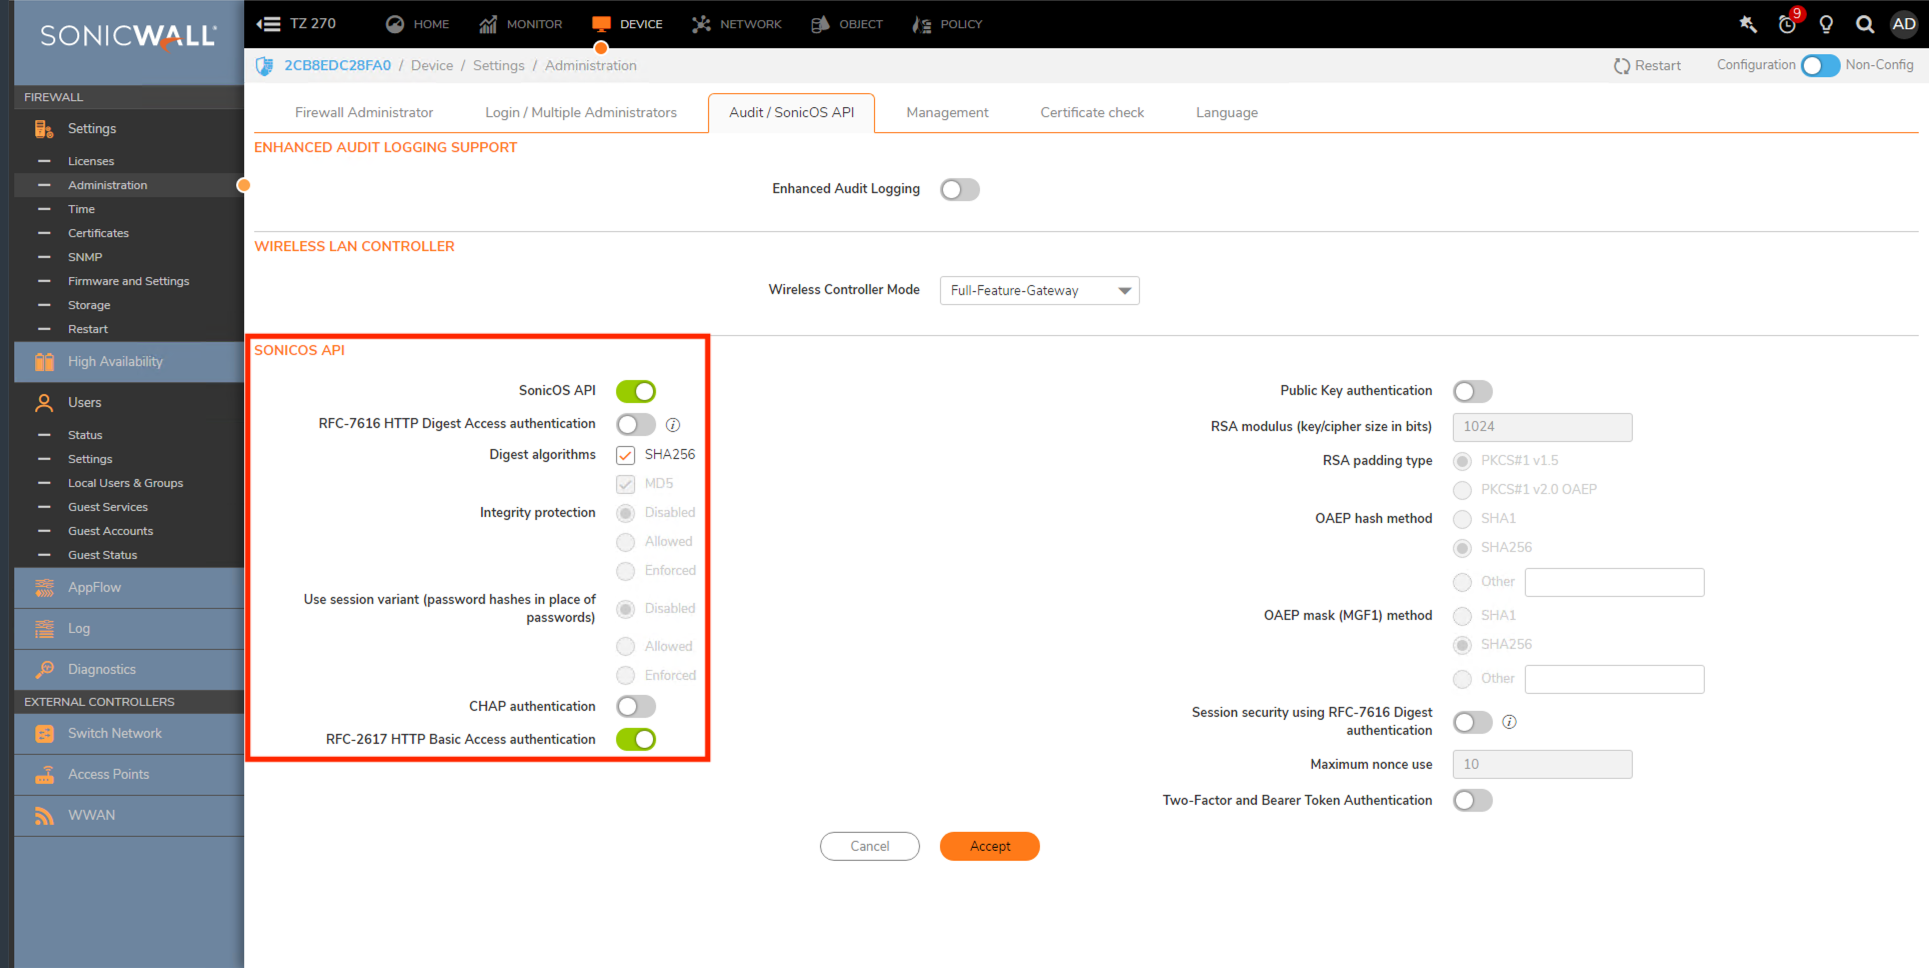
Note: If the toggles shown are disabled, a reboot is required to enable them.
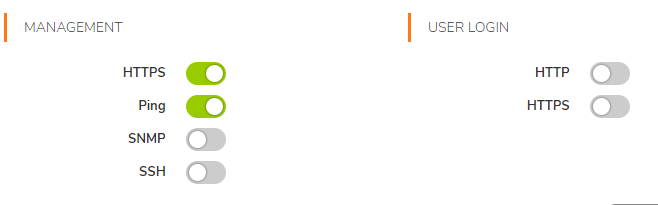
Step 3: Ensure HTTPS management is enabled on the interface that the Agent will connect to the SonicWall to
Liongard Inspector Setup
Inspector VersionWhen deploying a SonicWall running Firmware 7.x or higher, it is important to select the correct Inspector version as listed in the setup below. If the incorrect Inspector version is selected, the SonicWall Inspector will fail to complete.
In Liongard, navigate to Admin > Inspectors > Inspector Types > Navigate to the SonicWall Inspector > Select Add System.
Fill in the following information:
- Environment: Select the Environment this System should be associated with
- Friendly Name: Suggested "[Environment Name] - SonicWall"
- Agent: Select the On-premises or Self-Hosted Agent installed for this Environment
- Inspector Version: 7.0.0-XXX...
- Username: Liongard service credentials created in the Inspector Setup Preparation above
- Password: Liongard service credentials created in the Inspector Setup Preparation above
- IP/Hostname: Hostname or IP address of the SonicWall appliance
- HTTPS Management Port: HTTPS Port
- Schedule: The Inspector will default to run once a day at the time the Inspector is set up. Here you can adjust the schedule
Select Save. The Inspector will now be triggered to run within the minute.
Deployment via Auto-Discovery
If you have set up a Network Discovery Inspector, it will auto-discover your SonicWall Inspectors. After completing the Inspector Setup Preparation steps above, follow these steps:
Navigate to Admin > Inspectors > Select SonicWall Inspector > Select the Discovered Systems tab
Here you can Activate your Discovered SonicWall Inspector(s):
- Individually select the three dots Action menu to the left of the Discovered SonicWall Inspector(s)
- Edit the SonicWall Inspector(s) to include the following credentials gathered in the Inspector Setup Preparation
- Username: Liongard service credentials created in the Inspector Setup Preparation
- Password: Liongard service credentials created in the Inspector Setup Preparation
- Inspector Version: 7.0.0-XXX...
- Save the Inspector(s)
- Select the checkbox to the left of the Inspector(s) that you would like to Activate
- Select the Actions drop-down menu above the Discovered Systems table
- Select Activate Launchpoints
Deploying a SonicWall Inspector for Firmware Version 6.x
Deployment Methods
There are three methods for setting up a SonicWall Inspector in Liongard:
- Deployment using an On-Premises Agent
- Deployment using a Self-Hosted Agent
- Deployment via Auto-Discovery
If you would like to roll out the SonicWall Inspector through an On-Premises Agent, you must first install the Windows Agent on a server within the network residing behind the firewall of the SonicWall device.
If you would like to roll out the SonicWall Inspector through a Self-Hosted Agent, you must first install the Self-Hosted Agent in your data center.
If you would like to roll out the SonicWall Inspector through Auto-discovery, you must first deploy a Network Discovery Inspector
Remotely Inspect SonicWall through A VPN TunnelLiongard can inspect a SonicWall using an Agent at a different location if you have persistent site-to-site tunnels set up.
If you need to allow your SonicWall device's SSH management interface over a VPN tunnel, please review SonicWall's Documentation to learn more.
Deployment using an On-Premises Agent
Liongard Agent VersionThe SonicWall Inspector requires an Agent using version 3.2.1 or newer. If you are experiencing failures, ensure your Agents are upgraded. For more information, review our documentation.
Inspector Setup Preparation
You'll need to configure the SonicWall device to communicate with the Liongard On-premises Agent. Follow the steps below:
Step 1: Create new Host Address Objects for LAN zone
Location of Address ObjectsSome versions of the SonicWall firmware place address objects under the Objects menu and not the Network menu
- Navigate to Network > Address Objects
- Select Custom
- Click ADD
- Create Address Object using the following information:
- Zone should be LAN/LAN for the Liongard On-premises Agent
- Type should be Host
- Liongard Agent (IP Address) - x.x.x.x/255.255.255.255 (where x.x.x.x is the network address of the server where the Windows Agent has been installed)
Step 2: Create Liongard Address Group
- Navigate to Network > Address Objects > Address Groups
- Add Group > Suggested name "Liongard Monitor Group"
- Add the Liongard network object
- Click Save
Step 3: Enable SSH Management on Internal Interface
- Click Interfaces > Configure LAN
- Check SSH Management
- Click OK
Step 4: Enable SSH Access on LAN
Location of Access RulesSome versions of the SonicWall firmware place Access Rules under the Rules menu and not the Firewall menu
- Click Firewall > Access Rules > Grid View > LAN to LAN
- Under Configure column > Click Edit/Pencil for SSH Management
- Change Source to "Liongard Group" from above
Step 5: Create a Naming Convention for the Liongard Service Account (e.g. liongard.svc)
Naming ConventionPlease refer to your organization's naming convention policies when creating usernames. Usernames we state in the documentation are suggestions only.
- Click Users > Local Users > Add User
- User name: liongard.svc
- Create password
- Comment: Liongard Service
- Go to Groups tab
- Add SonicWall Administrators
- Click OK
SonicWall User Permission RolesAssigning a user permission role other than 'SonicWall Administrator' might result in incomplete data being displayed in the inspector.
SonicWall Password Supported Characters and Complexity RequirementsPlease note that SonicWall does not support certain characters in system passwords, which may cause authentication issues between Liongard and SonicWall if you attempt to use an unsupported character.
Additionally, SonicWall has different password complexity requirements for SSH access than it does for the web UI. These requirements can vary between versions of the firmware.
More information can be found in SonicWall's documentation.
Liongard Inspector Setup
In Liongard, navigate to Admin > Inspectors > Inspector Types > Navigate to the SonicWall Inspector > Select Add System.
Fill in the following information:
- Environment: Select the Environment this System should be associated to
- Friendly Name: Suggested "[Environment Name] - SonicWall"
- Agent: Select the On-premises Agent installed for this Environment
- Inspector Version: Latest
- SSH Username: Liongard service credentials created in the Inspector Setup Preparation above
- SSH Password: Liongard service credentials created in the Inspector Setup Preparation above
- IP/Hostname: Hostname or IP address of the SonicWall appliance
- SSH Port: SSH Port
- Enable Detailed Output: Toggling this on will run the show current-config, show tsr all, and show tech-support-report commands during the inspection. There is a risk of performance degradation to your SonicWall device if you enable these commands.
- Schedule: The Inspector will default to run once a day at the time the Inspector is set up. Here you can adjust the schedule
Select Save. The Inspector will now be triggered to run within the minute.
Deployment using a Self-Hosted Agent
Inspector Setup Preparation
You'll need to configure the SonicWall device to communicate with the Liongard Self-Hosted Agent. Follow steps below:
Step 1: Create New Host Address Objects for WAN Zone
- Go to Network > Address Objects
- Select Custom
- Click ADD
- Create address object using the information below:
- Zone should be WAN if the Liongard Self-Hosted Agent is being used.
- Type should be Host
- Liongard Agent x.x.x.x/255.255.255.255 (where x.x.x.x is the IP Address of the Agent you wish to run the inspection through)
Step 2: Create Address Group Liongard Group
- Navigate to Network > Address Objects > Address Groups
- Add Group > Name "Liongard Monitor Group"
- Add the Liongard network object
- Click Save
Step 3: Enable SSH Management on Internal Interface
- Click Interfaces > Configure WAN
- Check SSH Management
- Click OK
Step 4: Enable SSH Access on WAN
- Click Firewall > Access Rules > Grid View > WAN to WAN > Under Configure column click Edit/Pencil for the service named SSH Management
- Change Source to "Liongard Group"
Verify SSH Security Access
By default, SonicWall opens up the SSH port from any IP on the WAN interface. Make certain to verify the steps from "Enable SSH Access on WAN".
Verify the WAN to WAN access group for SSH has been locked down to Liongard and any other needs for your organization
Step 5: Create a Naming Convention for the Liongard Service Account (e.g. liongard.svc)
Naming ConventionPlease refer to your organization's naming convention policies when creating usernames. Usernames we state in the documentation are suggestions only.
- Click Users > Local Users
- Click Add User
- Suggested Username: liongard.svc
- Create password
- Comment: Liongard Service
- Go to Groups tab, add SonicWall Administrators
- Click OK
Liongard Inspector Setup
In Liongard, navigate to Admin > Inspectors > Inspector Types > Navigate to the SonicWall Inspector > Select Add System.
Fill in the following information:
- Environment: Select the Environment this System should be associated to
- Friendly Name: Suggested "SonicWall [Environment Name]"
- Agent: Select the Self-Hosted Agent
- Inspector Version: Latest
- SSH Username: Liongard service credentials created in the Inspector Setup Preparation above
- SSH Password: Liongard service credentials created in the Inspector Setup Preparation above
- IP/Hostname: Hostname or IP address of the SonicWall appliance
- SSH Port: SSH Port
- Enable Detailed Output: Toggling this on will run the show current-config, show tsr all, and show tech-support-report commands during the inspection. There is a risk of performance degradation to your SonicWall device if you enable these commands.
- Scheduling: The Inspector will default to run once a day at the time the Inspector is set up. Here you can adjust the schedule
Select Save. The Inspector will now be triggered to run within the minute.
Deployment via Auto-Discovery
If you have set up a Network Discovery Inspector, it will auto-discover your SonicWall Inspectors. After completing the Inspector Setup Preparation above (either for an inspection via an On-Premises Agent or via a Self-Hosted Agent), follow the steps below:
Navigate to Admin > Inspectors > Select SonicWall Inspector > Select the Discovered Systems tab
Here you can Activate your Discovered SonicWall Inspector(s):
- Individually select the three dots Action menu to the left of the Discovered SonicWall Inspector(s)
- Edit the SonicWall Inspector(s) to include the following credentials gathered in the Inspector Setup Preparation
- SSH Username: Liongard service credentials created in the Inspector Setup Preparation
- SSH Password: Liongard service credentials created in the Inspector Setup Preparation
- Save the Inspector(s)
- Select the checkbox to the left of the Inspector(s) that you would like to Activate
- Select the Actions drop-down menu above the Discovered Systems table
- Select Activate Launchpoints
Roll out Inspectors at Mass via CSV Import
Use this process when rolling out multiple SonicWall Inspectors at once.
CSV Import for v7 DevicesA CSV import will work for both v6 and v7 devices.
If deploying Inspectors for v7 devices, the "Inspector Version" will need to be changed on the Inspectors' configuration screen in Liongard after the import is complete.
For more information, review our documentation.
For more information detailed information, please watch check out our documentation.
To import SonicWall Inspectors via CSV Import, navigate to Admin > Inspectors > SonicWall > Select the down arrow icon in the top right-hand to Download CSV Import Template.
In the CSV Template, each row, starting on row three, will represent an Inspector. Fill in the following information for each Inspector you want to roll out:
- Agent.Name: This column is case sensitive. Copy and paste the associated Agent name from the Admin > Agents screen
- Inspector.Name: Enter "sonicwall-inspector"
- Environment.Name: This column is case sensitive. Copy and paste the associated Environment name from the Dashboard screen
- Alias: Enter the Desired Friendly Name
- Config.SSH_USER:
- v6 Devices: Enter the Liongard service username created in the Inspector Setup Preparation above
- v7 Devices: Use the API username created in the Inspector Setup Preparation above
- SecureConfig.SSH_PASSWORD:
- v6 Devices: Enter Liongard service password created in the Inspector Setup Preparation above
- v7 Devices: Enter the API password created in the Inspector Setup Preparation above
- Config.SSH_HOST: Enter the hostname or IP address of the SonicWall appliance
- Config.SSH_PORT:
- v6 Devices: Enter the SSH Port
- v7 Devices: Use the HTTPS Port
- Config.ENABLE_DETAILED_OUTPUT: Enter True or False
- FreqType: Enter "days"
- FreqInterval: Enter "1"
When ready to Import the CSV Template of Inspectors, navigate to Admin > Inspectors > SonicWall > Select the up arrow icon in the top right-hand to Import CSV > Select your saved template.
After the successful import notification, reload your browser to find your imported Inspectors.
These Inspectors will automatically trigger themselves to run within a minute.
Optional: Turn on Flexible Asset/Configuration Auto-Updating
If you would like this Inspector's data to be sent to ConnectWise and/or IT Glue, turn on Flexible Assets/Configurations for this Inspector:
- ConnectWise: Admin > Integrations > ConnectWise > Configuration Types > Confirm the "Configuration Auto-Updating" toggle is enabled
- IT Glue: Admin > Integrations > IT Glue > Flexible Assets > Confirm the "Flexible Asset Auto-Updating" toggle is enabled
SonicWall Quick Tips/FAQs
Updated 5 months ago