Azure Active Directory: Using Existing Azure Application
This document provides the steps required to configure the Azure Active Directory, using the Azure Active Directory application you configured for the Office 365 Inspector in Liongard.
Azure Active Directory (delegated access): Using Existing Azure Application
- Step 1: Update your Azure Active Directory application
- Step 2: Pre-Consent all of your delegated tenants to the Azure Active Directory Application
- Step 3: Parent Inspector Setup
- Step 4: Child Inspector Setup
Inspector Setup Preparation
Step 1: Update your Azure Active Directory application
- Log in to your Azure account (i.e.: portal.azure.com)
- On the lefthand navigation menu or under the Azure services section of the dashboard, select Azure Active Directory

- In the slide out panel, select App registrations
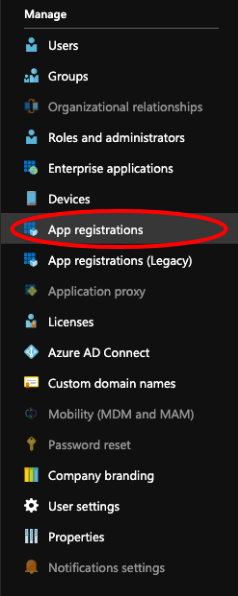
- Select the existing application you would like to use, We would recommend using the application created from the Office 365 Inspector setup

*Select API Permissions on the left hand side
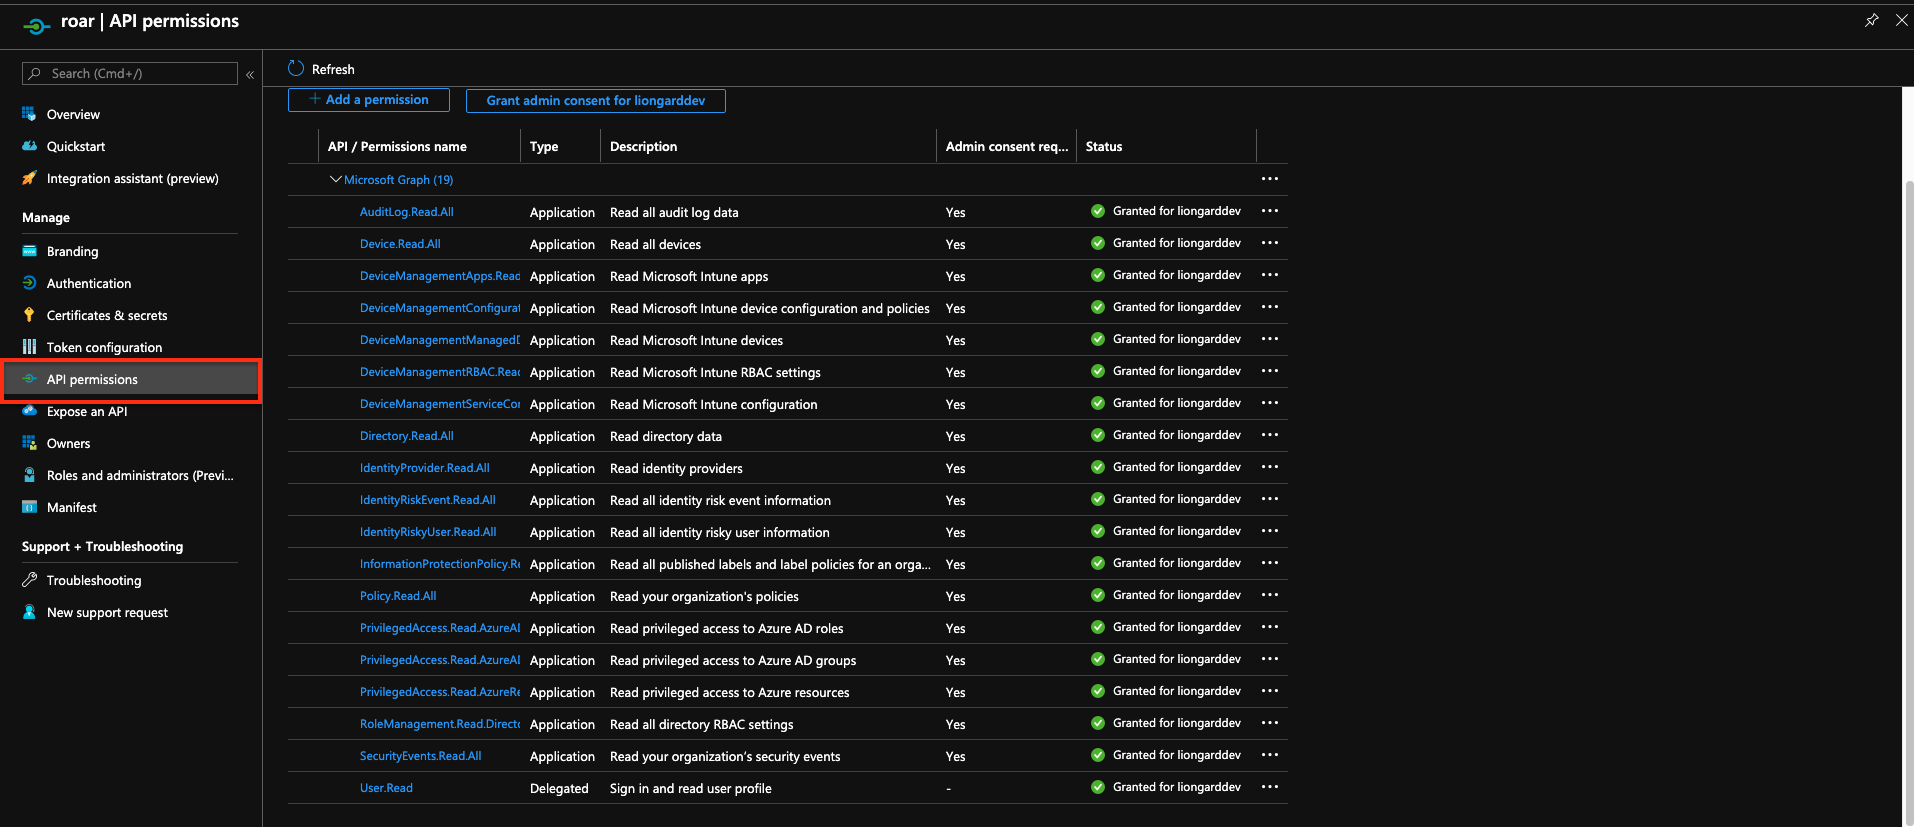
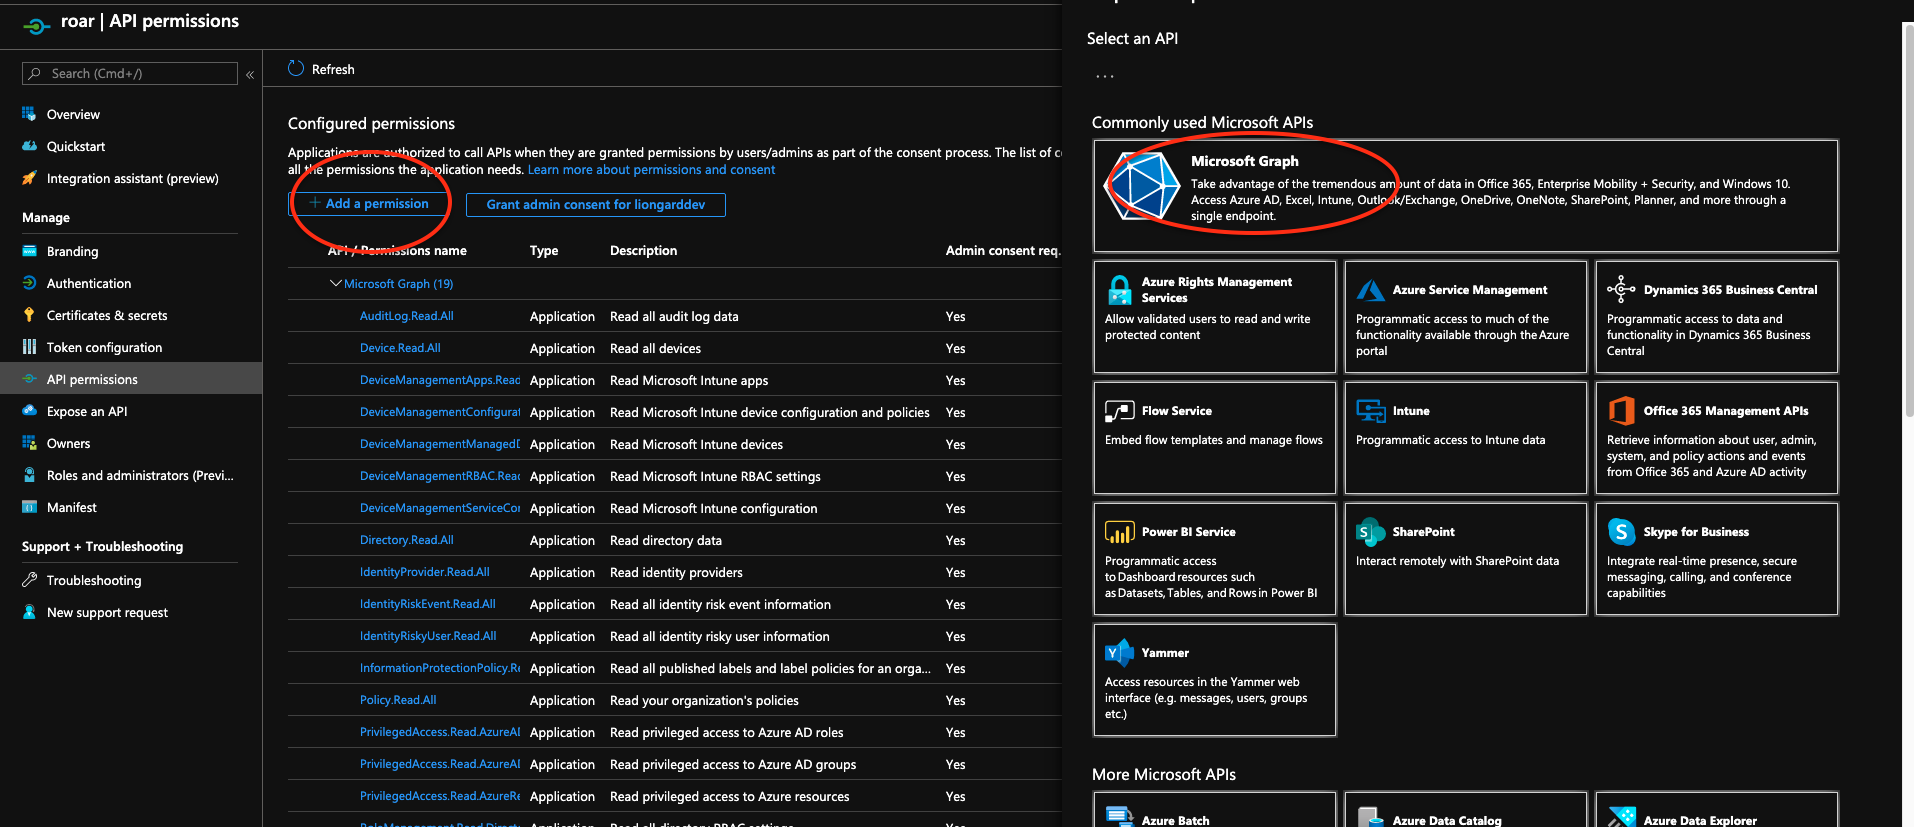
To add missing permissions selectAdd a Permission
Choose Microsoft Graph, then select Application Permission
Application Permissions vs. Delegated PermissionsIt is important that you select all the permissions below from the "Application Permissions" section and not the "Delegated Permissions" section. Choosing permissions from the "Delegated" section may prevent the Inspector from working correctly.
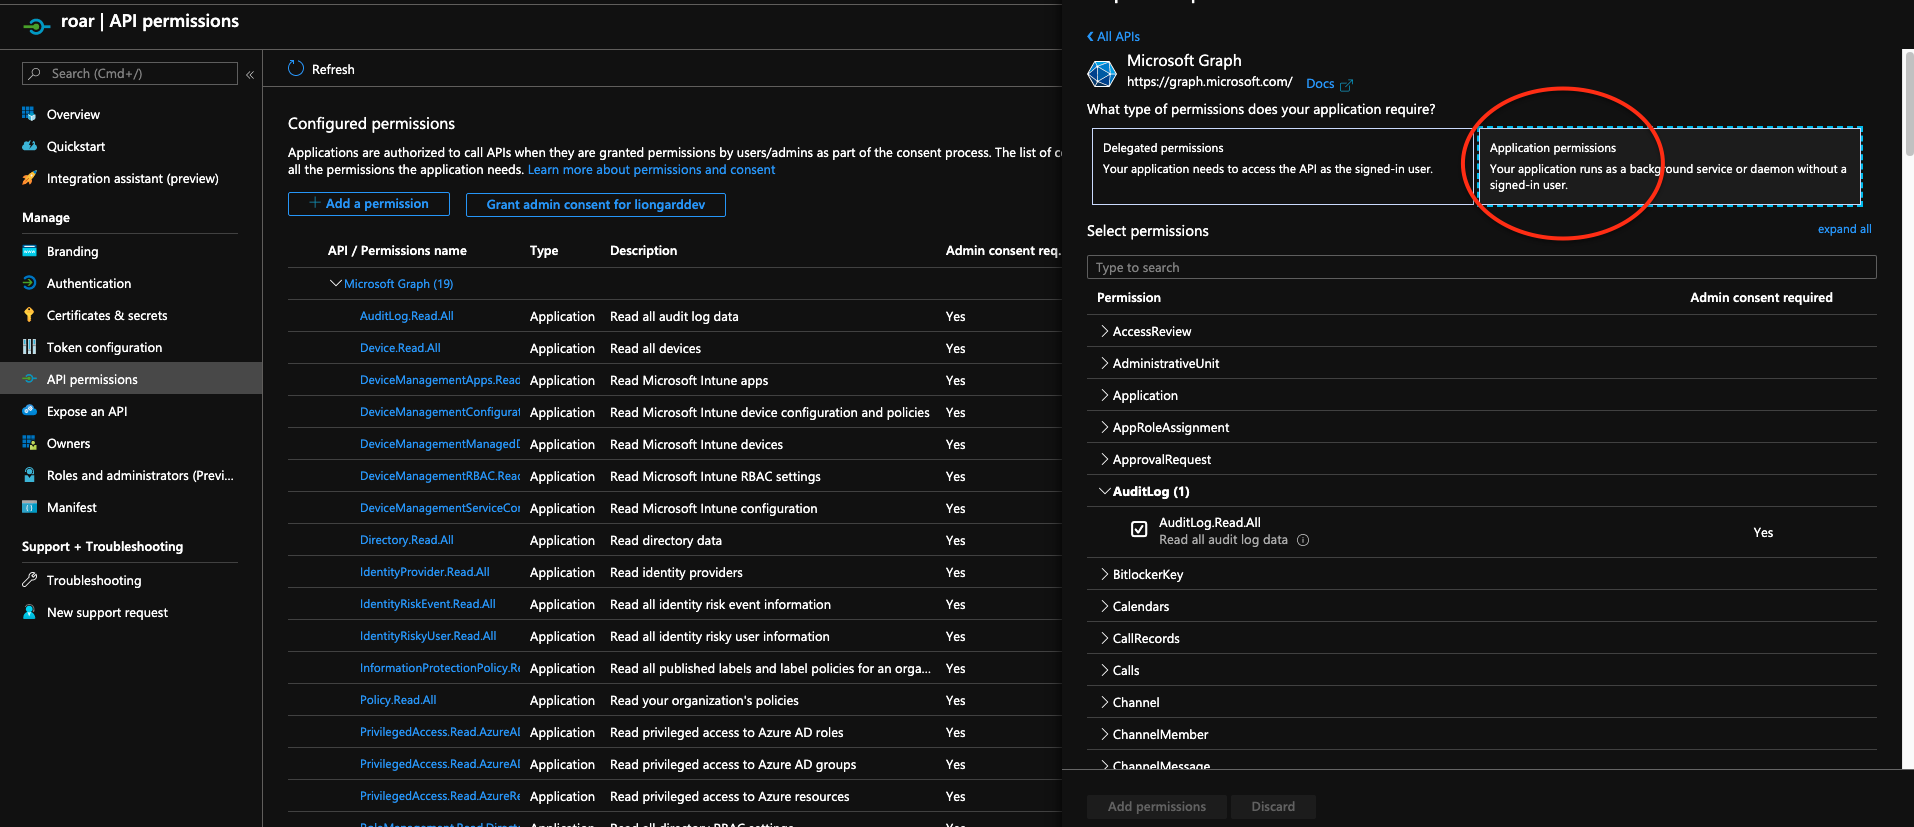
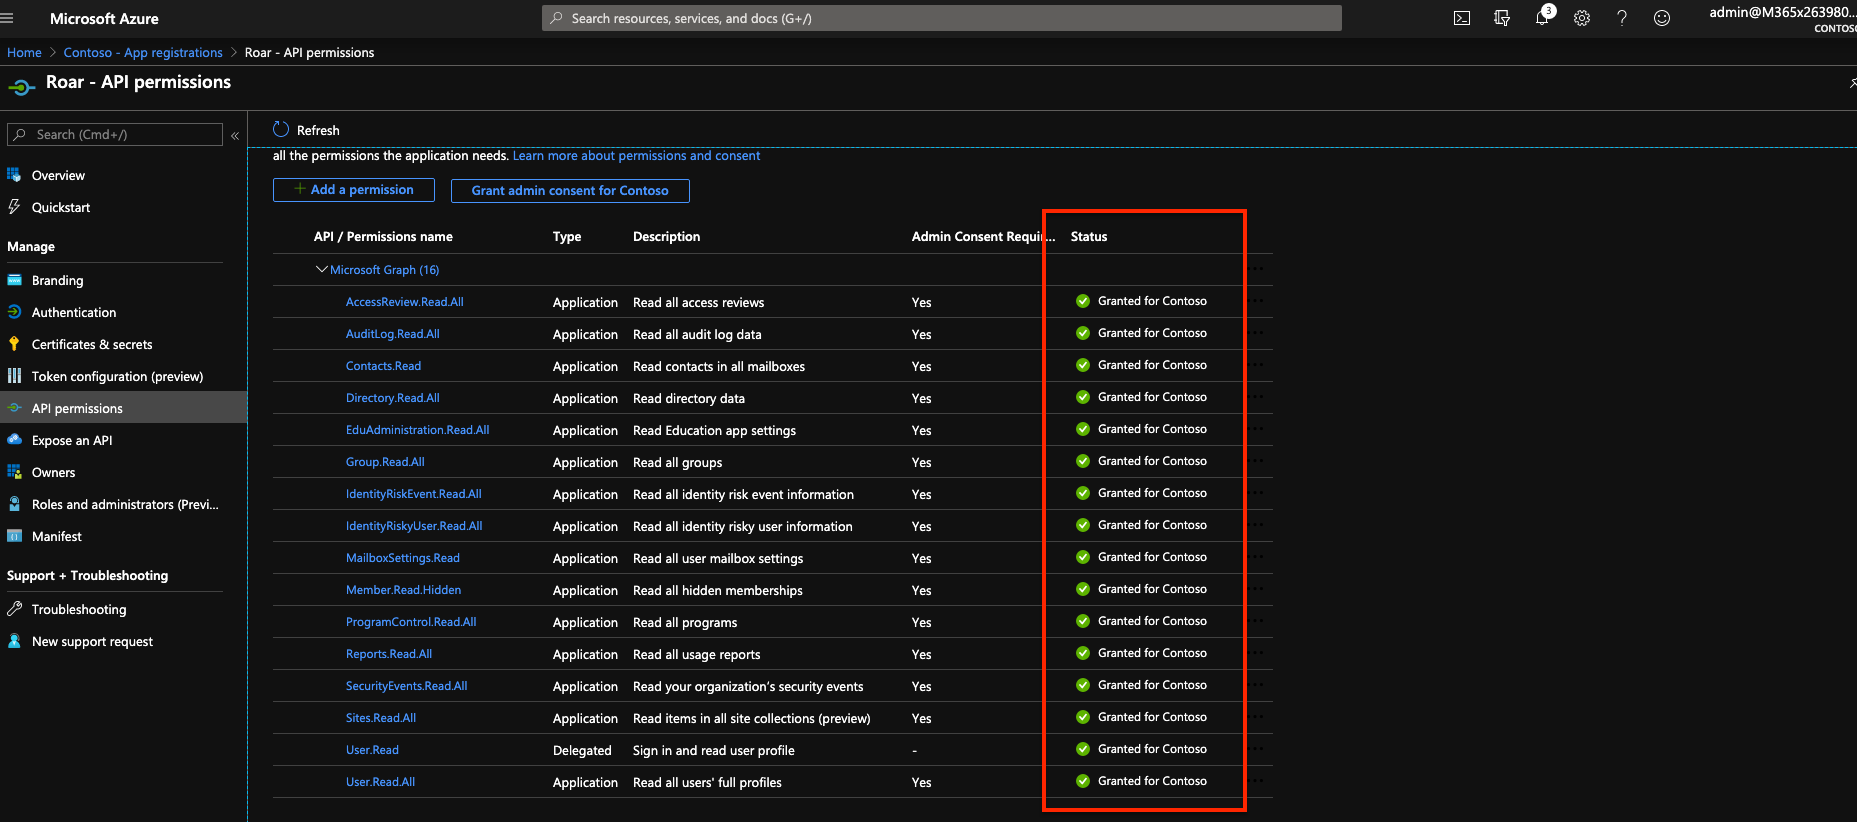
*Make sure the below permissions are added to the application
API PermissionsThese Permissions will ensure that the application can be used for both Office 365 and Azure AD Inspectors.
- Select the following permissions:
- AccessReview.Read.All
- AuditLog.Read.All
- Contacts.Read
- Devices.Read.all
- DeviceManagementApps.Read.All
- DeviceManagementConfiguration.Read.All
- DeviceManagementManagedDevices.Read.All
- DeviceManagementRBAC.Read.All
- DeviceManagementServiceConfiguration.Read.All
- Directory.Read.All
- EduAdministration.Read.All
- Group.Read.All
- IdentityProvider.Read.All
- IdentityRiskEvent.Read.All
- IdentityRiskyUser.Read.All
- InformationProtectionPolicy.Read.All
- MailboxSettings.Read
- Member.Read.Hidden
- PrivilegedAccess.Read.AzureAD
- PrivilegedAccess.Read.AzureADGroup
- ProgramControl.Read.All
- Policy.Read.All
- Reports.Read.All
- RoleManagement.Read.Directory
- SecurityEvents.Read.All
- Sites.Read.All
- User.Read.All
- Click on the Add permissions button at the bottom of the screen.
Next under the Grant consent section click on the Grant admin consent for ____ button.

- Click Accept when prompted about accepting permissions for your organization
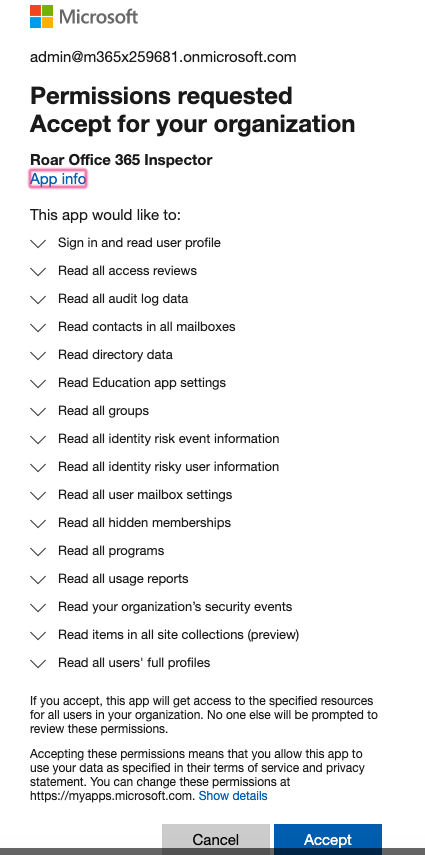
- Next under the Grant consent section click on the Grant admin consent for ____ button.
- If Grant Consent worked you should see the following checkboxes turn green
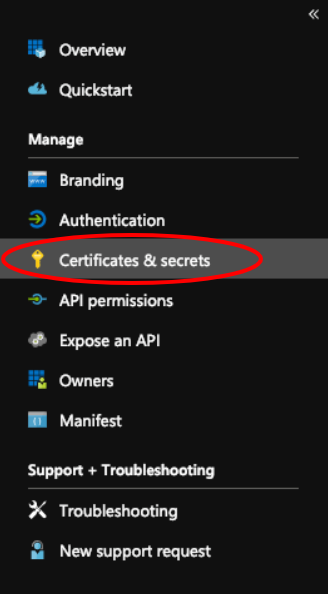
*Next go to your Certificates & Secrets
Client SecretsYou must generate a different secret key for each Inspector for which you want to use this application.
You cannot use the same secret key for both Office 365 and Azure AD Inspectors
- Under Client secrets select the New client secret button
- In the top panel that appears, fill in the Description and set the value for Expires to Never

- Click the Add button
A row will appear in the Secrets table. Make sure to copy the Secret.It will not be available once you navigate away from this page.
Secret StorageThis Secret value is sensitive and can facilitate access into your customers' Office 365 and Azure Active Directory instances.
If you choose to store this value after completing these steps, store it as securely as you would a highly credentialed password.
- In the slide-out panel that appears, select Overview
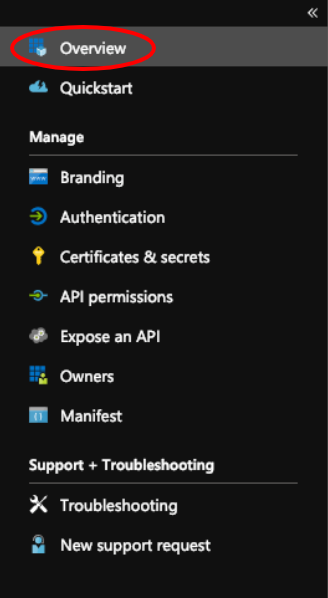
- Copy down your Application (client) ID and your Directory (tenant) ID.
Setting Up Liongard InspectorsYou will need the Application ID and Secret plus the Tenant ID in order to set up your Liongard Inspectors now and any in the future. We recommend securely documenting those values.
Step 2: Pre-Consent all of your delegated tenants to the Azure Active Directory Application
To pre-consent the Application permissions for all of your customers with the permissions configured above, please use the scripts below.
These scripts can be run from either a local Windows Server with Azure AD Connect installed through a PowerShell command window or Azure Cloud Shell through PowerShell
Running these scripts will automatically allow consent for all future customers without needing to rerun these commands.
Windows Server with Azure AD Connect
When running the script on a Windows server with AD Connect, the PowerShell terminal running the script will need to be run as an administrator for the installation of any missing modules.
# Run this full script as-is in Powershell. It will prompt for input as-needed.

#checks to see if AzureAD Module is installed, if not installed will proceed to install with prompt for consent to install module (select [A])
$moduleCheck = Get-Module -ListAvailable | Where { $_.Name -eq 'AzureAD' }
Try {
   If (!$moduleCheck) {
       Write-Warning "The AzureAD module is not installed, prompting to install..."
       $resp = Read-Host "If you would like to install AzureAD module, please type 'install'"
       if (($resp -ne "install") -And ($resp -ne "'install'")) {
        Write-Host "Input other than 'install' confirmation. Exiting.."
        return
       }

       Install-Module AzureAD -Confirm:$False
   } Else {
       Write-Output "Verified AzureAD Module is installed"
   }
} Catch {
   Write-Warning "There was an issue installing the AzureAD module, please retry, and/or reach out to Liongard if you need further assistance!"
}

#asks for Application ID from Azure

$appId = Read-Host "Please paste your Liongard Application ID"

#Makes connection to Azure AD Module
Connect-AzureAd
#Looks for AD Group "Adminagents"
$group = Get-AzureADGroup -Filter "displayName eq 'Adminagents'"
#Finds the Service Principal for Liongard application by the Application ID inputed above
$sp = Get-AzureADServicePrincipal -Filter "appId eq '$appId'"
#Adds the Liongard Application Service Principal into the Adminagents group
Add-AzureADGroupMember -ObjectId $group.ObjectId -RefObjectId $sp.ObjectId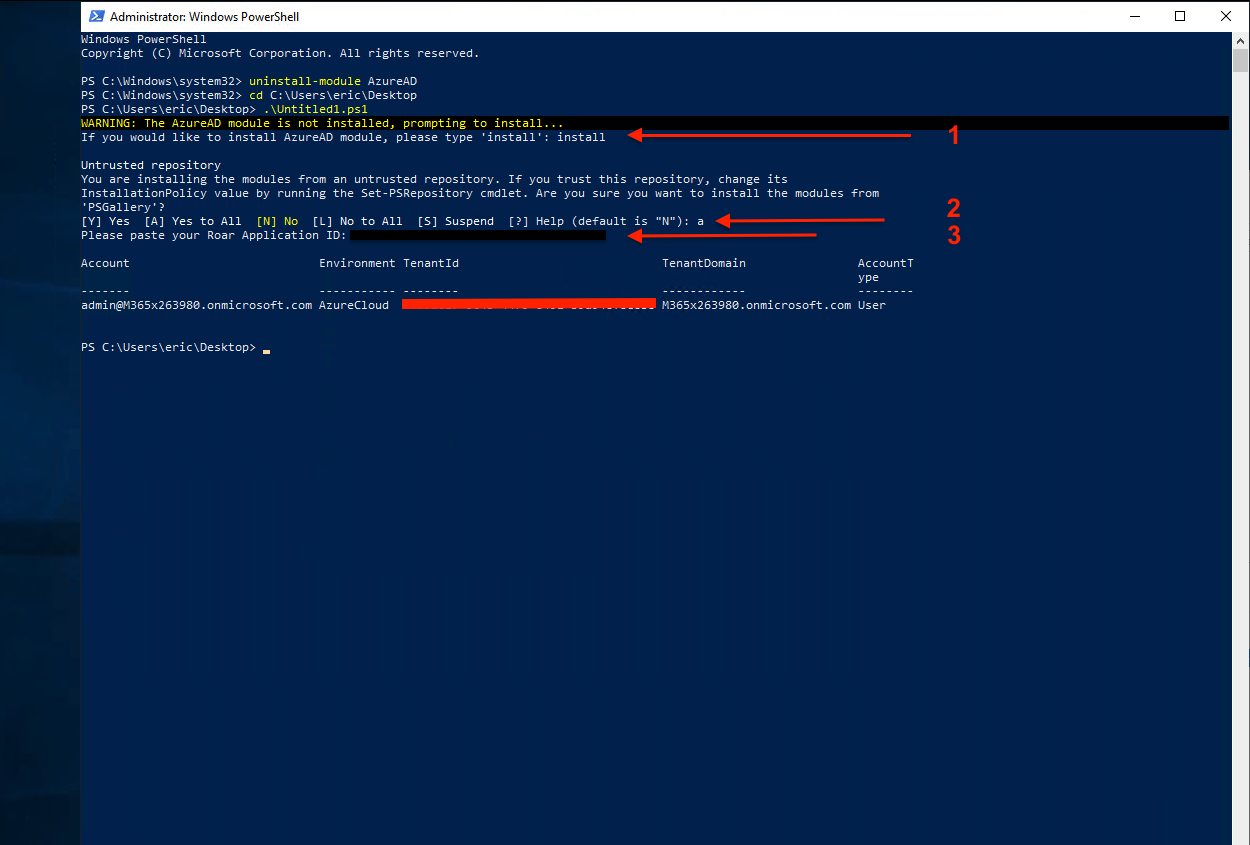
- Enter in "Install" in the prompt to initiate the installation of Azure AD module. This will only appear if the module is not installed.
- Type "A" to accept the installation prompt for the module.
- Enter in your Liongard Application ID that you created for your Liongard API and hit Enter.
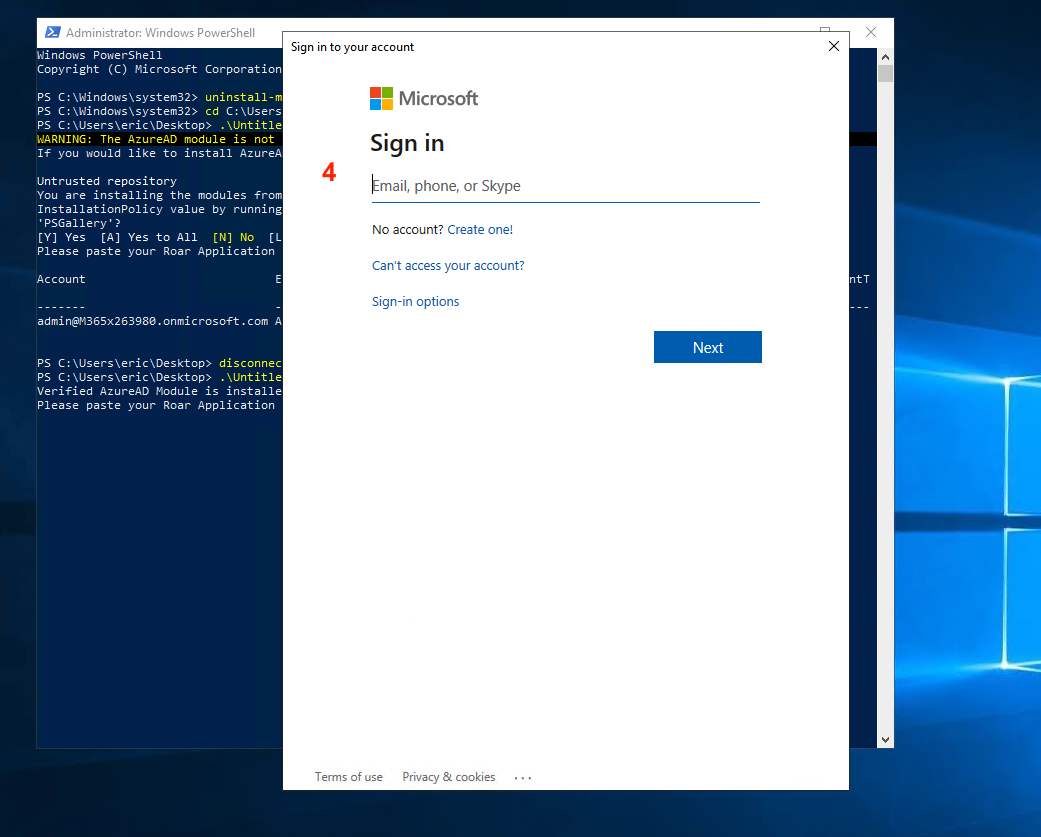
- Next, you'll be prompted for your Microsoft login. Proceed through the pop-up and enter in your CSP admin credentials.
- Once the script completes, you should see your information displayed with no errors, and the script will take you back to your cursor prompt
Azure Cloud Shell through PowerShell
Since Azure Cloud Shell has the Azure AD module included, there is no need to prompt an install for the module. For this reason, the method uses a shorter script from the one listed above.
#Asks for Application ID from Azure
$appId = Read-Host "Please paste your Liongard Application ID"

#Makes connection to Azure AD Module
Connect-AzureAd
#Looks for AD Group "Adminagents"
$group = Get-AzureADGroup -Filter "displayName eq 'Adminagents'"
#Finds the Service Principal for Liongard application by the Application ID inputed above
$sp = Get-AzureADServicePrincipal -Filter "appId eq '$appId'"
#Adds the Liongard Application Service Principal into the Adminagents group
Add-AzureADGroupMember -ObjectId $group.ObjectId -RefObjectId $sp.ObjectId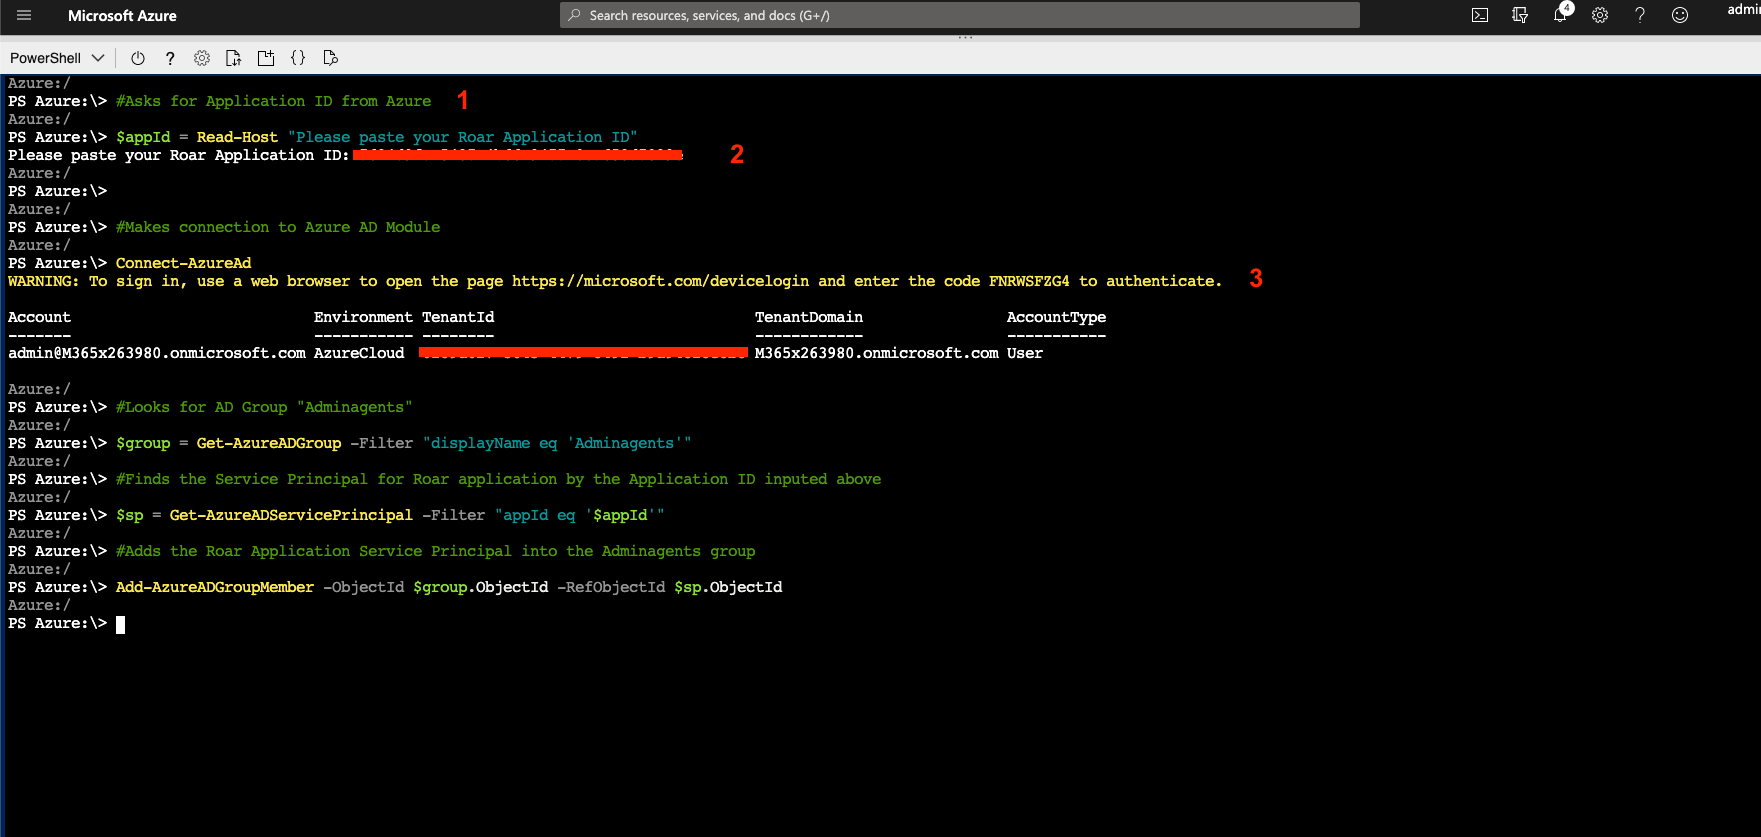
- Copy and paste the script into the Prompt
- Enter in your Liongard Application ID
- Navigate to the returned link and enter the provided code. Click Next.

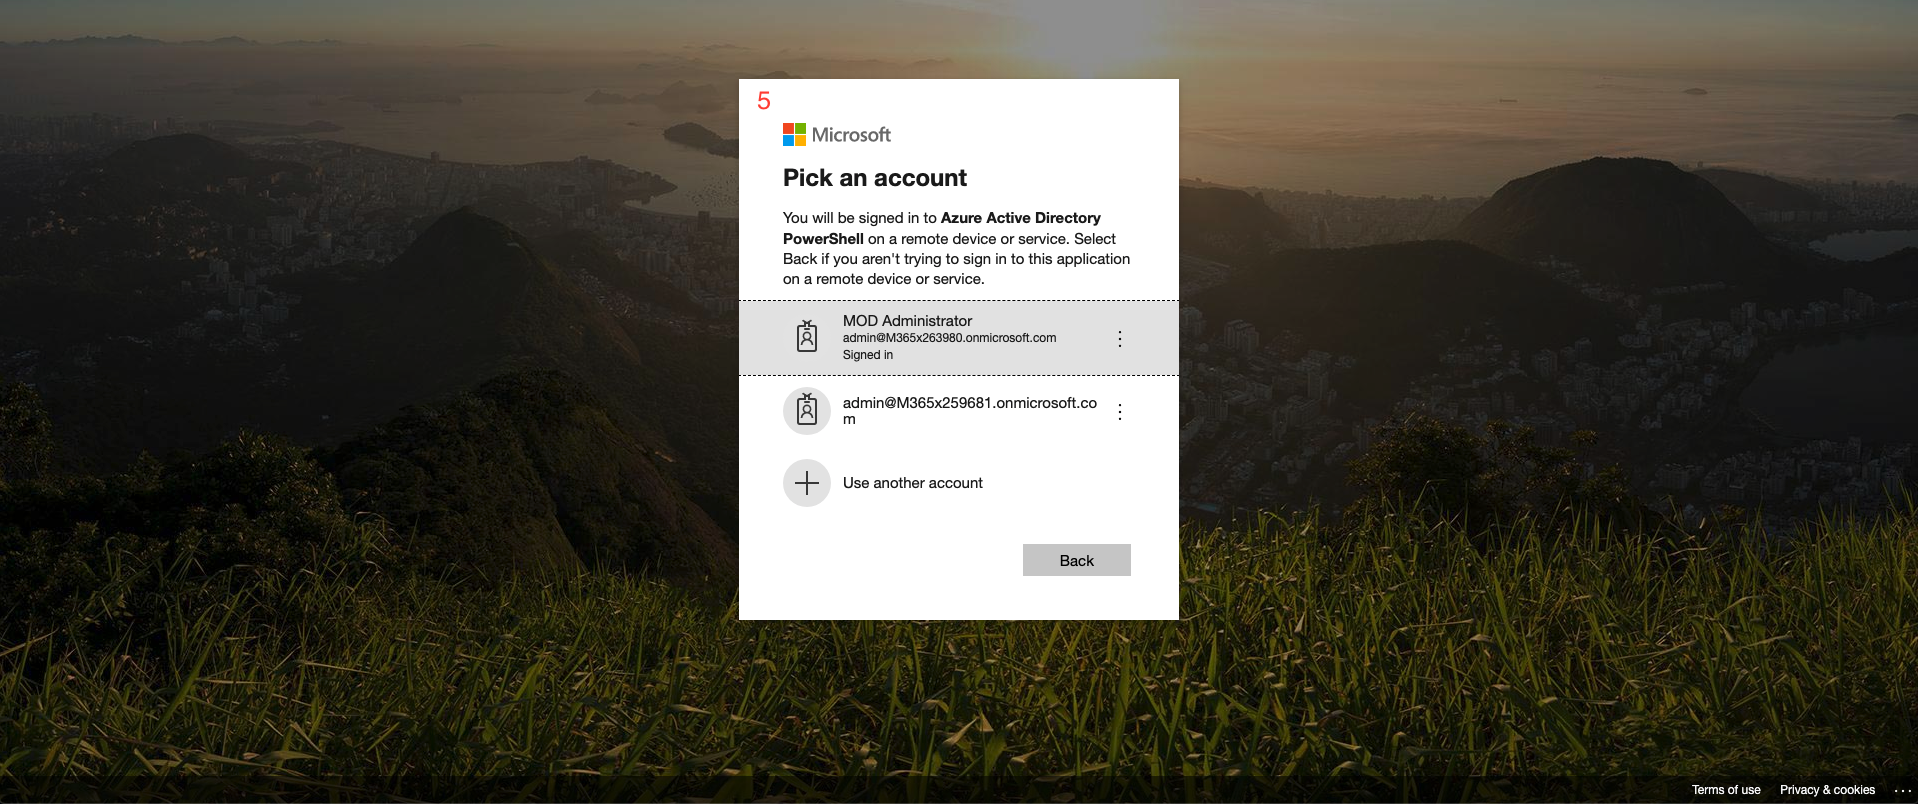
- Select or login with your delegated access admin account
- Return to your Cloud Shell after authentication. Hit Enter one last time to process the last command
- Once the script completes, you should see your information displayed with no errors, and the script will take you back to your cursor prompt
Clarification for Pre-Consent ScriptThis script will add the Service Principal associated with the application you created to the Admin Agents group in Azure Active Directory. This will grant the set of API permissions you configured for your application to all customer tenants tied to your CSP partner tenant.
For more information, see Microsoft's article on this subject
Liongard Inspector Setup
Step 1: Parent Inspector Setup
Since Azure Active Directory is a multi-tenant system where a single portal is used to manage many Environments, you will set up a single "Parent" Inspector with the Azure Application ID that will then auto-discover "Child" Inspectors for each Environment.
In Liongard, navigate to Admin > Inspectors > Navigate to the Azure Active Directory Inspector > Add System.
Fill in the following information:
- Type of Inspector: Parent
- Environment: Select your MSP's Environment
- Friendly Name: Suggested Naming: OUD-LINUX Azure AD Parent
- Agent: Select CLOUD-LINUX
- Azure Application (Client) ID: Paste in your Azure Application ID copied in Step 1
- Azure Application (Client) Secret: Paste in your Azure Application Secret copied in Step 1
- Azure Directory (Tenant) ID: Paste in your Azure Tenant ID copied in Step 1
- Enable Microsoft Intune Data: Leave the toggle enabled. If your Inspector fails and the log indicates the failure is due to issues with the Intune data, turn off the toggle and rerun the Inspector.
- Scheduling: The Inspector will default to run once a day at the time the Inspector is set up. Here you can adjust the schedule
- Inspector Version: Latest
Select Save. The Inspector will now be triggered to run within the minute.
Step 2: Child Inspector Setup
After the first run of the Parent Inspector, your clients' Azure AD organizations will be Auto-Discovered in the Discovered Systems tab on the Inspectors > Azure Active Directory page.
Navigate to the Discovered Systems tab in your Inspectors > Azure Active Directory page
- Activate or Archive your Discovered Systems by ensuring that they're mapped to the correct Environment > Check the checkbox to the left of Inspector(s) > Select the Actions drop down menu > Activate Launchpoints
Optional: Turn on Flexible Asset/Configuration Auto-Updating
If you would like this Inspector's data to be sent to ConnectWise and/or IT Glue, turn on Flexible Assets/Configurations for this Inspector:
- ConnectWise: Admin > Integrations > ConnectWise > Configuration Types > Confirm the "Configuration Auto-Updating" toggle is enabled
- IT Glue: Admin > Integrations > IT Glue > Flexible Assets > Confirm the "Flexible Asset Auto-Updating" toggle is enabled
Troubleshooting
Please check the following if you are receiving an error message:
- Ensure that the Permissions you've added (e.g. 'user.read.all') line up with the permissions listed above.
- Ensure that each of the API Permissions you've added to your Azure AD application have been added as Application Permissions and NOT Delegated Permissions
Once you've done so, ensure that admin consent has been granted on behalf of the users in your Azure AD directory using the button at the bottom of the API Permissions page:

Finally, make sure that Supported account types is set to Accounts in any organizational directory under the authentication settings for the application you've created.
If you're still running into issues after running through those steps, please reach out to Liongard Support.
Updated 3 days ago
