EMILY: Agent Deployment via MSI Installer
Agent Deployment via MSI Installer
The following document can be used to install Liongard's On-Premises, Endpoint, and Self-Hosted Agents.
Please review our Agents Overview documentation before proceeding.
Agent Deployment Methods
Additional Resources
On-Premises Agent Deployment
On-Premises Agent Installation Best Practices
- Install On-premises Agents on Domain Controllers
- We support On-premises Agents installed on servers; however, installing an On-Premises Agent on a Domain Controller will result in more Inspector auto-discovery, and therefore, less manual work.
- Liongard recommends using a Primary Domain Controller (PDC). The above-mentioned auto-discovery will include an Active Directory Inspector for the Agent machine. There is some Active Directory information that is only captured on the PDC, so activating the Active Directory Inspector for the PDC will ensure a full inspection.
- Generally, install ONE On-premises Agent per Network
- Our On-Premises Agents speak across VPN tunnels
- Our On-Premises Agents DO NOT speak across Active Directory Domains, so if you have two Active Directory Domains in one network, then you'll need an On-Premises Agent within each Active Directory Domain.
- Install an additional On-premises Agent on any server NOT tied to an Active Directory Domain
- The additional On-Premises Agent will auto-activate an Inspector for the local Windows server, and that Inspector will auto-discover a Network Discovery, Hyper-V, and/or SQL Server Inspectors if present

Video isn't playing? Click here!
Minimum Agent Requirements
Windows Servers Before 2012
We currently do not support Windows Server before 2012 because the Liongard Agent has a dependency on a software package called NodeJS. The Agent needs a specific minimum version of that software package to work and Windows Server 2008 R2 and below do not support it.
To run the Windows Agent, the following system resources are required:
- Operating System: Windows Server 2012 or newer
- Memory: 1 GB of usable RAM
- Disk Space: 50 MB of free disk space
- .NET Framework Version 4.6.2
To maximize system performance, we recommend the following system requirements:
- Operating System: Windows Server 2012 or newer
- Memory: 16 GB
- Disk Space: 32 GB
For Virtual Machines, we recommend a minimum of 2 processors
Step 1: Create an Active Directory User for Liongard to "Log on as"
- In Active Directory, create a New > User
- Complete the following fields:
- First Name: "Liongard Agent"
- Username: "LiongardAgent"
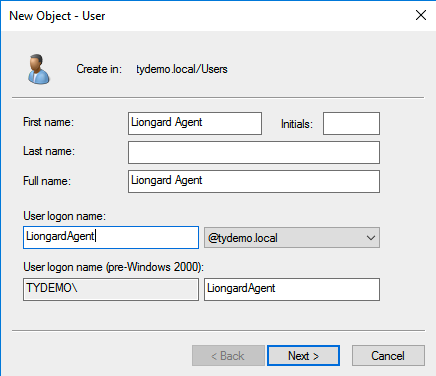
- Select Next
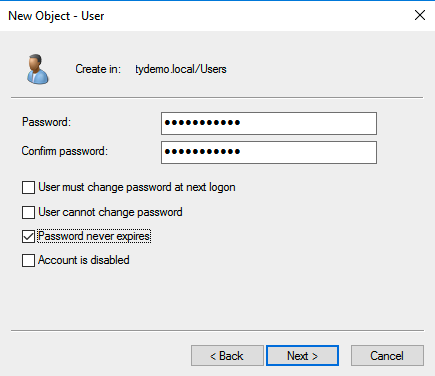
- Complete the following fields:
- Password: Enter and document a password. Liongard cannot accept passwords longer than 128 characters.
- Uncheck "User must change password at next login"
- Check "Password never expires"
- Select Next > Finish
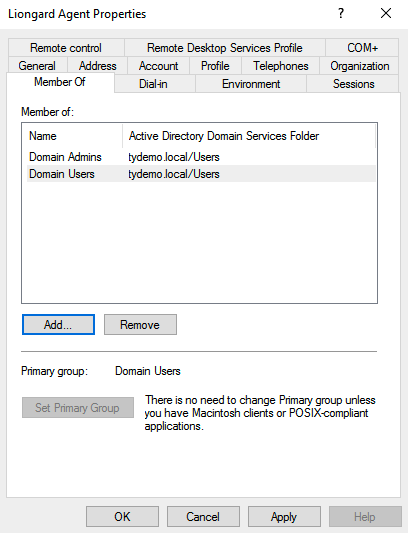
- Right-click the "Liongard Agent" user you just created. Select Properties
- On the General tab in the Description field,label the account as a service account. We suggest, "Liongard - Service Account"
- Select Member of > Add... > Include "Domain Admins" > Select Apply
Step 2: Record a Liongard Access Key ID and Secret
- In Liongard, navigate to Your Name > Account Settings > Access Tokens
- If you have an existing Access Token, you may use it to deploy the Endpoint Agent.
- If you need to generate a new token, select Generate New Token
- Record a Liongard Access Key ID and Secret, as you will need them in the next steps.

Access Tokens
Liongard Access Key Tokens and Secrets can be reused when installing Agents, or you can generate a new Access Key Token and Secret every time.
Our Access Tokens are used only to register an Agent. It is not something that the Agent stores, so if a token gets deleted, nothing will happen to Agents that were installed using that token.
Step 3: Download the MSI Installer
- Navigate to Admin > Agents > Click on "Download Agent Installer"
- Copy the MSI link or download the MSI installer

Step 4: Run the MSI Installer
- Open the MSI > Select Run
- Check "I accept the terms in the License Agreement" > Select Next
- For the Liongard Agent Type, select On-Premises > Select Next
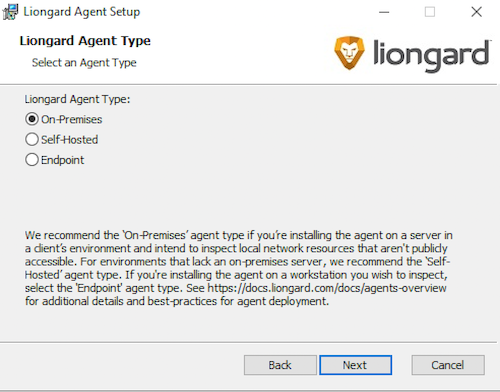
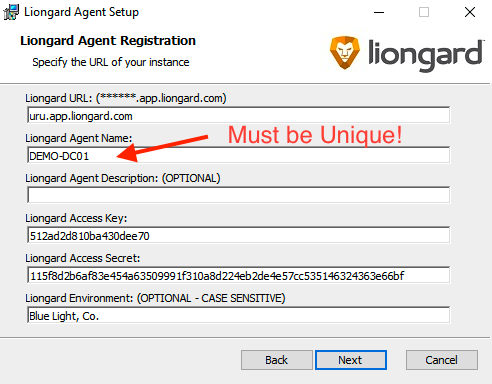
- Complete the following fields:
- Your Liongard URL (e.g., "us1.app.liongard.com"): Enter the core of your Liongard URL. Do NOT include "https://"
- Agent Name: The Agent Name must be unique. If the Agent Name is not unique, the Agent will fail. This field will default to the name of the server.
Naming Your Agent
At the moment, the Agent name cannot accept =, <, >, (, ), {, }, [, ] characters. Please avoid using them in the Agent name.
If you choose to use a script to deploy On-Premises Agents, include a unique identifier for the Agent name.
- Liongard Access Key ID and Secret: Enter the Access Key ID and Secret generated in Liongard.
- Liongard Environment: Environment name for which the Agent is being deployed. This name is case-sensitive.* If you do not wish to fill in the Environment name, you must leave this field blank. Once the Installer runs, you must associate the Agent to an Environment by navigating to Admin > Agents**.
Errors Accessing the API
If you are having issues accessing the API, copy and paste the Access Key ID directly from Liongard into the Installer.
- Select Next
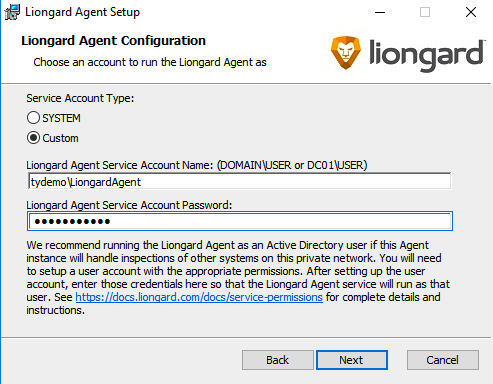
- For Service Account Type, select Custom
- Complete the following fields:
- Liongard Agent Service Account Name: Enter the name of the user you created in Step 1.
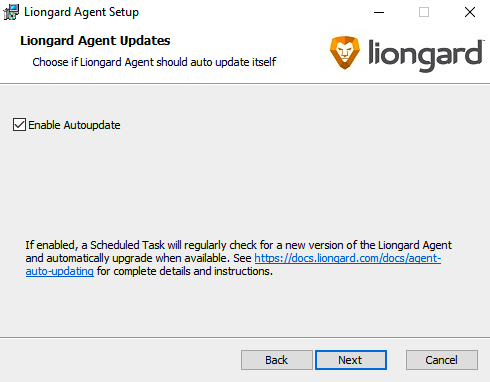
- Select Next > Ensure "Enable Autoupdate" is checked
- Selecting "Enable Autoupdate" will create a scheduled task on the system which will run at Midnight daily, checking for a new version of the Agent, and updating the Agent, if necessary.
- Select Next > Select Install > Select Finish
Step 5: Roll out On-Premises Agents for all Environments
Liongard recommends ONE On-premises Agent per Environment network. Repeat the steps above to continue deploying On-premises Agents for all of your Environments.
On-Premises Agent Auto-Discovery
When you roll out an On-Premises Agent, there is a potential for the auto-discovery of several other Inspectors:
- Upon install, an On-Premises Agent will auto-activate a Windows Inspector for the local Windows server
- After the Windows Inspector runs, it will auto-discover an Active Directory Inspector
- Once the Active Directory Inspector is activated and runs successfully, the Active Directory Inspector will auto-discover Inspectors for any additional Windows servers within its domain
- Once activated and successfully run, the Windows Inspectors will auto-discover any Inspectors for Hyper-V and/or SQL Server
- After the first Windows Inspector runs, it will also auto-discover a Network Discovery Inspector
- After the Network Discovery Inspector is activated and runs, it will auto-discover Inspectors for several makes/models of network devices. See our Network Discovery Inspector docs for more information.
Endpoint Agent Deployment
Liongard's Endpoint Agent is used to install and auto-activated Liongards' Windows Workstation Inspector
Minimum Requirements
- Operating System: Windows 10 or newer
- Memory: 1 GB of usable RAM
- Disk Space: 50 MB of free disk space
- .NET Framework Version 4.6.2
Step 1: Record a Liongard Access Key ID and Secret
- In Liongard, navigate to Your Name > Account Settings > Access Tokens
- If you have an existing Access Token, you may use it to deploy the Endpoint Agent.
- If you need to generate a new token, select Generate New Token
- Record a Liongard Access Key ID and Secret, as you will need them in the next steps.
Step 2: Download the MSI Installer
- Navigate to Admin > Agents > Click on "Download Agent Installer"
- Copy the MSI link or download the MSI installer
Step 3: Run the MSI Installer
- Open the MSI > Select Run
- Check "I accept the terms in the License Agreement" > Select Next
- For the Liongard Agent Type, select Endpoint Agent > Select Next
- Complete the following fields:
- Your Liongard URL (e.g., "us1.app.liongard.com"): Enter the core of your Liongard URL. Do NOT include "https://"
- Agent Name: The Agent Name must be unique. If the Agent Name is not unique, the Agent will fail. This field will default to the hostname of the device.
- Liongard Access Key ID and Secret: Enter the Access Key ID and Secret generated in Liongard.
- Liongard Environment: Environment name for which the Agent is being deployed. This name is case-sensitive.* If you do not wish to fill in the Environment name, you must leave this field blank. Once the Installer runs, you must associate the Agent to an Environment by navigating to Admin > Agents**.
- Select Next
- For Service Account Type, select System
- Select Next > Ensure "Enable Autoupdate" is checked
- Selecting "Enable Autoupdate" will create a scheduled task on the system which will run at Midnight daily, checking for a new version of the Agent, and updating the Agent, if necessary.
- Select Next > Select Install > Select Finish
Step 4: Windows Workstation Inspector
Once deployed successfully, the Endpoint Agent will auto-activate a Windows Workstation Inspector on the workstation.
We recommend confirming the Windows Workstation Inspector is deployed by navigating to Dashboard > Systems > Windows Workstation
Self-Hosted Agent Deployment
For Environments that do not have an on-premises server, and therefore, no way to deploy an On-Premises Agent to inspect edge devices, such as firewalls, you should deploy a Self-Hosted Agent.
Like Liongard's On-Demand Agent, Self-Hosted Agents can handle inspections across multiple Liongard Environments and are hosted from your own infrastructure, without the need to allow cloud IP addresses through firewalls.
For most use-cases, you should only need one Self-Hosted Agent in your Liongard Instance.
Minimum Requirements
If using the Self-Hosted Agent across multiple customer Environments, Liongard recommends installing the Agent on a non-domain joined server.
To run the Self-Hosted Agent, the following system resources are required:
- Operating System: Windows Server 2012 or newer
- Memory: 1 GB of usable RAM
- Disk Space: 50 MB of free disk space
- .NET Framework Version 4.6.2
To maximize system performance, we recommend the following system requirements:
- Operating System: Windows Server 2012 or newer
- Memory: 16 GB
- Disk Space: 32 GB
Step 1: Record a Liongard Access Key ID and Secret
- In Liongard, navigate to Your Name > Account Settings > Access Tokens
- If you have an existing Access Token, you may use it to deploy the Endpoint Agent.
- If you need to generate a new token, select Generate New Token
- Record a Liongard Access Key ID and Secret, as you will need them in the next steps.
Step 2: Download the MSI Installer
- Navigate to Admin > Agents > Click on "Download Agent Installer"
- Copy the MSI link or download the MSI installer
Step 3: Run the MSI Installer
- Open the MSI > Select Run
- Check "I accept the terms in the License Agreement" > Select Next
- For the Liongard Agent Type, select Self-Hosted Agent > Select Next
- Complete the following fields:
- Your Liongard URL (e.g., "us1.app.liongard.com"): Enter the core of your Liongard URL. Do NOT include "https://"
- Agent Name: The Agent Name must be unique. If the Agent Name is not unique, the Agent will fail. This field will default to the hostname of the device. Liongard recommends, "SELF-HOSTED AGENT - MSP NAME"
- Liongard Access Key ID and Secret: Enter the Access Key ID and Secret generated in Liongard.
- Liongard Environment: Leave blank.
- Select Next
- For Service Account Type, select System
- Select Next > Ensure "Enable Autoupdate" is checked
- Selecting "Enable Autoupdate" will create a scheduled task on the system which will run at Midnight daily, checking for a new version of the Agent, and updating the Agent, if necessary.
- Select Next > Select Install > Select Finish
Step 4: Ensure Self-Hosted Agent is Global
Through the MSI Process, the Self-Hosted Agent is set to Global. To ensure the Agent was deployed successfully, in Liongard, navigate to **Admin > Agents > Self-Managed tab > Search for the new Agent.
Your Self-Hosted Agent is now available to select in your Inspector Setup screens.
Additional Agent Deployment Methods
Deploying the Liongard MSI via Deployment Tool
If you would like to deploy Liongard's .msi file with your deployment tool, please refer to the vendor's knowledge base library for the appropriate steps.
Command-line switches for deployment can be found here.
Deploy Agents via Command Line or RMM
Liongard's MSI can be invoked for a silent install from the command line or for scripting via the RMM.
For more information on deploying Agents via RMM script, please reference our documentation.
msiexec /i LiongardAgent-lts.msi LIONGARDURL=yourinstance.app.liongard.com LIONGARDACCESSKEY=yourkey LIONGARDACCESSSECRET=yoursecret LIONGARDAGENTNAME="Friendly Name of Your Choice" LIONGARDENVIRONMENT="Exact Environment Name, Inc." LIONGARDAGENTSERVICEACCOUNT="mydomain\domainadmin" LIONGARDAGENTSERVICEPASSWORD="mypassword" LIONGARDAGENTDESCRIPTION="optional description" /qn
The only required fields are "LIONGARDURL," "LIONGARDACCESSKEY," "LIONGARDACCESSSECRET," and "LIONGARDAGENTNAME."
Optionally, you can pass the following parameters:
- "LIONGARDAGENTTYPE:"
- For On-Premises Agents, the type is "customer-on-prem"
- For Endpoint Agents, the type is "customer-endpoint"
- For Self-Hosted Agents, the type is "customer-managed"
- If you wish to add a description to the agent, include "LIONGARDAGENTDESCRIPTION"
- If you wish to choose a different directory to install, you can use the "INSTALLLOCATION" variable. If your custom path has spaces or special characters, then be sure to surround the location with triple double quotes to allow it to escape correctly in PowerShell. Otherwise, you do not need to use double quotes to escape the path.
If you do not provide "LIONGARDAGENTSERVICEACCOUNT" and/or "LIONGARDAGENTSERVICEPASSWORD," then the service will default to installing as a Local System.
For On-Premises and Endpoint Agents, if you do not pass in the "LIONGARDENVIRONMENT" parameter, you will have to assign the Environment in Liongard by navigating to Admin > Agents.
Deploying the Endpoint Agent via Command Line or RMM
If using your RMM to script Endpoint Agent installations, the "LIONGARDAGENTNAME" field can be left blank.
The Endpoint Agent will populate the field using the machine hostname.
Troubleshooting Agent Issues
If you are having issues with your Agent, please read our Troubleshooting Agent Issues Documentation.
Liongard Agent MSI Name Change
Starting with version 2.0.2, the Liongard Agent MSI package was renamed to "LiongardAgent-lts" as part of our new brand messaging.
Deployment scripts using the old naming conventions (RoarAgent.msi, ROARURL, ROARACCESSKEY, etc.) will still work if necessary, but we do recommend updating the scripts when possible to ensure consistency across the platform.
New installations using the MSI will change the Windows service name to "Liongard Agent." Upgrading an existing installation will leave the service name as "Roar Agent."
Whitelisting Liongard
On-Premises Agent Whitelisting
If any of your networks heavily filter outbound traffic, you may need to whitelist some hosts in order for the Agent to send data back to Liongard. There may be other situations where you need to whitelist the Liongard platform itself. If so, please see How to Properly Whitelist the Liongard Platform.
Self-Hosted Agent Whitelisting
Once the Self-Hosted Agent is installed, you will most likely need to whitelist the Agent IP address on the device being inspected.
- Inbound and Outbound from the Self-Hosted Agent machine to the target device: The static IP address of the machine for which the Agent is deployed.
- Outbound from the Self-Hosted Agent to Liongard: Full outbound requirements found here: How to Properly Whitelist the Liongard Platform
Updated 4 months ago
